background image

1

9

U

ser’s Manual


EN

 Function/ 

Camera

No.

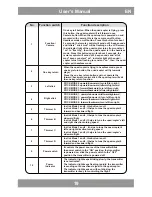
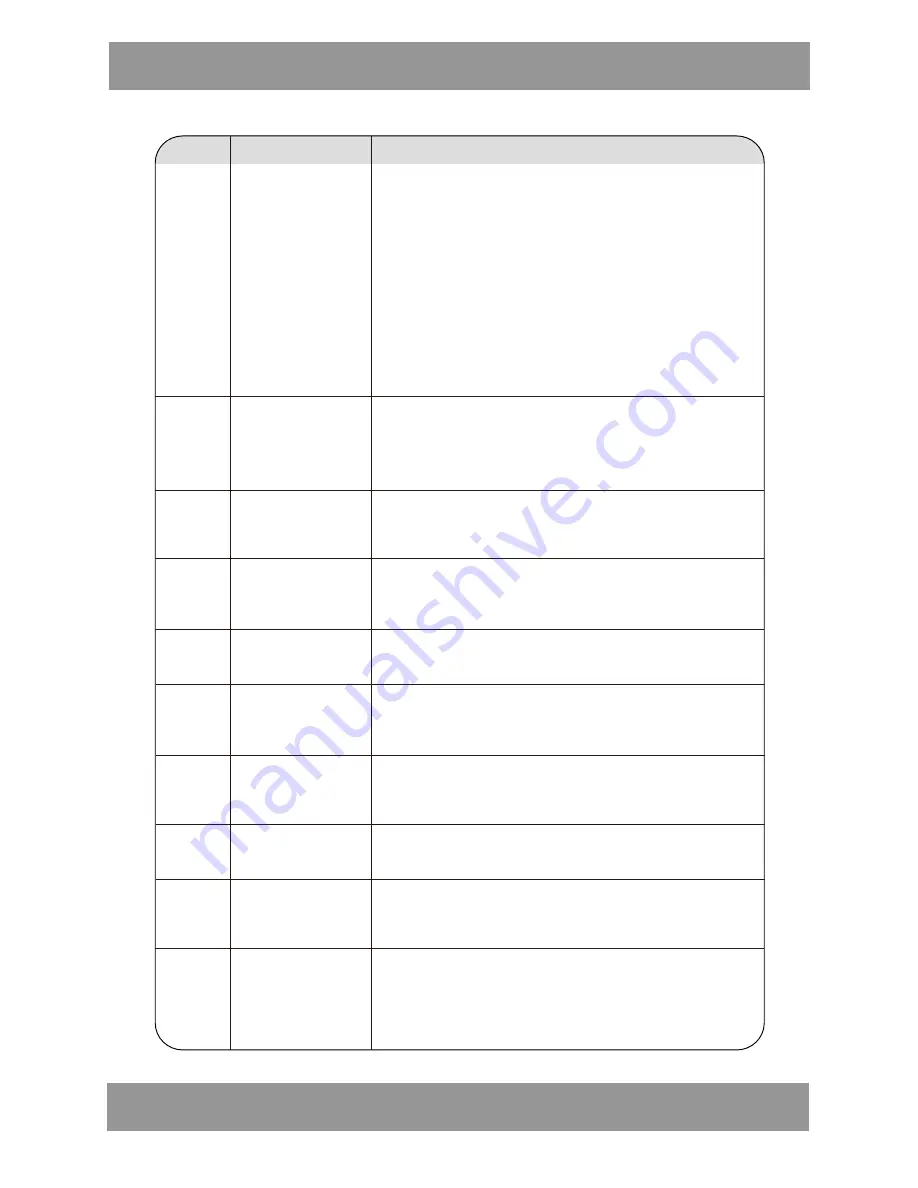
Function switch

Function description

1

2

3

4

5

6

7

8

9

10

Left stick

Right stick

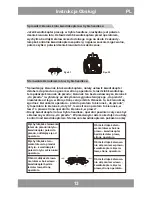
Trimmer  A

In stick Mode 2 and 4, this button is null.

In stick Mode 1 and 3, it helps to tune the quad-copter's 

forward and backward flight.

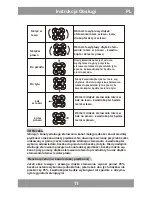
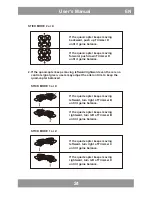
STICK MODE 2:upward/downward,turn left/turn right; 

STICK MODE 4:upward/downward,leftward/rightward. 

STICK MODE 1:forward/backward,turn left/turn right; 

STICK MODE 3:forward/backward,leftward/rightward.
STICK MODE 1: upward/downward,leftward/rightward; 

STICK MODE 3: upward/downward, turn left/turn right; 

STICK MODE 2: forward/backward,leftward/rightward; 

STICK MODE 4: forward/backward,turn left/turn right.

In stick Mode 3 and 4, it helps to tune the quad-copter's 

sideward flight.

In stick Mode 1 and 2,it helps to tune the quad-copter's left 

and right direction turning speed.
In stick Mode 3 and 4,  it helps to tune the quad-copter's 

left and right direction turning speed.

In stick Mode 1 and 2,it helps to tune the quad-copter's 

sideward flight.
In stick Mode 1 and 3, this button is null.

In stick Mode 2 and 4, it helps to tune the quad-copter's 

forward and backward flight.
It controls the power source of the transmitter.Slide 

the power switch to the “ON” position, the transmitter 

is powered on; slide the power switch to the “OFF” 

position, the transmitter is powered off.

Trimmer  B

Trimmer  C

Trimmer  D

Power switch

Power 

indicator

The indicator light keeps blinking slowly: the transmitter 

is not activated.

The indicator light keeps flashing rapidly: the transmitter 

is sending out connectional signal to the quad-copter. 

The indicator light keeps on without blinking: the 

transmitter is ready for controlling the flight.

One key return

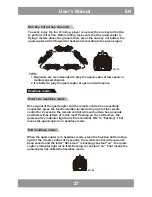
When the quad-copter is flying in headless mode, press 

one key return button, the quad-copter will fly towards 

player. 

Press the one key return button again or operate the 

forward /backward control stick, the quad-copter will exit 

the one key return function.

One key roll button: When the quad-copter is flying, press 

this button, the quad-copter will roll forward once.

Camera button: When the quad-copter is powered on and 

mounted with camera, this is the camera on-off button. 

Headless mode on-off button: Press this button for about 

2 seconds, the remote control will send out 2 beep sounds 

and letters “ stick mod” will be flashing on the LCD screen, 

the indicator light of the quad-copter turns from constant 

“on” to “flashing”, then, the quad-copter is in the headless 

mode. Press this button again for about 2 seconds, the 

remote control will send out 2 beep sounds and “stick 

mod” keeps constant “on”, indicator light of the quad-

copter turns from flashing to constant “on”, then, the quad-

copter exit headless mode.

Summary of Contents for MDR003 SKY STIG

Page 1: ...SKY STIG DRONE Model MDR003 Instrukcja Obsługi User s Manual ...

Page 2: ...ie jej na później Bezpieczeństwo Niniejszy produkt nie jest zabawką Produkt nie nadaje się dla osób które mają mniej niż 14 lat Przed przystąpieniem do użytkowania prosimy o uważne przeczytanie niniejszej instrukcji oraz o jej późniejsze przestrzeganie w czasie eksploatacji kwadrokoptera Pełną odpowiedzialność za skutki używania kwadrokoptera ponosi użytkownik Pro ducenci i sprzedawcy nie przyjmuj...

Page 3: ... jest obsługa kilku kwadrokopterów jednocześnie bez żadnych zakłóceń Przełączniki nadajnika zdalnego sterowania Zdalne sterowanie nadajnik POWER 3 Drążek lewy 2 Powrót automatyczny 13 Przycisk zmiany przepustnicy lewa 12 Przycisk zmiany przepustnicy prawa 9 Wyłącznik zasilania 10 Wskaźnik zasilania 1 Funkcja headless Kamera 4 Drążek prawy 5 Trimmer A 6 Trimmer B 7 Trimmer C 11 Przycisk ograniczeni...

Page 4: ...ny a po ustawieniu wyłącznika zasilania w po zycji WYŁ nadajnik zostanie włączony Trymer B Trymer C Trymer D Wyłącznik zasilania Wskaźnik zasilania Lampki kontrolne migają wolno nadajnik nie jest aktywny Lampki kontrolne migają szybko nadajnik wysyła sygnał parowania do kwadrokoptera Lampki kontrolne świecą światłem stałym nadajnik jest gotowy do sterowania lotem Powrót automatyczny Kiedy kwadroko...

Page 5: ...ć lub zmniejszyć prędkość lotu kwadrokoptera w górę w dół Przycisk zmiany przepustnicy Aby wybrać drążek sterowania przepustnicą przesu nąć przyciski 2 jednocześnie do dołu lub do góry Istnieją 3 tryby lotu kwadrokoptera z małą prędkością ze średnią prędkością i z dużą prędkością Przycisk zmiany lotki steru kierunku Zwany także przyciskiem zmiany Trybu Drążka Wcisnąć ten przycisk aby zmienić tryb ...

Page 6: ...przodu do tyłu Kontrola lotu do przodu do tyłu Sterowanie lotem do przodu I do tyłu Sterowanie przepustnicą Sterowanie przepustnicą Sterowanie przepustnicą Sterowanie przepustnicą Sterowanie skrę caniem w lewo w prawo Sterowanie skręcaniem w lewo w prawo Sterowanie skręcaniem w lewo w prawo Sterowanie lotem i skręcaniem w lewo w prawo Sterowanie lotem w lewo W prawo Sterowanie lotem w lewo w prawo...

Page 7: ...a prawa to prawa storna operatora Wszystkie kierunki opisane w niniejszej instrukcji są definiowane jak wyżej Upewnić się że akumulator umieszczony w dolnej części kwadro koptera jest solidnie zmontowany i podłączony do przewodu zasi lania kwadrokoptera Kwadrokopter jest WYŁĄCZONY Wyłączyć kwadrokopter otworzyć przedział akumulatora odłączyć wtyczkę kabla zasilającego kwadrokoptera od akumulatora ...

Page 8: ... lotu kwadrokoptera TRYB DRĄŻKA 1 lub 3 Rys 18 Po włączeniu kwadrokoptera należy sprawdzić kierunek obrotu łopatek wir ników łopatki wirnika przedniego lewego i tylnego prawego powinny obracać się w kierunku zgodnym z kierunkiem ruchu wskazówek zegara podczas gdy łopatki wirnika przedniego prawego i tylnego lewego powinny się obracać w kierunku przeciwnym do kierunku ruchu wskazówek zegara Jeżeli ...

Page 9: ...ę TRYB DRĄŻKA 3 lub 4 2 Jeżeli kwadrokopter porusza się ciągle w lewo w prawo nawet bez sygnału sterowania użytkownik może wyregulować ustawienie trymera lotki tak aby zapewnić wyrównanie lotu kwadrokoptera TRYB DRĄŻKA 1 lub 2 Jeżeli kwadrokopter porusza się cią gle w lewo obracać Trymer C w pra wo do czasu aż odzyska równowagę Jeżeli kwadrokopter porusza się cią gle w prawo obracać Trymer C w le ...

Page 10: ...nić wyrównanie lotu kwadrokoptera TRYB DRĄŻKA 1 lub 2 TRYB DRĄŻKA 3 lub 4 Jeżeli kwadrokopter obraca się ciągle w powietrzu w kierunku przeciwnym do ruchu wskazówek zegara należy obracać Trymer C w prawo do czasu aż odzyska równowagę Jeżeli kwadrokopter obraca się ciągle w powietrzu w kierunku zgodnym z ruchem wskazówek zegara należy obracać Trymer C w lewo do czasu aż odzyska równowagę W górę Wyc...

Page 11: ... lotem w bok na prawo kwadrokopter będzie leciał w prawo Jeżeli skok lewego i prawego drążka sterowania wynosi ponad 95 beczka zostanie wykonana jednokrotnie jeżeli skok obu tych drążków nie przekroczy 95 kwadrokopter będzie wykonywał lot zgodnie z otrzyma nymi sygnałami sterującymi Istnieją 3 kanały zdalnego sterowania kanał małej prędkości kanał średniej prędkości oraz kanał dużej prędkości Na d...

Page 12: ... przytrzymać przez 2 sekundy przycisk umieszczony po prawej stronie górnej części nadajnika nadajnik zdalnego sterowania wy emituje 2 dźwięki na ekranie będzie migał komunikat Stick Mode lampka kontrolna kwadrokoptera przestanie świecić światłem ciągłym i zacznie migać Oznacza to że kwadrokopter pracuje w trybie headless Wyjście z trybu headless POWER STICK MOD W trybie headless wcisnąć i przytrzy...

Page 13: ...ierunek do przodu tył operatora to kierunek do tyłu lewa strona operatora to kierunek w lewo a prawa strona operator to kierunek w prawo Sterowanie kierunkiem lotu w trybie headless Obrócić drążek sterowa nia skręcaniem w lewo kwadrokopter skręci w prawą stronę operatora Obrócić drążek sterowa nia skręcaniem w prawo kwadrokopter skręci w lewą stronę operatora Obrócić drążek stero wania lotem w bok...

Page 14: ...er rozpocznie lot w kierunku kontrolera Aby wyjść z tego trybu należy wcisnąć przycisk funkcji powrotu automatycznego ponownie lub posłużyć się drążkiem sterowania lotem do przodu do tyłu Uwagi Jeżeli kwadrokopter pracuje w trybie headless niezbędne jest potwier dzenie kierunku lotu Sprawdzając kierunek lotu kwadrokoptera należy ustawić kwadrokopter dziobem do przodu a ogonem w stronę operatora op...

Page 15: ...rzewodu zasilają cego Rys 25 Zmiana podstawki Montaż uchwytu telefonu komórkowego 1 Podłączyć pręt pod stawki do elementu mocującego telefon komórkowy Rys 29 2 Wyregulować pozycję elementu mocującego tele fon dopasowując go do rozmiaru telefonu Rys 30 3 Osadzić uchwyt tele fonu komórkowego w górnej części nadajnika zdalnego sterowania Rys 31 1 Aby zdemontować uchwyt należy odchylić środkową część ...

Page 16: ... 3 Obraz wyświetla ny jest na ekranie 2 Kliknąć przycisk Rys 33 Rys 34 Rys 35 1 Otworzyć aplikację MJX C4005 FPV Kwadrokopter posiada wbudowaną kamerę C4005 po zainstalowaniu programu MJX C4005 FPV w smartfonie zdjęcia i filmy rejestrowane przez kamerę kwadrokoptera będzie można oglądać na żywo w trakcie lotu W przypadku systemu Android zalecamy wejście na naszą stronę www manta com pl i pobranie ...

Page 17: ...rchasing this product Please read this manual carefully before use and retain it for future reference Safety guidelines This product is not a toy It is not applicable for children who are under 14 years old Please read this instruction manual carefully before playing and operate the product according to the manual The users are in full charge of proper operating the quad copter The manufacturer an...

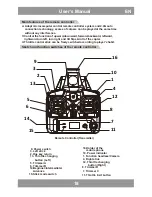
Page 18: ...technology scores of cotpers can be played at the same time without any interference Sketch and function switches of the remote controller Remote Controller Transmitter 3 Left stick 2 One key return 13 Throttle changing button Left 12 Throttle changing button Right 9 Power switch 10 Power indicator 1 Function headless Camera 4 Right stick 5 Trimmer A 6 Trimmer B 7 Trimmer C 11 Throttle limit butto...

Page 19: ...ered on slide the power switch to the OFF position the transmitter is powered off Trimmer B Trimmer C Trimmer D Power switch Power indicator The indicator light keeps blinking slowly the transmitter is not activated The indicator light keeps flashing rapidly the transmitter is sending out connectional signal to the quad copter The indicator light keeps on without blinking the transmitter is ready ...

Page 20: ... decrease the quad copter s upward downward speed Throttle changing button Slide down or slide up the 2 buttons at the same time to select the throttle control stick There are 3 flight modes of the quad copter low speed medium speed and high speed aileron rudder changing button Also named Stick Mode changing button Press this button to change the control stick mode Beginner Intermediate Advance Ho...

Page 21: ...WER POWER Forward Backward control Forward Backward control Forward Backward control Forward Backward control Throttle control Throttle control Throttle control Throttle control Left Right turning control Left Right turning control Left Right turning control Left Right turning control Leftward Rightward control Leftward Rightward control Leftward Rightward control Leftward Rightward control When t...

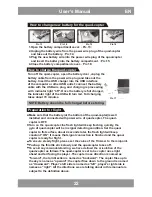
Page 22: ...rd Player s left side is named as left player s right side is names as right All the directions we are talking about in this manual are subject to the definition above Make sure that the battery at the bottom of the quad copter is well installed and connected with power wire of quad copter The quad copter is OFF Turn off the quad copter open the battery door unplug the battery cable from the power...

Page 23: ...rrected by adjusting the trimmer on the remote control Remarks Signal connection between the quad copter and the remote control is required for the first use Set the connection one by one to avoid signal connection error To better protect the battery please unplug the battery cable from the power wire after the use Trimmer functions If the quad copter keeps moving forward push down Trimmer A until...

Page 24: ... it gains balance STICK MODE 3 or 4 2 If the quad copter keeps moving leftward rightward even there is no control signal given users may adjust the aileron trim to keep the quad copter balanced STICK MODE 1 or 2 If the quad copter keeps moving leftward turn right of Trimmer C until it gains balance If the quad copter keeps moving rightward turn left of Trimmer C until it gains balance If the quad ...

Page 25: ...uad copter balanced STICK MODE 1 or 2 STICK MODE 3 or 4 If the quad copter keeps spinning counterclockwise in the air turn right of Trimmer C until it gains balance If the quad copter keeps spinning clockwise in the air turn left of Trimmer C until it gains balance Upward Push up the throttle control stick the rotation speed of the mains rotors are increasing and the quad copter ascends accordingl...

Page 26: ...tick to the right side the quad copter will fly rightward When both of the left and right control stick travels are more than 95 roll action will be performed once when both of the left and right control stick travels are less than 95 the quad copter will perform the flight according to the received control signal There are 3 channels of the remote control low speed channel medium speed channel an...

Page 27: ...ol is successfully connected press the function button located at top right of the remote control for 2 seconds the remote control will send out two beep sounds and there will be letters of stick mod flashing on the LCD screen the quad copter s indicator light turns from constant ON to flashing That means the quad copter is in headless mode Exit headless mode POWER STICK MOD When the quad copter i...

Page 28: ... front side is defined as forward the player s back side is defined as backward the player s left side is defined as left the player s right side is defined as right Flight direction control in headless mode Turn left the turning control stick the quad copter will turn to the right side of the player Turn right the turning control stick the quad copter will turn to the left side of the player Turn...

Page 29: ...he quad copter will fly towards player Press the one key return button again or operate the forward backward control stick the quad copter will exit the one key return function Remarks Flight direction proof is needed when the quad copter is going to fly in headless mode When checking up on the flight direction the quad copter should be set right ahead and tail facing the player the player should ...

Page 30: ...e plug Pic 25 How to change the foot stand Install the holder of the mobile phone 1 Connect the stand bar to the mobile phone fixing component Pic 29 2 Adjust the fixing component upward or downward according to the size of the mobile phone Pic 30 3 Set the mobile phone holder to the top of the remote control Pic 31 1 Pull back the lock center of the stand bar and slowly push up the holder the mob...

Page 31: ...nstall software Instructions FPV software download and installation 3 Image is showing on the screen 2 Click the button Pic 33 Pic 34 Pic 35 The quad copter is with build in camera C4005 install the MJX C4005 FPV software to smart phone the photos and videos that taking by the quad copter can be seen alive when the quad copter is flying For Android system please visit our website www manta com pl ...

Page 32: ...ację produktu bez uprzedzenia Strona główna www manta com pl Strona wsparcia technicznego www manta info pl SERVICE INFOLINE tel 48 22 332 34 63 or e mail serwis manta com pl from Monday to Friday 9 00 17 00 The manufacturer reserves the right to make changes to product specifications without notice Home www manta com pl Home support www manta info pl Made in P R C FOR MANTA EUROPE ...

Reviews: