background image

15.12.2014     

3


Applicator unit function:

  Rotating  atomisers  are  driven  by  means  of  a  rechargeable  battery.  Metering  on  all  the  units 

mentioned is path-dependent and takes place by means of a wheel driven pump. Droplets are formed by the centrifugal force 

of  the  rotating  atomiser.  The  droplets  are  discharged  downwards  by  the  rotating  atomiser  through  an  adjustable  segment. 

Residual chemical solution in the tank not intended for application is approx. 50 ml. This residual fluid can be poured back 

into the original herbicide container. 

Checking applicator unit function: 

Chemical solutions may flow quicker or slower due to temperature fluctuations, which is 

why the flow rates in the metering table should be checked and corrected as necessary. This system is not suitable for the 

application of water. Always use herbicides for testing the spray process and for calibrating the flow rate. Check the rotating 

atomiser on a daily basis for cleanliness and free turning motion. Check the output volume from time to time throughout the 

season. 

Using the applicator unit:

 Adjust the height of the spray hood so that it is as close to the ground as possible - if it is set too 

high, the risk of spray driftage exists. During operation, chemical solution collects in the rotating atomiser reservoir and will 

continue to drip for approx. 30 seconds after the shut-off valve has been closed if the unit is tilted. In order to avoid damage to 

cultivated plants due to dripping, we recommend closing the shut-off valve at the end of a row, for example, then folding the 

spray hood upwards and waiting approx. 30 seconds until the reservoir has emptied. 
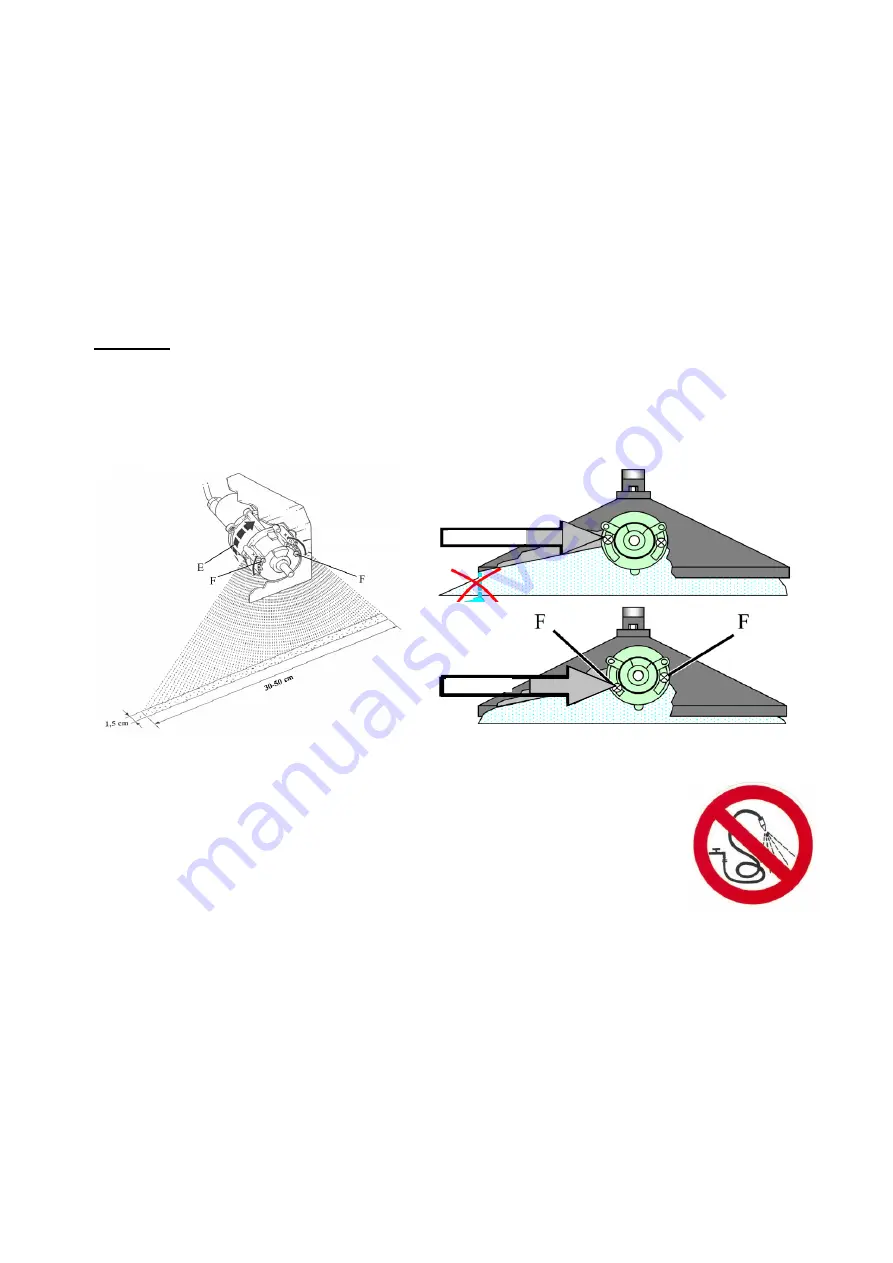
Spray width 

  Place an underlay (cardboard or paper) on the ground and prop up the unit on stands. 

  Actuate the switch button while simultaneously turning the wheel and appraising the spray width obtained, initially at one 

location. The spray width must be set so that the droplets are discharged over the entire width of the spray hood. The 

optimal spray width under standard operating conditions is set by the manufacturer. 

  In the event of deviations, the screw (F) can be loosened in order to move the width adjustment on the atomiser 

(see drawing). 

  Further details regarding operating width adjustment can be found on the pages for the individual applicator units. 


Cleaning 

Do not clean the applicator unit with a high-pressure sprayer or an intense water jet spray

Cleaning during the season: 

During short work breaks (a few hours), herbicide can remain 

in  the  system  as  long  as  the  shut-off  valve  remains  closed.  After  work  completion:  Before 

cleaning,  drain  the  chemical  solution  and  pour  it back into the original container. Open the 

shut-off and set the metering pump to maximum. Fill the chemical solution tank up to halfway 

with water, then, with the unit positioned, turn the wheel smoothly approx. 50 x and allow the 

fluid  to  drain  into  a  collector  receptacle  or,  operating  the  unit  for  approx.  100  m,  apply  the 

cleaning fluid to the pre-treated surface. Remove any remaining water from the tank and turn 

the wheel approx. 50 x again until the system is completely empty. 

Cleaning at the end of the season:

 Rinse the unit with warm water as described above. The spray hood and the atomiser 

housing  can  be  cleaned  with  a  damp  cloth.  Remove  the  atomiser  disc  in  order  to  avoid  damage.  In  the  case  of  heavy 

contamination, the atomiser housing should be unscrewed to remove contaminants and plant parts. Connect the unit to the 

charging device (see below). 

Charging the applicator unit and battery care 

The applicator unit has an automatic charging device. Trickle charging is possible. 

Recharging a completely empty battery up to full capacity takes approx. 16 hours. 

The battery should be recharged immediately after use. 

Battery charge 

Min. charging time 

Time interval


Fully discharged 

16 hours 

Immediately 

Short-term use 

  6 hours 

Immediately 

Storage without use 

 (2 hours 1 x per month) 

or charge continually


With a fully charged battery, units with one atomiser can be used for 16 hours, while units with 2 atomisers can be used for 

approx. 8 hours. 

INCORRECT 

CORRECT 

Summary of Contents for MANKAR

Page 1: ...ents and regional regulations for the use of herbicides and if necessary obtain approval from the responsible authorities e g environmental conservation agency Application is to be performed only by a competent user Remarks about usage of the unit Settings This system is not suitable for the application of water Use herbicides for testing the spray action and calibration of the flow rate Usage Pos...

Page 2: ...miser or other small parts Keep pesticide applicators and chemical substances away from children Assembly and preparation for first use Unit assembly is described for the individual models Before using the unit for the first time charge the battery for at least 16 hours Attention Always follow the sequence 1 Insert the plug jack into the charger socket 2 Plug the charging unit into a 230 V mains s...

Page 3: ...re width of the spray hood The optimal spray width under standard operating conditions is set by the manufacturer In the event of deviations the screw F can be loosened in order to move the width adjustment on the atomiser see drawing Further details regarding operating width adjustment can be found on the pages for the individual applicator units Cleaning Do not clean the applicator unit with a h...

Page 4: ... M N O Checking the output volume 1 Place an underlay e g cardboard or paper on the ground and prop up the unit on stands 2 Fill the chemical tank with herbicide undiluted 3 Disconnect the hose from the spray hood and place a measuring cup underneath 4 Open the shut off valve initially setting the metering adjustment knob to the maximum flow rate and simultaneously turning the wheel wait until the...

Page 5: ...round and prop up the unit on stands 2 Fill the chemical tank with herbicide undiluted 3 Disconnect the hose from the spray hood and place a measuring cup underneath 4 Open the shut off valve initially setting the metering adjustment knob to the maximum flow rate and simultaneously turning the wheel wait until the chemical solution is evenly applied 5 Set the chemical solution volume according to ...

Page 6: ... 7 104170 Cable holder plastic Mankar Roll 8 100998 Countersunk Philips head screw M 4 x 12 mm VA 9 100992 Washer M8 Ø8 4 mm VA 10 101145 Allen head screw M 8 x 16 mm VA 11 104140 3 way ball valve Mankar Roll 12 104130 Flow controller mount Mankar Roll 13 104131 Flow controller clips Mankar Roll 14 103319 Flow controller cpl PC HQ PC glass 35 0 mm 15 104100 Frame pump carrier Mankar Roll 16 104150...

Page 7: ... Handle bar bushing Mankar Roll 10 104200 Handle bar guide Mankar Roll 11 104501 Fully suspended drive flange Mankar Roll 12 104502 Friction bearing left Mankar Roll 13 104100 Frame pump carrier Mankar Roll 14 104161 Pump protection ring Mankar Roll 15 104160 Pump protection Mankar Roll 16 104503 Friction bearing right Mankar Roll 17 103477 Wheel 530 x 60 mm pneumatic tyred Mankar Roll 18 104112 A...

Page 8: ... 8 104315 Spring retainer for pressure spring Mankar Roll 9 104314 Pressure spring rotary joint Mankar Roll 10 104316 Bolt Allen key 10 x 130 mm VA Mankar Roll 11 101145 Allen head screw M 8 x 16 mm VA 12 104701 Height adjustment ONE Mankar Roll 13 104731 Width adjustment ONE ONE S Mankar Roll 14 103826 Allen head screw M 6 x 45 mm VA 15 103467 Filister head screw M 6 x 12 mm VA with Allen head 16...

Page 9: ... Mount plastic power pack Mankar Roll ItemPart No Description ItemPart No Description 100527 Metering pump MANKAR 3 capacity 5 12 ml min for MANKAR 110 GP 100492 Metering pump MAFEX 3 capacity 2 20 ml min 1 100528 Pump housing for two channel pump Metering pump MANKAR 1 100493 Pump housing for single channel pump Metering pump MAFEX 2 102209 Rotor 3 chromed brass for piston pump MAFEX MANKAR 2 102...

Page 10: ...spray one sided Incorrect width setting Undo screws F see page 3 and adjust the width setting to the left or right Atomiser drips Metering valve incorrectly adjusted Check setting see table Atomiser disc faulty contaminated Replace clean disc Atomiser spray discharge contaminated Clean Atomiser foams Residual water in the system Completely empty tank hose and segmental atomiser Air in hose Hose co...

Page 11: ...eclare under our sole responsibility that the following products are in conformity with the provisions of the following Council Directive 2006 42 EG Typ MANKAR ONE MANKAR TWO Hiske Weissmann Managing Director Geesthacht January 2020 _______________________ _________________________________ Place and date of signature Name title and signature ...

Reviews: