background image

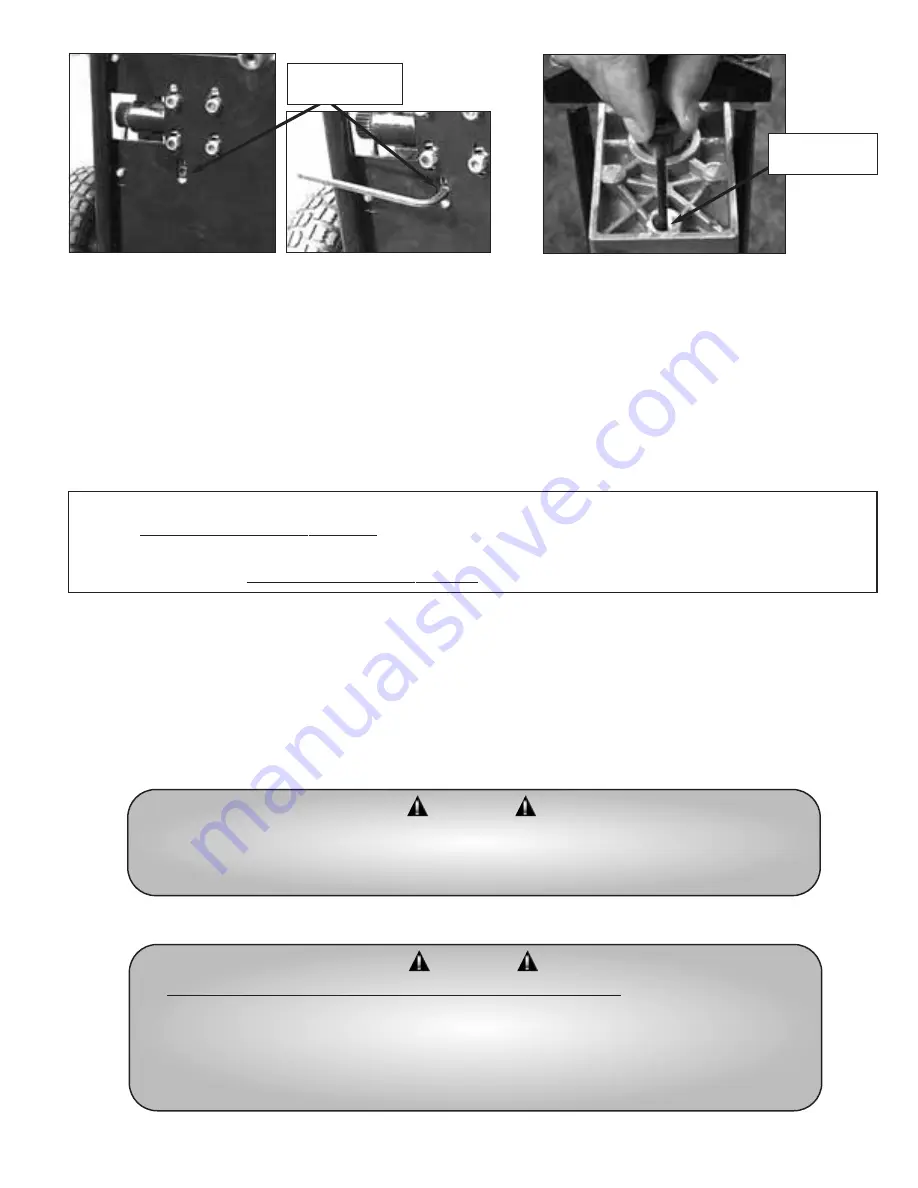
Drain Port

14

IMPORTANT! 

IF THE OIL LEVEL IS TOO HIGH THE HEAT WILL NOT BE DISSIPATING QUICKLY ENOUGH 

AND THE TEMPERATURE OF THE HYDRAULIC SYSTEM WILL RISE. 

IF THE OIL LEVEL IS TOO LOW IT MAY CAUSE CAVITATION*.

•  To drain the oil, tip unit back, place an empty container that can hold at least 1 Gallon (4 Liters) of oil under the 

log splitter.

•  Use an Allen Wrench [P/N 510543 (8mm)] and remove Drain Port Plug and the seal in the aluminum bottom cover plate

of the log splitter.

•  Hold the handle, move unit up a little and position it under the angle. Using an Allen Wrench, unscrew the Dipstick and

open the Oil Fill Port to let air in and help the oil flow out. Wait until the oil completely escapes from the oil reservoir.

•  Reinstall the Drain Port Plug and the seal. Be careful not to damage the threads of the Aluminum Bottom Cover.

•  After the used oil is drained, pour approximately 0.8-0.9 of a gallon (3-3.3 liters) of recommended oil into the Oil Fill Port.

•  Clean the Dipstick and insert it to check the oil level; it should be between the two notches on the stem. If level is low,

add recommended type of the hydraulic oil. If the level is too high, poor out a little at a time into a container.

*Reference:

Cavitation

occurs when the volume of hydraulic fluid demanded by any part of a hydraulic circuit exceeds the volume

of fluid being supplied. If there is an air bubble in the system, the force applied gets used compressing the air in the bubble rather
than moving the piston. This affects the efficiency of the system. In this case, Force (Rated 5 tons) will be cut down.

•  Reinstall the Dipstick and the seal. Be careful not to damage the threads of the Dipstick Plug and Aluminum 

Top Cover.

•  Clean thoroughly.

•  Loosen air bleed screw, turn 3-4 times.

•  Purge air from the hydraulic system by cycling the pressure plate back and forth 3 to 4 times.

WARNING

DUMPING USED HYDRAULIC OIL IN THE ENVIRONMENT IS FORBIDDEN. THE FLUID

MUST BE DISPOSED IN ACCORDANCE WITH THE LOCAL ENVIRONMENTAL RULES 

AND PROCEDURES.

WARNING

BEFORE PERFORMING ANY MAINTENANCE BE SURE THAT:

LOG SPLITTER IS DISCONNECTED FROM POWER SOURCE.

PUSHER PLATE IS FULLY RETRACTED (RETURNED TO THE LOWEST POSITION)
AND NO RESIDUAL HYDRAULIC ENERGY IS LEFT IN THE SYSTEM.

OIL HAS COOLED.

J. Sharpening the wedge

Sharpen the splitting wedge, as needed, using a fine-toothed file to remove any burrs, nicks or flat spots from the wedge.

Oil Fill Port

Summary of Contents for SwiftSplit 5000

Page 1: ...2006 Mantis Div of Schiller Pfeiffer Inc All Rights Reserved Owners Manual and Safety Instructions Log Splitter Manual...

Page 2: ...valve A switch set and the solenoid valve let the operator actuate the hydraulic cylinder to split a log An internal reservoir holds the hydraulic oil that feeds the pump The hydraulic assembly is at...

Page 3: ...bottom of the unit 2 Put log splitter with the cardboard part s box in the vertical position by holding the top of the beam and carefully lifting the top of the log splitter until it can stand Top of...

Page 4: ...30 111 31 7 KNOB CABLE TIE 152MM 6 LONG 2 510501 2 1 1 2 2 510146 510543 510144 510524 WHEEL SHAFT M14 WHEEL NUT ALLEN WRENCH 6MM ALLEN WRENCH 8MM DRAIN PLUG 2 2 4 2 2 510508 510509 510503 510104 5105...

Page 5: ...steps for the opposite side of the handle and tighten the knobs 7 Use cable ties P N 510147 to secure the power cord in place 8 Installing Wheels Insert the Wheel Shaft P N 510144 in the hub of the Wh...

Page 6: ...plit com or contact our customer service department by calling 1 800 366 6268 E Special Safety Information 1 Safety Decals An important part of the safety system incorporated in this log splitter are...

Page 7: ...UNSTABLE SURFACES DO NOT WORK IN ODD POSITIONS WARNING WEAR SHOES THAT PROVIDE PROTECTION AGAINST THE RISK OF LOGS ACCIDENTALLY FALLING ON FEET DANGER KEEP BOTH HANDS ON THE SWITCHES AND AWAY FROM MOV...

Page 8: ...hat handles guards and fasteners are secure and in place Be sure that all electrical cords are not damaged or broken Never attempt to use an incomplete machine or one fitted with unauthorized modifica...

Page 9: ...f current 4 Disconnect power cord from power source When not in use Before servicing Before clearing blockages Before checking cleaning or working on the cutting portion of the unit When you need to m...

Page 10: ...lt of improper use or improper maintenance of the log splitter F Before You Start Splitting Before each use inspect your unit and ensure that all handles guards and fasteners are secure and in place B...

Page 11: ...log splitter if the switch does not turn it on and off Have any defective switches replaced by an authorized service center Lubricate ram vertical beam and guides to reduce wear Use 2 Lithium grease N...

Page 12: ...the power source or proper extension cord see Extension Cord Chart 4 Before starting the splitting operation cycle pressure plate of the log splitter three to four times back and forth by pushing and...

Page 13: ...ivate pressure plate by depressing both switches and keep holding them until split pieces of the log fall away Then release them This will cause the pressure plate to retract to its starting position...

Page 14: ...ANY OTHER MATTER THAT IMPAIRS THE FUNCTION OF THE FLUID CONTAMINATION ACCELERATES WEAR OF HYDRAULIC COMPONENTS I How to change the hydraulic oil Oil should be changed after every 200 hours of operatio...

Page 15: ...of the hydraulic oil If the level is too high poor out a little at a time into a container Reference Cavitation occurs when the volume of hydraulic fluid demanded by any part of a hydraulic circuit ex...

Page 16: ...ACTED RETURNED TO THE LOWEST POSITION AND NO RESIDUAL HYDRAULIC ENERGY IS LEFT IN THE SYSTEM OIL HAS COOLED L Maintenance Area Maintenance procedure Frequency Inspect Hydraulic fluid level Using an Al...

Page 17: ...use Visually Inspect All Welds Check alignment of moving parts and for damaged or worn parts Before each use Replace Hydraulic oil when oil viscosity and force decrease You need 0 8 0 9 of a gallon 3...

Page 18: ...il level Place piece of cardboard under the log splitter to locate the leak Worn components should be replaced Contact qualified hydraulic mechanic for assistance or call 1 800 366 6268 Pressure plate...

Page 19: ...18 O Exploded View LOG SPLITTER EXPLODED VIEW 37 34 36 39 40 35 38 REV F 12 20 05...

Page 20: ...56 510165 LOG GUIDE 2 ITEM PART DESCRIPTION REMARKS QTY 57 510166 THRUST PAD 2 58 510167 PRESSURE PLATE 1 59 510168 BOTTOM COVER PLATE 1 60 510169 O RING 55MM DIA BOTTOM COVER 1 61 510170 DRAIN PLUG...

Page 21: ...ent of a defect or malfunction the purchaser must send the product postage paid to Mantis 2800 Turnpike Dr Suite 1 2800 Commerce Center Hatboro PA 19040 MANTIS assumes no responsibility in the event t...

Reviews: