30
Montage- und Betriebsanleitung
Installation and Operating Instructions
EN
44..55
TToooollss aanndd m
maatteerriiaallss rreeqquuiirreedd
Included in scope of supply:
•
Replaceable head holder
•
TORX® wrench
•
Handle for TORX® wrench
Not included in scope of supply:
•
Replaceable drill head
•
Special clamping screw
•
Torque wrench with hex bit
(see chapter 4.7 Accessories)
•
High-pressure spray gun
44..66
TTeecchhnniiccaall ddaattaa
•
Technical data of the special clamping screw
DDiiaam
meetteerr
rraannggee
[[m
mm
m]]
TThhrreeaadd ooff rreeppllaacceeaa--
bbllee hheeaadd hhoollddeerr
TToorrxx ssiizzee
PPeerrm
m.. TTrraannssffeerraabbllee
ttoorrqquuee
[[N
Nm
m]]
12.0-13.99
M3 x 0.5
T6
0.4
14.0-17.49
M3.5 x 0.6
T7
0.7
17.5-19.49
M4 x 0.7
T8
1.3
19.5-24.49
M5 x 0.8
T10
2.0
24.5-28.49
M6 x1.0
T15
3.1
28.5-32.49
M6 x 1.0
T15
5.6
Diameter range, thread size, Torx size and permissible transferable torque
44..77
AAcccceessssoorriieess
AAcccceessssoorriieess
TTiigghhtteenniinngg ttoorrqquuee rraannggee
[[N
Nm
m]]
O
Orrddeerr N
Noo..
Torque wrench
0.2 – 1.2
30911425
Torque wrench
1.0 – 6.0
30911426
Accessories
Montage- und Betriebsanleitung
Installation and Operating Instructions
31
EN
TTooooll aasssseem
mbbllyy
CCAAU
UTTIIO
ON
N
SShhaarrpp ccuuttttiinngg eeddggeess oonn tthhee ttooooll!!
Sharp cutting edges may cause cutting injuries.
Wear protective gloves during tool changes.
55..11
IInnssttaalllliinngg tthhee ssppeecciiaall ccllaam
mppiinngg ssccrreew
w oonn tthhee rreeppllaacceeaabbllee ddrriillll hheeaadd
W
WAARRN
NIIN
NG
G
IInnaaddeeqquuaattee ttiigghhtteenniinngg ooff tthhee ssppeecciiaall ccllaam
mppiinngg ssccrreew
w!!
Inadequate tightening of the special clamping screw can lead to the replacea-
ble drill head being released at high projectile speeds and resulting in serious
injuries.
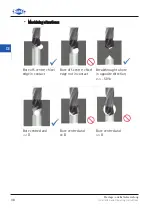
Tighten the special clamping screw up to the stop on the replaceable drill
head.
IIN
NFFO
ORRM
MAATTIIO
ON
N
The special clamping screw is al-
ready installed on the replaceable
drill head on delivery. If removed,
the special clamping screw can be
installed again by screwing into the
replaceable drill head.
1.
Insert the special clamping screw into
the bore of the replaceable drill head
with the small thread end facing for-
ward.
2.
Tighten the special clamping screw in
clockwise direction up to the stop.
RREESSU
ULLTT
Installation of the special clamping
screw is completed.
Insert and tighten special
clamping screw
DE
Montage- und Betriebsanleitung
Installation and Operating Instructions
31


