32
Montage- und Betriebsanleitung
Installation and Operating Instructions
EN
55..22
IInnssttaalllliinngg rreeppllaacceeaabbllee ddrriillll hheeaadd oonn rreeppllaacceeaabbllee hheeaadd hhoollddeerr
1.
Clean replaceable head holder and re-
placeable drill head with compressed
air.
Clean with compressed air
2.
Push the replaceable drill head onto the
replaceable head holder.
3.
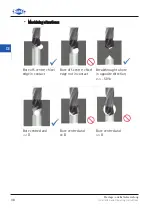
Check whether chip flute and serrations
of replaceable drill head and replacea-
ble head holder are aligned. If they are
not aligned, turn the replaceable drill
head until chip flute and serrations are
aligned (see Fig. 7: Chip flute and serra-
tions are aligned (left) | are not aligned
(right)).
Fit the replaceable drill head
Chip flute and serrations are aligned (left) | are not aligned (right)
Montage- und Betriebsanleitung
Installation and Operating Instructions
33
EN
IIN
NFFO
ORRM
MAATTIIO
ON
N
The replaceable drill head is tight-
ened using the TORX® wrench. A
bore is provided for this on the un-
derside of the replaceable head
holder through which the TORX®
wrench can be inserted to tighten
the special clamping screw.
The direction of rotation required to
tighten or loosen the replaceable
drill head is indicated symbolically
alongside the bore.
TTiigghhtteenn ((lleefftt)): Turn in counter-
clockwise direction.
LLoooosseenn ((rriigghhtt)): Turn in clockwise di-
rection.
Symbolic representation of the
direction of rotation
4.
Press the replaceable drill head lightly
against the replaceable head holder so
that it maintains its fitted position (see
Fig. 9: Tighten the special clamping
screw up to the stop).
5.
Insert the TORX® wrench through the
lower bore in the replaceable head
holder and into the head of the special
clamping screw.
6.
Tighten the special clamping screw us-
ing the TORX® wrench by turning in
counter-clockwise direction.
PPRREELLIIM
MIIN
NAARRYY RREESSU
ULLTT
The special clamping screw is tight-
ened finger-tight and the replacea-
ble drill head is correctly positioned
against the replaceable head holder.
Tighten the special clamping
screw up to the stop
DE
Montage- und Betriebsanleitung
Installation and Operating Instructions
33


