When an object is created, it can be assigned an Access Class (A-F). When that object is activated (for example, a
button is touched), the OIT compares the access classes allowed for the current user to the access class specified for
the object. If the access class of the object is within the classes allowed, the object’s action is executed.
The access class for an object is configured in the User
Restriction
section of the Security tab for that object. So, for
example, if you wish to set the access class for a set bit object, click on the security tab of that objects properties
dialog, as shown below:
The object can be configured to handle insufficient security in one of two ways:
• The object can be hidden while security is not sufficient.
• The OIT can display the message defined as Message 1 in the System Message object.
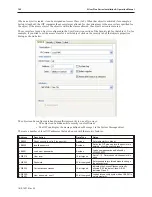
There are a number of local OIT addresses that can be used with the security features.
Address
Description
Data Type
Notes
LB9050
Reset security level to 0 (no security)
Boolean
Set momentarily to trigger.
LB9060
Invalid password
Boolean
Set by the OIT when an invalid password is
entered. Must be explicitly reset.
LB9061
Load new passwords
Boolean
Loads new passwords as defined by
LW9500-9523
LW9219
User level
16-bit signed
Set to 1-12. Determines which password is
used.
LW9220
Password
32-bit unsigned
Enter password into this address to change
the security level
LW9222
Current access classes
16-bit signed
Indicates the Access Classes currently
allowed. Bit 0 indicates Class A; Bit 5
indicates Class F.
LW9500,
LW9501
New password, user 1
32-bit unsigned
Loaded into security system when LB9061 is
set momentarily
1010-1007, Rev 05
100
Sil ver Plus Se ries In stal la tion & Op er a tion Man ual
Summary of Contents for Silver Plus Series
Page 20: ...1010 1007 Rev 05 16 Silver Plus Series Installation Operation Manual ...
Page 31: ...COM Ports for the HMI5056 5070 1010 1007 Rev 05 Connect the OIT to the PLC or Controller 27 ...
Page 38: ...1010 1007 Rev 05 34 Silver Plus Series Installation Operation Manual ...
Page 49: ...7 Click the Shape tab 1010 1007 Rev 05 Creating Your First Project 45 ...
Page 62: ...1010 1007 Rev 05 58 Silver Plus Series Installation Operation Manual ...
Page 75: ...3 Click OK The System Parameter Settings dialog appears 1010 1007 Rev 05 Using EZware 5000 71 ...
Page 132: ...1010 1007 Rev 05 128 Silver Plus Series Installation Operation Manual ...
Page 156: ...1010 1007 Rev 05 152 Silver Plus Series Installation Operation Manual ...
Page 210: ...1010 1007 Rev 05 206 Silver Plus Series Installation Operation Manual ...
Page 216: ...1010 1007 Rev 05 212 Silver Plus Series Installation Operation Manual ...
Page 246: ...1010 1007 Rev 05 242 Silver Plus Series Installation Operation Manual ...


