2
2. ALIGNMENTS
Idling Current Adjustment
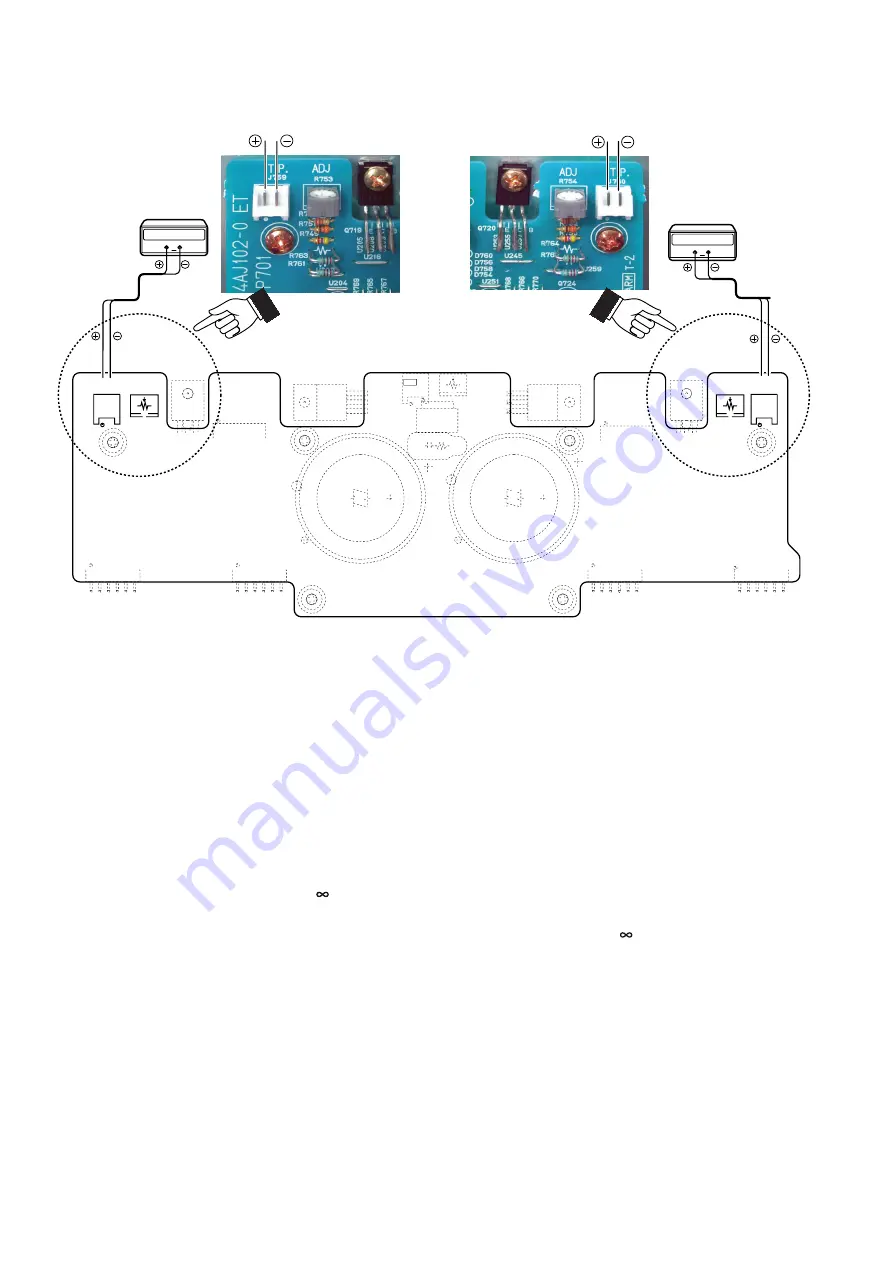
Adjustment Procedure
Set the power voltage to rated voltage for this adjustment.
1. Adjust the Idling Current with the variable resistor
R753
and
R754
on the PWB P701.
2. Turn off the power.
3. "
+
" of Connect Digital Voltage is connected to the
No. 1
pin
and connected "
-
" to
No. 2
pin of
J759
.
4. "
+
" of Connect Digital Voltage is connected to the
No. 1
pin
and connected "
-
" to
No. 2
pin of
J760
.
5. Before turning on the power,
R753
and
R754
have been
counter clockwise turned with the adjustment driver.
6. Turn on the power,
VOLUME
is set as -
.
7. After 2 minutes.
With seeing the digital voltage meter turn the variable
resister clockwise slowly to adjust the idling current.
Idling adjustment with
R753 (R754)
.
• Turn
R753 (R754)
clockwise to increase the idling
current.
• The adjustment value of idling current is
4 mV(20 mA) ± 0.5 mV(2.5 mA) each.
8. After 7 minutes.
Repeat the same procedure as 7.
• The adjustment value of idling current is
12 mV(60 mA) ± 0.5 mV(2.5 mA) each.
アイドリング電流調整
調整手順
調整時は必ず電源電圧を定格電圧に合わせてください。
1
.
P701
基板上の半固定抵抗
R753
と
R754
でアイドリング
電流を調整します。
2
. 電源を
OFF
します。
3
.
P701
基板の
J759
にデジタルボルトメーターを接続しま
す。デジタルボルトメーターは
J759
の
1
番ピン(丸印側)
を
"
+
"
、
2
番ピンを
"
-
"
に接続します。
4
.
P701
基板の
J760
にデジタルボルトメーターを接続しま
す。デジタルボルトメーターは
J760
の
1
番ピン(丸印側)
を
"
+
"
、
2
番ピンを
"
-
"
に接続します。
5
. 電源を投入する前に半固定抵抗
R753
と
R754
を、調整ド
ライバーで反時計方向に回しきってください。
6
. 電源を投入しボリュームを
-
にしてください。
7
. 電源を投入後
2
分経過後。
P701
基板の
J759
(
J760
)に接続したデジタルボルトメー
ターの電圧値を監視しながら、半固定抵抗
R753
(
R754
)
をゆっくりと時計向に回してください。
•
R753
と
R754
を時計方向に回すとアイドリング電流が
増加します。
•
アイドリング電流の調整値はそれぞれ
"
4 mV(20 mA) ± 0.5 mV(2.5 mA)
"
にします。
8.
さらに
"
7
分
"
経過後。
上記
7.
の手順でもう一度調整します。
•
アイドリング電流の調整値はそれぞれ
"
12 mV(60 mA)
± 0.5 mV(2.5 mA)
"
にします
。
P701
ADJ
R754
T.P.
J760
ADJ
R753
T.P.
J759
Digital Voltmeter
R ch
V
Digital Voltmeter
L ch
V
Summary of Contents for PM7001KI
Page 9: ...7 Click Device Click Apply Device をクリックします Apply をクリックします ...
Page 16: ...14 Select Password in Setup Setup から Password を選びます ...
Page 20: ...18 Auto Programming opens Auto Programming の設定画面が開きます ...
Page 23: ...21 Click Cancel Click Cancel Cancel をクリックし終了します Cancel をクリックします ...
Page 37: ...47 48 Q201 TMP86FH47UG ...


