background image

User Guide

58

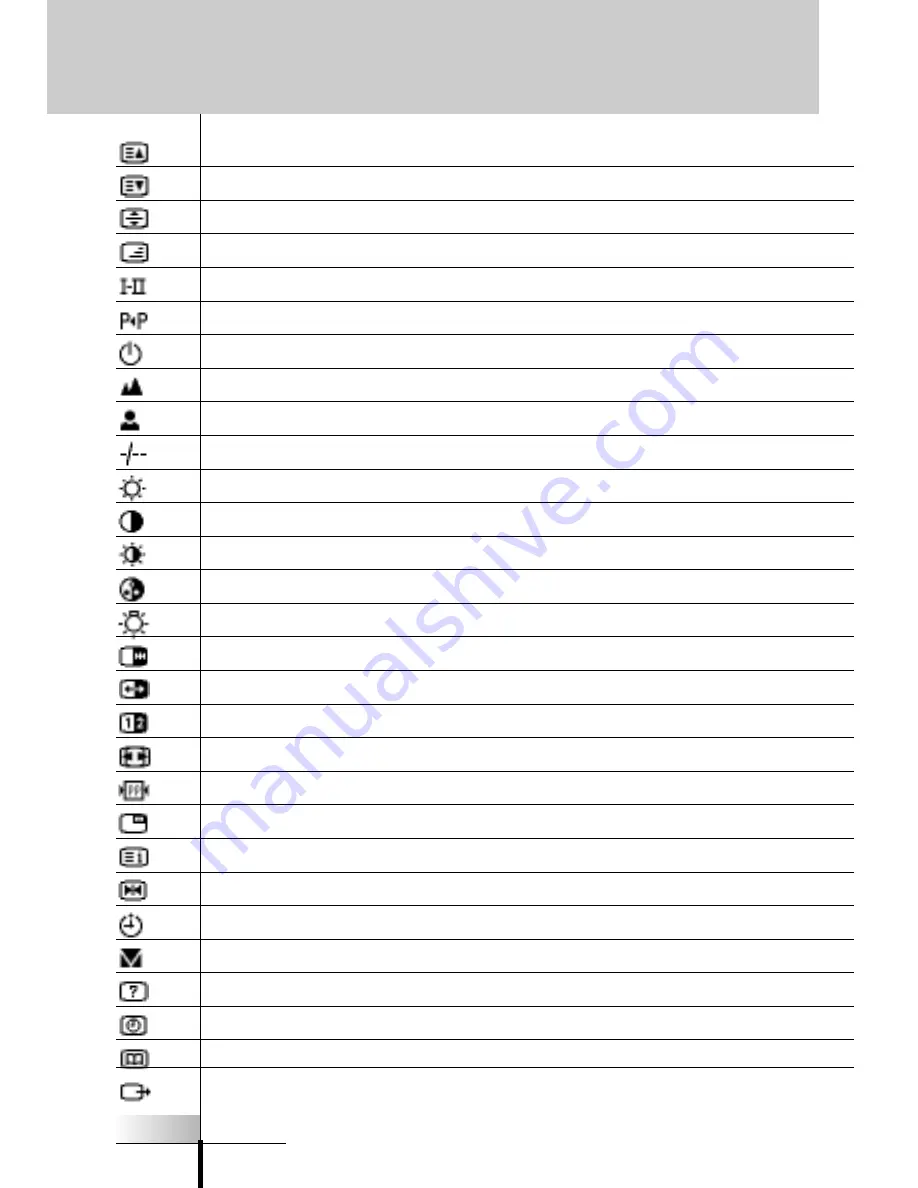
Overview of Symbols

Page number up

Page number down

Page enlargement

TV and text mixed

1st or 2nd language

Last view, previous program

Power, Stand-by

Zone focus: long distance

Zone focus: very short distance

Single or multi-digit selection

Brightness, brilliance

Contrast

Brightness/contrast

Color saturation

Lamp, lighting, illumination

Split screen freeze / double screen freeze

Split screen swap / double screen swap

Split screen / double screen

Movie expand

Personal preference

Picture-in-picture freeze

Main index page

Picture freeze

Programmable timer, general

Tracking

Application assistance

Actual time on screen

EPG / Electronic Program Guide

Video output

Specifications

Summary of Contents for RC9200

Page 1: ...User Guide To The RC9200 RC5200 Touch Screen Remote Controls Automating Your Home Theater With Marantz ...

Page 2: ... found to comply with the limits for a Class B digital device pursuant to part 15 of the FCC rule These limits are designed to provide reasonable protection against harmful interference in residential installation This equipment generates uses and can radiate radio frequency energy and if not installed and used in accordance with the instructions may cause harmful interference to radio communicati...

Page 3: ...8 3 Complex Operation Macros or Help 20 4 Programming Help Lists 22 5 Macro Panel Jump Capabilities 23 6 Programming Macros Panel Jumps 24 7 Macros From Your Home Buttons 26 Reference 28 1 Programming Buttons 28 2 Labeling Buttons Frames and Menu Items 32 3 Working with Device and Macro Groups 35 4 Deleting and Restoring 40 5 Recording Macros 43 6 Using the Remote Control with Radio Frequency 47 7...

Page 4: ...emote controls Introduction 1 The Marantz RC9200 5200 The Volume Channel and Mute buttons are typically programmed to always work the same way regardless of what panel is displayed The Infrared Eye transmits to your devices and learns from your existing remotes The Touchscreen The INFO button enables you to check batte ry life Back and Ahead buttons enable you to quickly navi gate the last six scr...

Page 5: ...vices appears Tap again to select Panel number shows active control panel Tap the Scroll Arrows to scroll to other panels within the acti ve group 2 The Battery When you use the Remote Control for the first time you will have to install the battery pack place the Remote Control in the docking station and charge the Remote Control tap the INFO button on the Home Panel to check battery life Warning ...

Page 6: ...d 4 Place the battery cover back on Note Make sure the cable of the battery pack does not get stuck between the molded interior and the battery cover After a few seconds the Remote Control starts up automatically and an Introduction screen appears The Remote Control beeps twice to indicate that it has finished starting up Because the battery pack of the Remote Control is not fully pre charged you ...

Page 7: ...s place When the Remote Control is fully charged the LED goes off Note Normal charging time is 2 to 3 hours depending on the condition of the battery pack You can operate the Remote Control while it is being charged The battery pack does not have to be entirely empty before recharging You can place the Remote Control in the docking station at any time When the battery pack is running low the Low B...

Page 8: ...te In the settings see page 13 you can choose to activate the backlight automatically when you turn the RC9200 5200 on Modes The RC9200 5200 has different modes When you activate the RC9200 5200 for the first time it starts up in Use mode allowing you to immediately operate your devices In Use mode the menu bar at the bottom of the screen displays the symbol for the Mode Menu Tap the symbol A menu...

Page 9: ...lect the Input of your Home Theater Receiver or Preamp Home buttons are linked to the Device pull down menu which also selects inputs on your receiver Access Home by tapping the Home button at the bottom left of the remote Devices The Device side displays the control panels of your components one device group at a time A button on a Device panel will act just like the buttons on the original remot...

Page 10: ...ote by tapping the left or right menu bar 2 Tap the Menu bar again A menu will pop into view enabling you to choose which group of panels you want If you have a large system with more than seven groups scroll arrows enable you to select those that are out of sight 3 After using the scroll arrows to view all of the choices simply tap the label of the group you would like Note When you jump to a Dev...

Page 11: ...me theater receiver preamp to the appropriate input See page 30 to program for a non Marantz receiver pre amp Jump to a Device Panel Group Without Changing Inputs 1 Pop up the Device menu by tapping the Device Menu bar 2 Look at the labels for the Left and Right hard buttons Now they are labeled NO IR 3 Press and hold either of the two Left and Right hard buttons then select the device you would l...

Page 12: ...i ve group home macros or devices Getting Started Opposite the scroll arrow on the bottom of the screen the Panel display shows you which panel you are viewing Using the Back Ahead Hard Buttons Tap the Back hard button to navigate to last six panels you ve viewed Use the Ahead hard button to navigate in the other direction ...

Page 13: ... the appropriate panel Your Macro Groups have also been programmed with one touch jump buttons and tab style navigation to make it easy to sort your macros out Getting Started 1 To view the TV s Effects panel press the EFX tab 2 The RC9200 5200 will jump to the TV Effects panel 1 To view the channel macros for sports channels press the sports tab 2 The RC9200 5200 will jump to the panel displaying...

Page 14: ...ng regardless of the panel displayed teach commands on Home Panel or they can change their function depending on which device is active teach commands only to the specific devi ce For example Since Volume Up Volume Down and Mute are typically receiver preamp commands in most home theaters these direct access buttons have been pre programmed to always operate a Marantz receiver preamp Should you ow...

Page 15: ...le MZE REV You are using the memory saving stripped down file See pages 17 and 57 To exit INFO panel display Tap the INFO button again Most of the RC9200 5200 s features can be set to your own wishes 1 Make sure you are on the HOME panel Once you are on the HOME panel tap the Mode button at the bottom of the screen 2 Choose SETUP The first setup panel appears You can display the second and third s...

Page 16: ...e Deactive Turns off the Mode Menu Icon so the user cannot access SETUP LEARN LABEL etc Good when children are tech savvy Active Normal Anyone can program or adjust the Remote by tapping on the Mode Menu icon SPECIAL NOTE To access the MODE menu after deactivating it press and hold the spot where the Mode Menu icon used to be for five or six seconds Macro Menu Active DeActive Turns off Macro Navig...

Page 17: ...here is no EDIT button The mode menus are utilized like this 1 Select either the Home Device or Macro divisions of panels by touching the appropriate tabs or the Home Icon 2 Touch the Mode icon at the bottom of the screen 3 Select the mode you wish to use to customize your RC9200 5200 by touching the appropriate button on the Mode Menu When you operate your devices the RC9200 5200 is in Use mode F...

Page 18: ...de button at the bottom of the touchscreen or the label of the mode you are using The Mode menu pops up 2 Tap the mode you want to use The label of the active mode appears on the RC9200 5200 icon You can now work in the selected mode Note USE mode is the normal operating mode for the RC9200 5200 The RC9200 5200 will not time out and automa tically return to USE mode You must redisplay the Mode Men...

Page 19: ... Marantz remote codes for your convenience See creating new devi ces on page 36 FAV TV Macro groups for surfing channels with one touch via customizable labels See recording macros on page 43 ADJUST a macro group with one touch jumps to all of the power user features of a Marantz system POWER a group of control panels that will help your family power up a home theater system See Deciding on Macros...

Page 20: ... pages you ll find step by step guidelines on each of the three stages When a more detailed explanation can be found in the Reference section we ve noted the page 1 Gather all of your remote controls in front of you 2 Play with all of the example device groups Compare the device groups with your existing remote controls Can you use any as templates for non Marantz components 3 Use DEL mode to dele...

Page 21: ... of the RC9200 5200 Relabel any buttons as needed to match your existing remote controls Check all of your devices 12 Switch to LEARN mode and teach the RC9200 5200 all of your non Marantz components RC Codes see page 28 32 13 Switching back and forth between USE and LEARN modes test all codes and reteach as necessary Note Should you need to delete a command use the DEL mode Be very careful to NEV...

Page 22: ...you press the Power button The RC9200 5200 cannot look at your components to see if they are on or off So if you recorded a macro intended to power up a non Marantz home theater it wouldn t be very reliable Here s an example Your spouse goes out to the local video store and rents a videotape When he she gets home they pop the tape in the VCR most VCR s automatically turn on when a tape is inserted...

Page 23: ...are discrete the macro will work reliably If even one command is a toggle command you should program a help list for the operation instead of a macro Tip Sometimes there is a reliable way to use toggle type commands in macros Unfortunately it will not be written down in your component s instruction manu al You will have to find it through experimentation and imagination What you are looking for is...

Page 24: ...a descriptive title like POWER RECORD etc 6 Stay in LABEL mode Relabel any of the introductory text on panel 1 Type in any guidelines your family may need to know for this operation 6 Stay in LABEL mode Relabel as many of the buttons on the five panels as you need Tip Do not relabel the buttons labeled Press for Next Help Screen unless the button is the last step in the operation 7 Switch to LEARN...

Page 25: ...Perform Jumps to Any Device Panel The Marantz RC9200 5200 has the unique capability of jumping to any device panel during a macro You can make any or all of the 255 steps a jump to any Device panel This provides you with the opportunity to give some feed back to the end user while a macro is being played back For example you can reveal the CD device panel to show the user that RC commands are bein...

Page 26: ... really does see page 26 Macros Can Delay Between Steps You can program a delay as any or all of the 255 steps of a macro You can adjust that delay in 1 10th of a second intervals between 1 and 99 9 seconds Customizing Your RC9200 5200 6 Programming Macros Panel Jumps You will do all of your Macro Jump programming within a window that will appear after you press the EDIT button on the Macro Mode m...

Page 27: ...escriptive name even if it requires a few words 8 Switch to Edit mode 9 Press your newly named Macro button to enter the EDIT win dow The EDIT window will appear If you had any previously programmed commands in this button they will appear for you to edit 10 Working from your written list navigate to the desired device and panel to program all of the steps in the Macro see step 5 on page 44 Comman...

Page 28: ...Try moving commands so that a TV command alternates with another component command before another TV command is issued To move a command simply select it and use the up and down arrows to reposition it within the macro window When a delay is added to the macro the default timing is 5 seconds If the macro works with a 5 second delay try a smal ler delay to shorten the macro When programming Channel...

Page 29: ...name of your Device at the top of the window 8 Program your macro following steps 10 through 15 on the pre vious page Note In use you can select a device without issuing the macro by revealing the Device Menu then pressing and holding the left hard key labeled NO IR then selecting the device Otherwise every time you select the device from home or select it from the device menu the macro will be se...

Page 30: ...9200 5200 s learning eye Test the first command from any new remote control to find the correct learning distance Once you have found the correct lear ning distance do not change it for any other button on that parti cular remote control Most commands learn correctly when you press and hold them until the OK indicator appears However sometimes the RC9200 5200 will say OK yet the command will not o...

Page 31: ...uttons 1 Navigate to the Device panel buttons you want to program 2 Switch to Learn mode via the Mode button Additional empty buttons appear which can be programmed and labeled 3 Point the device s original remote control to the RC9200 5200 s learning eye as shown on page 28 4 Tap the RC9200 5200 button you want to program The button starts flashing 5 Press and hold the corresponding button on you...

Page 32: ...n 3 Point the device s original remote control to the RC9200 5200 s learning eye as described above 4 Tap the device tab to open the Device menu 5 Touch and hold either the RC9200 5200 s Left or Right button now labeled Device and tap the device you want to program Even when you want to program the currently active device you have to tap it in the Device menu The label device starts flashing on th...

Page 33: ...ns can be programmed with a global function for all devi ces and or for a deviced specific local command for a particular device When a command is taught to a hard button from a device page it will only be issued when that device group is active even if a com mand has been taught globally Local learning overrides global lear ning When a command is taught to a hard button from a home panel it will ...

Page 34: ...he label of the button you have pressed e g chan or vol starts flashing on the RC9200 5200 icon Reference 2 Labeling Buttons Frames and Menu Items The following elements can be labeled buttons on a device panel text frames on a device panel they don t do anything except dis play text Device groups the name for the Device group that appe ars on the Device Tab and on the Home button buttons on a mac...

Page 35: ...e you want to label is displayed above the keyboard 4 Edit the label To delete a character press the Right button To enter a character tap the keyboard near the character you want to use The keyboard is zoomed in allowing you to tap exactly the character you need After you have tapped the character the keyboard is zoomed out Repeat this action for every character Note You can zoom out again withou...

Page 36: ...home are linked automatically aliased to the labels you create for the Device menu so any chan ge you make to the Device menu names will be automatically car ried out on your home panel buttons 1 Switch to Label mode via the Mode button 2 Tap the device tab to open the Device menu or Tap the macro tab to open the Macro menu 3 Touch and hold either the RC9200 5200 s Left or Right button and tap the...

Page 37: ... You will be able to choose from a list of preprogrammed templates with or wit hout Marantz RC codes A drop down scrollable list will appear As you scroll down the list you will notice Device type dividers and devices you can add Only select Device Templates to ADD Although it is possible to ADD the Device Type Divider as a Device it is not useful Should you acci dentally Add a divider to your dev...

Page 38: ...and TUNERS Since you typically use the two sections of your Marantz receiver at different times we have separated them into two devices You will find the amp section in AMPS and the Tuner section in TUNERS Marantz constantly updates the templates for new models so your remote may show considerably more models than we show here The Marantz SR14EX Receiver is actually two templates The SR14EX AMP te...

Page 39: ...the device name Status If you add additional Status devices they will be named Status2 Status3 Status4 and so on Each panel is named according to its numbered position 1 5 etc so that if you are edi ting a macro you will know which panel you have jumped to Help This template is used to create a Help List that will help users through a multiple step process that cannot be reliably pro grammed as a ...

Page 40: ...reating a New Device Step by Step 1 Make sure the device tab is active The device tab is active when the name of a device is displayed 2 Switch to Add mode via the Mode button The RC9200 5200 displays the following choices Create New Device Copy Existing Device Restore Deleted Device 3 Tap the device you want to add in the Device menu 4 You can add the device with or without RC codes Create with R...

Page 41: ...y on the Home panel is issu ed when the TV device is selected Restore Deleted Device Use this option to restore a device you have deleted Adding Macro Groups Macro Groups can be added three ways with the same procedures as described for Device Groups on page 38 Create New Group Copy Existing Group Restore Deleted Group However should you choose Create New Group there is not a long list of macro te...

Page 42: ...l panel buttons and actions associated with a direct access or a Left Right button You can also delete Device menu items and Macro menu items Home menu buttons cannot be deleted directly You have to delete them via the Device menu Deleting a button or button action Note Borderless buttons frames such as the greeting on the home panel cannot be deleted You can only hide them by deleting all of the ...

Page 43: ...ton labels change into Group 3 Press and hold down the Left or Right button depending on what you are deleting Left button labeled Device For deleting a device in the Device menu Right button labeled Action For deleting an action from an item in the Device menu Left button labeled Group For deleting a macro group 4 Tap the menu item you want to delete 5 Tap Delete Device or Delete Macro Group The ...

Page 44: ...up Reteaching Control panel buttons 1 Switch to LEARN mode via the Mode button The deleted buttons become visible 2 Complete steps 3 to 7 in Programming control panel buttons on page 16 The button reappears Restoring Device or Macro menu items 1 Make sure the device tab or macro tab is active The device or macro tab is active when the name of a device or macro is displayed 2 Switch to Add mode via...

Page 45: ... is typi cally the preamp receiver s source selection or input command GO TV Main A Go command indi cates a panel jump In this case TV means a jump to the TV device group and Main is the name for the particular panel sometimes panels just have numbers not names TV External Input When a device name and a button name are listed that particular button s IR command will be issued DVD A device name and...

Page 46: ... button you want to use for your macro 5 Enter the sequence of commands you want to record You can navigate to whatever control panel you want just as you do in Use mode 6 Tap the Macro menu button The contents of the macro appear You can now play edit or close the macro 7 Press the Left button to close the macro A confirmation screen appears where you can save or cancel the macro 8 Tap Save and a...

Page 47: ...to a device control panel To jump to any device panel first navigate to the device you want using the Device menu then select the exact device panel you want using the scroll arrows not the tab buttons then open the Device menu hold down the Left hard button labeled Device and tap the device you want After you ve recorded a jump check your Edit window You ll see that you recorded both a jump and a...

Page 48: ...y to be used Organizing macros into groups You can create as many macro groups as you like Each group can contain up to 25 macros 1 Open any macro group 2 Switch to Add mode via the Mode button You can create a new group copy an existing group or restore a previous deleted group Create a new group You add a new group in which you can record new macros Copy an existing group You copy a group and it...

Page 49: ... RF signals instead of IR signals RF signals have an operating distance of approximately 20 meters 66 feet in house and can unlike IR signals go through obstacles like furniture or walls The RF signals sent out by the Remote Control are picked up by the RF 77 RF Extender The RF Extender translates the RF signals in IR signals and sends the IR signals to the appropriate device Therefore the RF Exte...

Page 50: ... currently operated with IR signals 4 Tap RF The RF IR settings for the selected device are changed from IR to RF When you have several RF Extenders to operate devices you have to assign the correct Extender ID to the selected device Continue with Step 5 or When you have only one RF Extender you can accept the default settings for the Extender ID and the Channel Skip to step 7 Note The ID on the R...

Page 51: ...e RF interference or unreliable operation you should try choosing another channel to operate your devices Note All devices you want to operate with RF signals use the same channel If you choose another channel for one device the Remote Control will automatically change the channel for all devices that work with RF signals 1 Switch back to RF IR mode The Device menu appears 2 Select a device that i...

Page 52: ...ations to and from your Remote Control You do this with the serial cable included with your Remote Control connected to the serial port on the side of the remote Add delete modify and move control panels devices and com mands anywhere on the touchscreen Save duplicate and share configuration files codes or devices with other Remote Controls Preview new configuration files on RC9200 5200 Emulator I...

Page 53: ... shows using your own photos or art When you become familiar with Touch Screen Setup you can achieve results like these Internet Fun A community of enthusiasts helping each other to learn how to use PC s to configure their remote controls exists at www remotecentral com System requirements Windows 95 98 2000 or NT 4 0 16 MB of RAM 16 MB of free hard disk space Free serial portng By Conrad Jacobson...

Page 54: ...re the RC9200 5200 s sending eye is pointed towards the device you re operating Check if the Low Battery icon is flashing If so replace the batte ries or recharge the battery pack Check if the button you are trying to use is programmed proper ly see page 18 Check if your device understands these particular Marantz infra red codes Re add the device group with the correct model num ber see page 36 T...

Page 55: ...0 5200 under bright fluorescent light it might affect the infrared signals Make sure the button you want to edit has a border Text frames cannot be programmed with commands The RC9200 5200 won t switch modes When the batteries are low the RC9200 5200 prevents you from switching to customizing modes so that no customization can get lost Recharge the battery pack see page 3 The RC9200 5200 is low on...

Page 56: ...ersion Tip The bulletin boards and friendly users at www remotecentral com can often give you help with problems on weekends or in eve nings when your dealer or Marantz technical support may not be available Recharging Problems The batteries won t recharge Make sure you are using the rechargeable battery pack included with your recharging dock and not the AA batteries The indicator light flashes C...

Page 57: ... RC9200 5200 restarts and beeps to indicate it is ready for use Can I revert to the original configuration Yes by using a Windows PC with Touch Screen Setup Once the program is installed open a ccf titled RC9200 5200_Default in C Program Files Touch Screen Setup Samples Downloading this configuration to your RC9200 5200 will restore your RC9200 5200 to its factory state How can I free up more memo...

Page 58: ...change is made to the configuration a label a delay in a macro or one new code has been learned Should the button be greyed out make a change to the configuration and then use revert How do I calibrate the touchscreen The RC9200 5200 is calibrated when it leaves the factory so nor mally you do not have to calibrate it yourself It is possible that the RC9200 5200 displays a message to calibrate the...

Page 59: ...speed Eject Open Close Record general Key Lock Navigate in the direction of the arrow Still mode Freeze Frame Autoreverse a tape Tape running direction Next track Next chapter Next song Previous track Previous chapter Previous song Fast forward to index Rewind to index Frame by frame general Frame by frame general Subtitle Cancel picture Picture in picture mode Menu Picture in picture shift Pictur...

Page 60: ...it selection Brightness brilliance Contrast Brightness contrast Color saturation Lamp lighting illumination Split screen freeze double screen freeze Split screen swap double screen swap Split screen double screen Movie expand Personal preference Picture in picture freeze Main index page Picture freeze Programmable timer general Tracking Application assistance Actual time on screen EPG Electronic P...

Page 61: ... of up to 56 KHz with the exception that most Bang Olufsen commands at 455 KHz can also be succesfully learned Learning distance 2 5 cm 1 inch up to 100 cm 3 feet Memory 2MB RC5200 8 MB RC9200 non volatile flash memory memory is kept with no battery 512 K SRAM Batteries 4 8 V rechargeable battery pack Radio Operating distance of approx 20 m depends on the surrounding frequency condition Carrier fr...

Page 62: ...200 5200 the RC codes of your existing remote controls The following popu lar Marantz codes are included TV Marantz PV6080 5580 CD Marantz CC3000 CC4000 DVD Marantz DV 18 DV7000 CDR Marantz DR 17 DR 17II Tuner Marantz ST 17 VCR Marantz MV 880 Tape Marantz SD4050 AMP SR18 AV9000 Restoring The Default Marantz File Via PC You can restore the default Marantz configuration on any Windows PC with intern...

Page 63: ...de 15 Switch Modes 16 F Free Memory 13 G GO 43 H Help Lists Programming 22 Home Buttons 9 Home Theater Operation 20 Home 7 macros from a home but ton 26 J Jump Capabilities 23 Jump To A Device Group 8 Without Changing Inputs 9 Jump to a Macro Group 8 L Label Mode 16 Switch Modes 16 LCD Timeout 14 Learn Mode 15 Switch Modes 16 Learning 18 Left menu bar 8 M Macro Menu Bar 3 Macro Tips 21 Macro Panel...

Page 64: ... Planning Help Lists 20 Planning Macros 20 Power Macros 21 Programming Buttons 28 Help Lists 22 R Revert 14 right menu bar 8 S Scroll Arrows 3 10 in macros 26 Scroll TV Inputs Command 21 Selecting Source Macros 21 Sending Eye 2 Serial Port 2 Setup Panels 13 Show Hide Device 14 Show Hide Macro 14 Specifications 59 Switch Modes 16 Symbols 57 T TabButtons 11 Teaching 18 Toggle Type Commands 21 Touchs...
Page 65: ...the technical information listed on the Info panel To view this information follow these steps 1 In Use mode navigate to the HOME panel by touching the Home button 2 Touch the INFO icon to display the INFO screen 3 When you wish to return to USE mode tap the INFO icon again Updates and New Products For news about updates and new products please visit us on the World Wide Web at http www marantz co...

Page 66: ......

Page 67: ......

Page 68: ...Printed in the USA ...

Reviews: