background image

ENGLISH

1

Get
ting

 Star

ted

Connections

Pla
ybac

k
Tr

oubleshooting

Specifications

Get
ting

 Star

ted

Getting started

Thank you for purchasing this marantz product. To ensure proper 
operation, please read this owner’s manual carefully before using the 
product. 
After reading them, be sure to keep them for future reference.

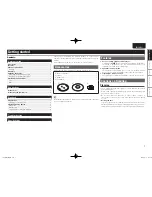
Accessories

Check that the following parts are supplied with the product.

q

 Owner’s manual ...................................................................... 1

w

 Platter ...................................................................................... 1

e

 Rubber mat .............................................................................. 1

r

 EP adapter ............................................................................... 1

w

e

r

Note that the illustrations in this instructions may differ from the actual 
set for explanation purposes.

Features

1.  Easy-to-operate, fully automatic player

Simply press 

START

 button to start playing an analog record. When 

the record is finished the tone arm automatically returns to its 
original position and the turntable stops.

2.  Equalizer switch provided

The equalizer switch enables you to connect to a variety of audio 
devices such as pre-main amplifiers and radio cassette players.

3.  Lightweight, compact design

The lightweight, compact design makes it easy to use anywhere.

Cautions on Handling

Cleaning

• Use a wiping cloth and wipe lightly to remove dirt from the cabinet 

and operation panel.
When using chemically treated cloths, follow the precautions that 
have been written for them.

• Do not use benzene, thinners, or other organic solvents or 

insecticides on the unit since they may cause a change in quality 
or color.

• 

Moving the unit

To prevent short-circuits or damaged wires in the connection cables, 
always unplug the power supply cord and disconnect the connection 
cables between all other audio components when moving the unit.

Accessories

 ····················································································1

Features

 ·························································································1

Cautions on Handling

 ···································································1

Cleaning ························································································1

Assembly

 ·······················································································2

Changing the Stylus

 ·····································································2

Removing the Replaceable Stylus ················································2
Mounting the Replaceable Stylus ·················································2

Part Names and Functions

 ···························································3

Front ·····························································································3
Rear ······························································································3

Contents

Connections

 ·············································································4

Connections

 ···················································································4

Connecting the Power Cord

 ·························································4

Playback

 ·····················································································5

Preparations

 ··················································································5

Preparing to Play a Record ····························································5

Playing an Analog Record

 ····························································5

Auto Start······················································································5
Manual Start ·················································································5
Stopping a Record During Playback ··············································5

Getting started

 ·······································································1

Troubleshooting

·····································································6

Specifications

 ··········································································6

1.TT5005N_ENG_NEW.indd   1

2012/04/13   16:47:26

Summary of Contents for TT5005

Page 1: ...Owner s Manual Turntable TT5005 SVENSKA ENGLISH DEUTSCH FRANÇAIS ITALIANO ESPAÑOL NEDERLANDS РУССКИЙ POLSKI 1 TT5005N_ENG_NEW indd 1 2012 04 13 16 47 25 ...

Page 2: ...in the literature accompanying the appliance WARNING TO REDUCE THE RISK OF FIRE OR ELECTRIC SHOCK DO NOT EXPOSE THIS APPLIANCE TO RAIN OR MOISTURE CAUTION To completely disconnect this product from the mains disconnect the plug from the wall socket outlet The mains plug is used to completely interrupt the power supply to the unit and must be within easy access by the user VORSICHT Um dieses Gerät ...

Page 3: ...gua y polvo Desconecte el cordón de energía cuando no utilice el equipo por mucho tiempo No obstruya los orificios de ventilación No deje objetos extraños dentro del equipo No permita el contacto de insecticidas gasolina y diluyentes con el equipo Nunca desarme o modifique el equipo de ninguna manera La ventilación no debe quedar obstruida por haberse cubierto las aperturas con objetos como periód...

Page 4: ...rirle ma smaltirle conformemente alla normativa locale sui rifiuti chimici Questo prodotto e gli accessori inclusi nell imballaggio sono applicabili alla direttiva RAEE ad eccezione delle batterie ACERCA DEL RECICLAJE Los materiales de embalaje de este producto son reciclables y se pueden volver a utilizar Disponga de estos materiales siguiendo los reglamentos de reciclaje de su localidad Cuando s...

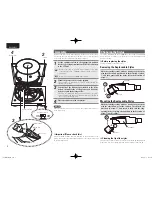
Page 5: ...ight compact design The lightweight compact design makes it easy to use anywhere Cautions on Handling Cleaning Use a wiping cloth and wipe lightly to remove dirt from the cabinet and operation panel When using chemically treated cloths follow the precautions that have been written for them Do not use benzene thinners or other organic solvents or insecticides on the unit since they may cause a chan...

Page 6: ...ve the ribbon tape after hooking the belt onto the roller Turn the platter by hand until the drive belt is positioned at the center of the driving roller 4 Place the rubber mat on the platter NOTE If the equalizer switch is not set correctly the sound will be extremely weak or distorted Changing the Stylus The stylus supplied with the TT5005 has a life of approximately 400 hours Be sure to replace...

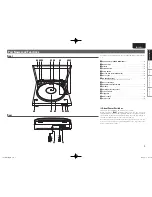
Page 7: ...us 5 Q3Tone arm rest Q4Finger lift 5 Q5Audio cable 4 Q6Power cord 4 Q5 Q6 Front Rear Getting Started n nAbout Power Switches This unit is not equipped with a main power switch When you press START automatic play or move the tone arm manual play the power is automatically turned on and this unit starts its operation When this unit finishes playing the tone arm returns to the arm rest and the power ...

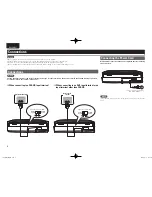
Page 8: ...an input terminal other than PHONO n nWhen connecting to a PHONO input terminal Amplifier Mini stereo system OFF ON Equalizer switch OFF OFF ON Equalizer switch ON Connections Connections NOTE Set the equalizer switch to the correct setting for the type of input terminal on the device to which the TT5005 is being connected For details refer to Assembly vpage 2 Connecting the Power Cord Wait until ...

Page 9: ...r lift move the tone arm to the position at which you want to start playing and lower it carefully When the record is finished the tone arm returns to its original position and the turntable stops automatically Auto return function NOTE Be careful not to scratch the record when moving the tone arm Do not touch the tone arm or turntable or turn off the power while a record is playing Doing so can d...

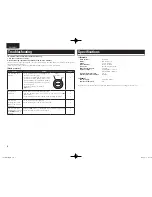
Page 10: ... cable connected properly Has the amplifier been set correctly for use with the TT5005 audio cable Is the replaceable stylus mounted in the cartridge properly 4 4 2 The sound is scratchy the stylus skips or the sound is distorted Is the stylus or the record dirty Is the stylus worn or the record scratched 2 2 The tone arm does not move even when the START button is pressed Is the TT5005 s power co...

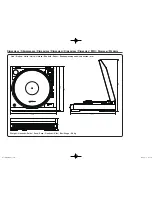
Page 11: ...imensions Dimensies Mått Размеры Wymiary Unit Einheit Unité Unità Unidad Eenheid Enhet Единицы измерения Jednostka mm 410 357 97 349 360 355 Weight Gewicht Poids Peso Peso Gewicht Vikt Вес Waga 2 8 kg 10 TT5005N_Backpage indd 1 2012 04 13 16 50 07 ...

Page 12: ...D M Holdings Inc Printed in China 5411 10893 00AM V00 10 TT5005N_Backpage indd 2 2012 04 13 16 50 07 ...

Reviews: