background image

Cod:0040305734

MER245

W | MER245SS

Congratulations on the purchase of your new 

Marathon Electric Range

!

To activate your Warranty, please register your appliance at 

www.stirlingmarathon.com


or by completing and mailing the enclosed Warranty Registration Card. We are confident


you will have years of hassle free enjoyment and ask that you please retain the Use & Care 
Guide for future reference and your safety.

Before installing please, read your Use & Care guide carefully and pay special attention


to the Safety & Warning information outlined in the following pages.

For immediate assistance: 1-844-309-9777 

www.stirlingmarathon.com

Smooth Top Electric Range

Summary of Contents for MER245SS

Page 1: ...sed Warranty Registration Card We are confident you will have years of hassle free enjoyment and ask that you please retain the Use Care Guide for future reference and your safety Before installing pl...

Page 2: ...w appliance Your appliance must be correctly installed as detailed in this Manual in order to avoid the risk of fire electrical shock or injury WARNING For your safety this appliance should never be u...

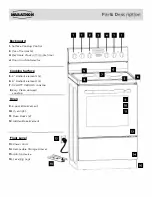
Page 3: ...oking Surface 5 6 Radiant elements 2 6 8 Radiant elements 2 7 SCHOTT CERAN cooktop 8 Easy Clean upswept cooktop Oven 9 6 pass Broil Element 10 Oven light 11 Oven Racks 2 12 Hidden Bake Element Floor L...

Page 4: ...y become dangerous to use Do not carry out cleaning or maintenance operations on the appliance without having previously disconnected it from the electric power supply After use ensure that the knobs...

Page 5: ...f cook top should break cleaning solutions and spillovers may penetrate the broken cook top and create a risk of electric shock Contact a qualified technician immediately Clean Cook top With Caution I...

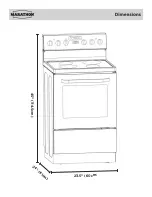
Page 6: ...45 114 5cm 24 61cm 23 5 60cm...

Page 7: ...th a CSA International Certified Power Cord intended to be plugged into a standard 14 50R wall receptacle Be sure the wall receptacle is within reach of range s final location The range must be connec...

Page 8: ...MARATHON 20 inch min 500mm Installation Dimensions Guide 13 inch max 330 mm C E 5 E N 0 0 i t ____ 24inch 608 mm 3 inch 76 mm...

Page 9: ...o the range and structure per installation instructions Engage the range to the Anti tip bracket installed on the structure Re engage the anti tip bracket if the range is removed Failure to follow the...

Page 10: ...the oven bottom This makes the bottom of the oven interior easier to clean and provides an even heat when baking BROIL uses the upper heating element only to provide high heat projected downwards to c...

Page 11: ...ss the timer button you will hear a beep and the LED timer indicator and display will flash Use the up and down arrows to set the timer length Once finished press the timer button again and you will h...

Page 12: ...switch o the oven turn the thermostat control to the OFF setting position and turn the Oven function selector to OFF Temperature in F Temperature in C 200 93 250 121 300 149 350 177 400 204 450 232 50...

Page 13: ...ibility when broiling When broiling only the upper element is switched ON Use with the oven door closed and the note that the thermostat can be set from 200 to 500 F even on BROIL setting For best bro...

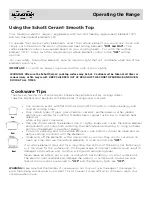
Page 14: ...nt is a waste of energy To avoid spattering and to maximize efficiency pan bottoms should be clean and dry before coming in contact with the elements Wipe spills off the elements with a damp cloth as...

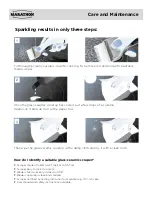
Page 15: ...sure your new glass ceramic cooktop lasts here are a few important tips USEFUL CARE TIPS Clean your SCHOTT CERAN glassceramic cooktop regularly preferably every time you use it Avoid using abrasive s...

Page 16: ...mic cooktop with a damp cloth and dry it with a clean cloth How do I identify a suitable glass ceramic scraper Scraper made of metal won t melt or catch fire Scraper easy to lock to unlock Blade is fi...

Page 17: ...ise the door upward towards the closed position to withdraw the lower hinge pins from their position Rest the door face down on a soft but sturdy surface To re install the door repeat the steps above...

Page 18: ...ew one suitable for high temperature 300 C 570 C having the same specifications 240V 60Hz 25W G9 Replace the protective cover NOTE Please note the oven light turns on and stays on when using the BAKE...

Page 19: ...g the knob to wrong direction Light bulb is loose or defective Switch operating oven light is broken You have blown a household fuse or tripped a circuit breaker You have note set the oven function kn...

Page 20: ...the evaporator system due to improper defrosting of the unit Service or Repairs by unauthorized service technicians Service calls that do not involve defects in material and workmanship such as instr...

Reviews: