background image

11

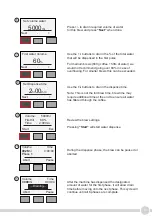
Set volume water

Next            -             +

5000

ml

First water Volume

Next            -             +

   60

%

Use the +/- buttons to dial in the % of the total water 

that will be dispensed in the first pulse.

For medium brews (800g 5ltrs of water) we 

would not recommend going over 60% in case of 

overflowing. For smaller brews this can be exceeded.

Press +/- to dial in required volume of water 

for this brew and press 

“Next”

 when done.

Set Dispense time

Next            -             +

2

hr

00

min

Use the 

+/- 

buttons to dial in the dispense time.

Note: This is not the full brew time, brew time may 

require additional time at the end to ensure all water 

has filtered through the coffee.

Volume :      5000ml

First fill  :     60%

Time      :   2:00min

Start                         Esc

Review the brew settings.

Pressing

 “Start” 

will start water dispense.

Volume        :          Time

0026

ml        :       0:00:04

Phase 


Abort                    Pause

During the dispense phase, the brew can be paused or 

aborted.

Abort                    Pause

Volume        :          Time

3000

ml        :       0:03:04


---Draining---

After the machine has dispensed the designated 

amount of water for the first phase, it will allow drain 

time before moving onto the next phase. This cycle will 

continue until all 6 phases are complete.

6

7

8

9

10

11

Summary of Contents for 1000950

Page 1: ...1 ColdBRU Instruction Manual 1900950 Machine P N 1000950...

Page 2: ...5 Maintenance 5 Hazards 6 3 Installation 7 Connecting the ColdBRU to water 7 Connecting the ColdBRU to power 7 4 Setup 8 Calibrate the machine 8 Create your own recipe 8 Prepare ColdBRU for Brewing 9...

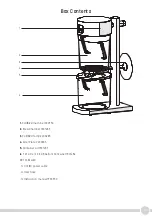
Page 3: ...hamber 1801489 3 ColdBRU Tamp 2200638 4 Filter Plate 2200635 5 Container Lid 1801487 6 7 67 Litre 2 03 US Gallon Container 1801486 NOT LABELLED 1x C13 IEC power cable 1x Inlet hose 1x Instruction manu...

Page 4: ...is not in use e g overnight etc If a non fixed water connection is implemented use only the water hose provided with the appliance alternatively if a fixed water connection is used it must be impleme...

Page 5: ...1MPa Fit a stop valve on a cold water line and attach a 9 16 24 UNEF 3 8 Compression Threads Turn on the water to flush any impurities dust etc from the inlet hose and water pipe Allow several litres...

Page 6: ...technical service assistance Use of the machine in these conditions could cause fires or electric shocks ATTENTION If the equipment is installed in a kitchen European Standard EN 60335 2 75 specifies...

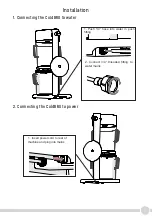
Page 7: ...1 Connecting the ColdBRU to water 2 Connecting the ColdBRU to power 1 Insert power cord to rear of machine and plug into mains 2 Connect 3 4 threaded fitting to water mains 1 Push 1 4 hose into water...

Page 8: ...e suggest starting with a medium sized brew and adjusting based on your results If you achieve less than this you should repeat the brew grinding finer or increasing the coffee dose to create a deeper...

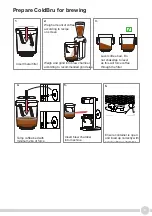
Page 9: ...not shake tap to level as this will force coffee through the filter Tamp coffee bed with minimum 2kg of force Ensure container is open and lined up correctly with nozzle of brew chamber Insert brew ch...

Page 10: ...ory select New Select Brewing Method Record Preset Select Preset mode Method 1 Create new brew Note The Preset Brew option dispenses the desired water volume over 6 separate phases Each phase consists...

Page 11: ...dispense time Note This is not the full brew time brew time may require additional time at the end to ensure all water has filtered through the coffee Volume 5000ml First fill 60 Time 2 00min Start E...

Page 12: ...12 Esc DISPENSE CYCLE COMPLETE Once all phases of the brew have been completed a message will appear on screen informing the user Press Esc to move to next screen 12...

Page 13: ...ed grind setting Next Step 2 Tamp the coffee Next Step 3 Insert Brew chanber into the machine Follow on screen prompt Follow on screen prompt Follow on screen prompt 1 2 3 4 5 Start Esc Press Start an...

Page 14: ...e press Start to commence second water dispense This cycle continues through a maximum of 12 phases Pressing Esc will give you the option to exit and save the brew if you are satisfied with the result...

Page 15: ...ile B NEWFILE2 File C NEWFILE3 Select the file you want to access File A NEWFILE1 Name NEWFILE2 Volume 05000ml First Fill 060 Start Edit Next Screen displays the file information Pressing Start will S...

Page 16: ...ION Option will be given to view the selected brew data before beiginning brew Pressing No will skip the brew data and prompt you to start the brew Pressing Yes will bring you to the brew data Esc Nex...

Page 17: ...ished and not just the dispense process Check container is filled to desired level Remove brew chamber Dump puck When using with POUR D connect tubing to lid Ensure bottom tube goes all the way to bot...

Page 18: ...18 Unclip to remove filter for cleaning All parts above can be cleaned in a dishwasher 1 2 Cleaning 3 Wipe down body with damp cloth...

Page 19: ...e more water at the start Not enough coffee concentrate Use more water If strength is acceptable scale up brew increase both amount of grinds and amount of water Try a coarser grind Leave to drain for...

Page 20: ...20 Marco Beverage Systems Limited 63d Heather Road Sandyford Industrial Estate Dublin 18 t 353 0 1 295 2674 f 353 0 1 295 3715 e sales marco ie www marcobeveragesystems com NSF ANSI 4...

Reviews: