background image

Service manual April 2017 Qwikbrew 2 version 2 


Page 17 of 26


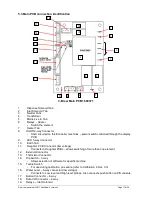
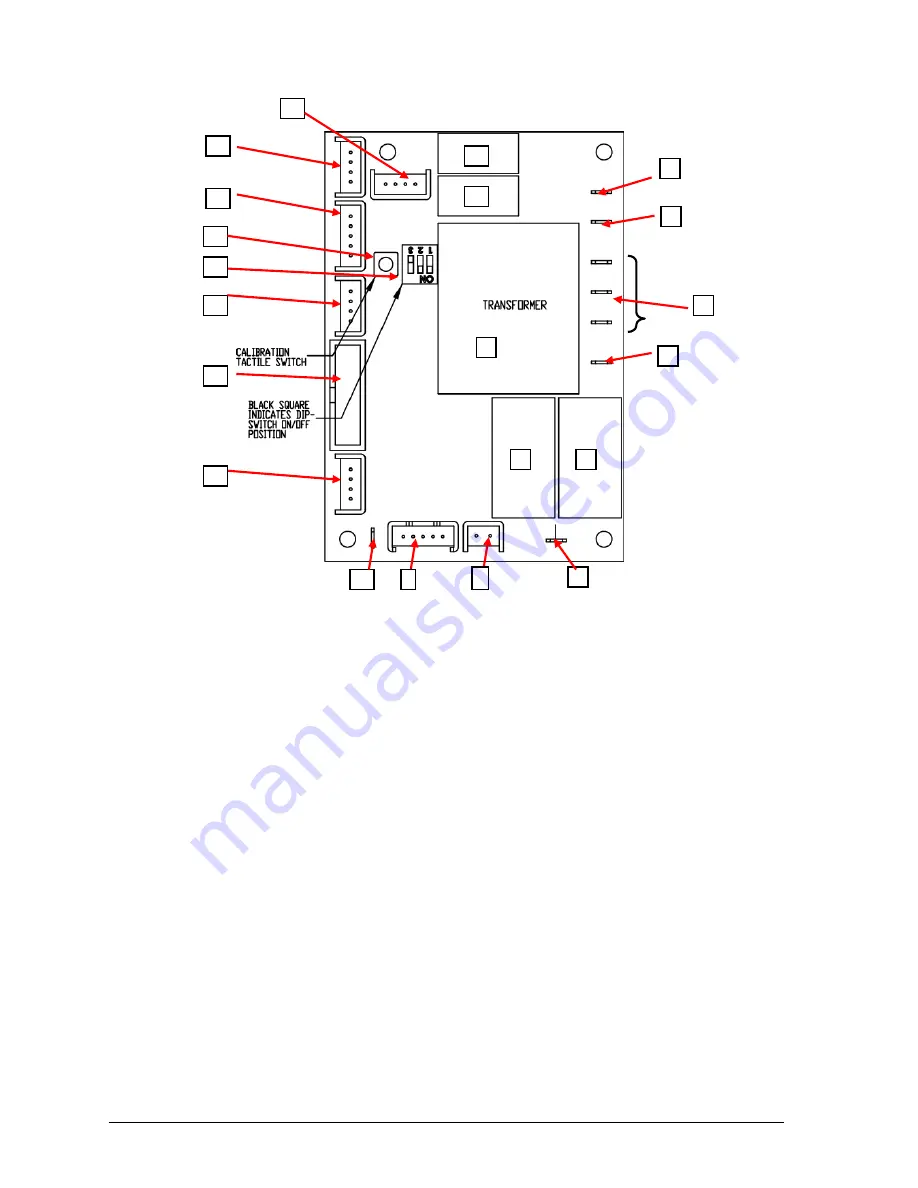
5.3 Main PCB connection identification 


3-Brew Main PCB 1600371 


1.       Dispense Solenoid Tab 
2.       Inlet Solenoid Tab 
3.       Neutral Tabs 
4.       Transformer 
5.       Mains Live In Tab 
6.        Relays  - Heater  


Switch the element 

7.       Heater Tab 
8.       On/Off 2-way Connector 


Short circuited on this Ecoboiler machines 

– power switch controlled through the display 

PCB 

9.        LED 5-way Connector 
10.       Earth Tab 
11.       Daughter PCB Connector (low voltage)  


Connects to Daughter PCBs 

– allows switching of more than one element 

12.      External Connector 
13.      Thermistor Connector 
14.      Dip Switch 

– 3 way 


Allows selection of software for specific machine 

15.      Tactile Switch 


For use during calibration procedure (refer to Calibration in Sec 3.3) 

16.      Water Level 

– 5-way connector (low voltage) 


Connects to Low level and High level probes. Also connects push button on PB variants. 

17.      Button Connector 

– 4-way 

18.      Data I/O Connector 

– 4-way 

19.      Relays 

– Inlet Solenoid 

16 

17 

11 

13 

14 

15 

19 

10 

12 

19 

18 

Summary of Contents for Qwikbrew 2 Twin

Page 1: ...wikbrew 2 Version 2 2004 onwards Marco Beverage Systems Ltd 63d Heather Road Sandyford Industrial Estate Dublin 18 Republic of Ireland Ireland Tel 01 295 2674 Ireland Fax 01 295 3715 UK Tel 0207 27445...

Page 2: ...peration 4 2 Brewing coffee 4 3 Brew calibration Instructions 4 4 Cleaning 4 5 Descaling 5 Technical data 5 1 Troubleshooting 5 2 Access to internal components 5 3 Main PCB connection and identificati...

Page 3: ...allation This manual is not a substitute for any safety instructions or technical data affixed to the machine or its packaging All information in this manual is current at the time of publication and...

Page 4: ...d before cleaning Allow to cool before putting on or taking off parts Do not operate any appliance with a damaged cord plugs or after the appliance malfunctions or has been damaged in any manner The u...

Page 5: ...BSP Food grade inlet hose supplied 5 50 psi 35 345 kPa Dimensions Height Height incl Cup Rail Width Depth Depth incl Drip Tray 705mm 775mm 365mm 440mm 575mm Qwikbrew 2 5 6kW Performance Coffee output...

Page 6: ...o close the stop valve when not in use for long periods e g weekends holidays For model 1000384 Push Button Rear Delivery there is an optional drain hose to allow urn to be emptied into a drain or con...

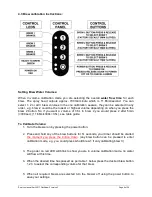
Page 7: ...flash momentarily 3 The machine will automatically take in water The Power On LED will begin to flash until water has passed safely above the elements 3 minutes 4 Heating will begin and the Power On L...

Page 8: ...ve pack sizes to suit the brews of your Qwikbrew 2 Depending on the coffee grind and roast and on water quality you may have to adjust these quantities to obtain the optimum flavour 4 Level off the su...

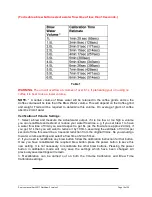
Page 9: ...would press 2 after 5min 300sec 11 66mlx300s 3 5L see table guide To Calibrate Volume 1 Turn the brewer on by pressing the power button 2 Press and hold any of the brew buttons for 5 seconds your time...

Page 10: ...d extend or reduce your water flow time e g if you set brew 1 to have a water flow time of 3min you would expect to get 6L as the flow rate is approx 2L min if you got 6 1L then you will want to reduc...

Page 11: ...front of the machine For machines with Push Button Delivery For model 1000384 Push Button Rear Delivery This model comes with an optional drain hose to allow the user to empty the Urn into a drain or...

Page 12: ...in hard water areas Marco can advise on suitable water treatment by contacting sales marco ie A service agent should descale the machine regularly Marco suggests that the machine be descaled every 3 m...

Page 13: ...th keyswitch capabilities Switch keylock 3 position 1501727 3 Basket complete 2300087 10 Tap Coffee 2100295 4 Urn Lid 2300350 11 Tap Hot Water 2100275 5 Panel Top Qwikbrew 2 1801531 12 Curved Panel 6...

Page 14: ...Probe High Level 2300300 22 Tee Plastic Overflow 1801250 16 Probe Low Level 2300320 23 Pump Nikkiso 1501540 17 Sight Glass 1700260 24 Inlet Solenoid Valve 1502190 18 Transformer 24V 220V 50VA 1502140...

Page 15: ...machine Remove the two mounting screws positioned in the plastic service panel near the tap spigots Pull the bottom of the plastic service panel away from the curved steel panel Push the service panel...

Page 16: ...Service manual April 2017 Qwikbrew 2 version 2 Page 16 of 26...

Page 17: ...Connector 10 Earth Tab 11 Daughter PCB Connector low voltage Connects to Daughter PCBs allows switching of more than one element 12 External Connector 13 Thermistor Connector 14 Dip Switch 3 way Allo...

Page 18: ...nected to the Brew Board PCB with an orange wire Brew Level Probe assembly 2300310 The brew level probe is mounted on the tank near to timer PCB and is connected to the Brew Board PCB with a red wire...

Page 19: ...Service manual April 2017 Qwikbrew 2 version 2 Page 19 of 26 Fig 1...

Page 20: ...Service manual April 2017 Qwikbrew 2 version 2 Page 20 of 26 5 6 WIRING DIAGRAM 2 8KW...

Page 21: ...Service manual April 2017 Qwikbrew 2 version 2 Page 21 of 26 5 6 WIRING DIAGRAM 5 6KW...

Page 22: ...Service manual April 2017 Qwikbrew 2 version 2 Page 22 of 26 5 7 PART LISTS QB2 P N1000379...

Page 23: ...Service manual April 2017 Qwikbrew 2 version 2 Page 23 of 26 5 7 PART LISTS QB2 P N1000379...

Page 24: ...Service manual April 2017 Qwikbrew 2 version 2 Page 24 of 26 5 7 PART LISTS QB2 P N1000379...

Page 25: ...Service manual April 2017 Qwikbrew 2 version 2 Page 25 of 26 5 8 PART LISTS QB2 TWIN P N1000495...

Page 26: ...Service manual April 2017 Qwikbrew 2 version 2 Page 26 of 26 5 8 PART LISTS QB2 TWIN P N1000495 MARCO is an ISO9001 2000 Registered Company...

Reviews: