background image

-E7-

-E8-

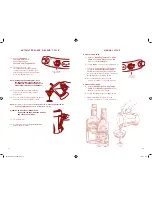
13.

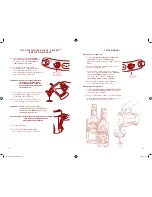
   Start the 

Automatic


Shave ’n Blend

™ 

Cycle


by pushing up on the  

Shave ’n Blend

™ 

Toggle Switch

.

14.

   The unit will shave ice for  

the appropriate time (based on the  

settings selected). The blender will  

start automatically. The unit will stop  

at the completion of the cycle. 

NOTE:  DURING THE SHAVE ‘N BLEND™ CYCLE  

THE PROGRESS INDICATOR LIGHTS WILL  
ILLUMINATE IN A SEQUENCE FROM LEFT TO  
RIGHT TO INDICATE THE CYCLE PROGRESS. 

15.

   The Power Indicator Light will blink  

to indicate the unit is ready to make  

more drinks.

16.

   To serve: With the Spiller Spoiler lid, there’s  

no need to remove the lid for serving.

NOTE:  

To remove excess ice from the 

Ice Reservoir 

hold the 

Shave Only Toggle Switch 

in the 

Shave Only 

position until the

 Ice Reservoir 

is empty

WARNING:  DO NOT PLACE FINGERS IN THE  

ICE HOPPER THE SHAVING BLADE IS SHARP  
AND COULD CAUSE INJURY. 

17.

  Turn off the unit. 

18.

   Periodically check the 

Ice Melt Reservoir 


and empty as needed. 

AUTOMATED SHAVE ’N BLEND

 CYCLE

Shave ’n Blend™ 

 Toggle Switch

Blend Only/

Shave Only 

Toggle Switch

MANUAL CYCLE

To make a thicker drink:
 

a. 

  Hold the 

“Blend Only/Shave Only” Toggle 

Switch

 in the 

Shave Only 

position to add 

more ice to the 

Blending Jar


b.

  To stop adding ice, release the toggle switch.


c. 

  To mix the newly added ice into the drink, 

hold the 

Blend Only/Shave Only Toggle 

Switch

 in the blend only position until the 

desired consistency is achieved. To stop the 

blending release the toggle switch.


d.

 Use less drink mixer than in recipe. 


(example: for 3 drinks, use 9 oz. liquid content)

To make a thinner drink:
 

a. 

  Hold the 

Blend Only/Shave Only Toggle 

Switch

 in the 

Blend Only position

 until the 

desired consistency is achieved.


b.

  To stop blending release the toggle switch.


c.

  Add more drink mixer than in recipe 


(example: for 3 drinks, use 10.5 oz. of total mix)

DM1946-000-033_16EFM1.indd   7-8

6/13/16   10:01

Summary of Contents for DM1946 Series

Page 1: ...667 8623 www margaritavillecargo ca 2016 Sunbeam Products Inc doing business as Jarden Consumer Solutions All rights reserved Distributed by Sunbeam Corporation Canada Limited doing business as Jarden...

Page 2: ...be used but must be used only when the appliance is not running 10 Blades are sharp handle carefully 11 The use of attachments including canning jars not recommended by the manufacturer may cause a ri...

Page 3: ...lade Creates forward action when blending drinks 14 Jar Base Designed with wide base for stability 15 Ice Reservoir Release Button Releases ice reservoir from unit 16 Ice Melt Reservoir Contains melte...

Page 4: ...Jar Lid Making frozen drinks 10 Replace Blending Jar Lid and return Blending Jar to Blending Base by pushing up on the Ice Chute with the Blending Jar and then placing it on the Blending Base 11 Set...

Page 5: ...HARP AND COULD CAUSE INJURY 17 Turn off the unit 18 Periodically check the Ice Melt Reservoir and empty as needed AUTOMATED SHAVE N BLEND CYCLE Shave n Blend Toggle Switch Blend Only Shave Only Toggle...

Page 6: ...otate clockwise Hand tighten only SHAVING BLADE SHAVING BLADE 3 Press the two Ice Hopper release catches and lift the Ice Hopper to remove 4 Turn the Shaving Blade Assembly Nut counter clockwise to th...

Page 7: ...able replacement may be made with a similar product of equal or greater value This is your exclusive warranty This warranty is valid for the original retail purchaser from the date of initial retail p...

Page 8: ...erv s Distribu e par Sunbeam Corporation Canada Limited faisant affaire sous le nom de Jarden Consumer Solutions 20 B Hereford Street Brampton Ontario L6Y 0M1 MargaritavilleMD est une marque d pos e d...

Page 9: ...anipulez les prudemment 11 L utilisation d accessoires y compris de bocaux conserves n tant pas formellement conseill s par le fabricant peut entra ner un risque de blessures corporelles 12 Ne vous se...

Page 10: ...3 Couteau Cr e un tourbillon qui m lange les consommations 14 Embase large base stabilisatrice 15 Bouton de d gagement du r servoir gla ons Lib re le r servoir 16 R servoir eau Recueille l eau de la f...

Page 11: ...levez le couvercle du pichet PR P ARATION DES BOISSONS GLAC Es 10 Remettez le couvercle du pichet replacez le pichet sur le socle pour ceci remontez la goulotte l aide du pichet puis posez ce dernier...

Page 12: ...BLESSER 17 teignez l appareil 18 V rifiez le r servoir eau de fonte de temps autre et videz le au besoin CYCLE AUTOMATIQUE SHAVE N BLENDMC RABOTER M LANGER Interrupteur bascule pour raboter m langer I...

Page 13: ...AME RABOTEUSE 3 Pressez les deux loquets de d gagement de la tr mie et levez celle ci pour la retirer 4 Tournez l crou d assemblage de la lame raboteuse en sens antihoraire gauche et enlevez le puis r...

Page 14: ...stitue votre garantie exclusive Cette garantie est valide pour l acheteur initial du produit la date d achat initiale et ne peut tre transf r e Conservez votre facture d achat originale La preuve d ac...

Reviews: