65
2. Suction basket assembly
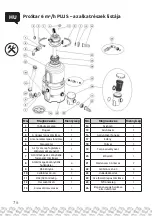
Connect the bottom of the suction basket to the suction basket itself by clicking 6
locks around its circumference. Insert the suction pipe (FIG. 2.1) into the complete
suction basket. Place the unit in an empty container (FIG. 2.2) and fix its position
by fitting a hopper (FIG. 2.3). The container is now ready to be filled with sand.
3. Sand filling
We recommend to place the container on a base with a pump before filling the
sand. Handling a full container is difficult. Align the side slots in the container with
the slots in the base; the drain fitting must point away from the switch (FIG. 3.1).
With the hopper fitted, fill the container with the required amount of sand (FIG.
3.2). The sand level in the container should reach the top of the side slots (FIG.
3.3). Now draw out the hopper and remove grains of sand or other impurities
from the sealing surface of the container neck.
4. Installation of multi-port valve
Insert the O-ring seal from below the valve and place it on the neck of the filled
container. Turn the valve so that its PUMP neck is oriented in the same direction
as the pump outlet in the vessel figure. Then place both halves of the sleeve on
the container and valve fitting; connect the screws (FIG. 4.3), and tighten them
evenly.
Insert a small rubber seal into the manometer hole; screw on the manometer
body (FIG. 4.1) and tighten lightly by hand.
!!! Pay special attention to correct screwing, fine thread may be damaged !!!
Screw the plug with seal (FIG. 4.2) onto the WASTE neck.
5. Installation of connecting hose
Slide the clamping clips on the hose; insert the elbows together with the cap
nuts into both ends of the hose (FIG. 5.1). Insert a grid against intrusion of solids
into the side outlet of the pump (FIG. 5.2); then connect the prepared hose to
this outlet and to the PUMP valve neck using cap nuts and seals (FIG. 5.3).
!!! Tighten the hose clips only after tightening the cap nuts !!!
6. Installation of pre-filter and pins
Mount the transparent pre-filter on the suction connection of the pump and
then the connecting hose pin (FIG. 6.1).
!!! Pay attention to the shape of the shaped seal used !!!
7. 7.A For ProStar 6 m
3
/h PLUS filtration with a large pre-filter, proceed as follows:
Slide the body of the pre-filter together with the seal onto the pump neck and
fasten by means of the cap nut inside the pre-filter; insert the basket for im-
purities into the pre-filter and close with the lid containing O-ring. Mount the
connecting pins on the neck using a cap nut (FIG. 6.2).
!!! Pay attention to the shape of the seal used !!!
Screw the second connecting hose pin onto the POOL valve neck (FIG. 6.3).
8. Connecting the device to the pool - see FIG. 7.1, FIG. 7.2
Connect the device to the pool using suitable pool hoses and hose clips.
EN
Summary of Contents for 10604267
Page 15: ...15 CZ Kontakty www marimex cz Zákaznické centrum tel 261 222 111 e mail info marimex cz ...
Page 71: ...71 EN Contact www marimex cz Custome Centre tel 420 261 222 111 zakaznickecentrum marimex cz ...
Page 86: ...86 1 1 1 2 1 3 1 4 1 5 2 1 2 2 2 3 3 1 3 2 3 3 4 1 ...
Page 87: ...87 4 2 4 3 5 1 5 2 5 3 6 1 6 2 6 3 7 1 7 2 ...
Page 88: ...88 8 1 8 2 9 3 10 1 10 2 9 1 9 2 12 1 12 2 ...
Page 91: ......
Page 92: ......


