background image

Exploded View

11

Summary of Contents for XM-7630

Page 1: ...Owner s Manual 8 09 XM 7630 ADJUSTABLE DUMBBELL BENCH ...

Page 2: ...Table Of Contents 3 4 5 9 11 Important Safety Information Before You Start Assembly Parts List Exploded View 2 10 ...

Page 3: ... read the Owner s Manual and are familiar with safety information and precautions This unit should only be used on a level surface and is intended for indoor use only XMARK Fitness recommends an equipment mat be placed under the unit to protect the floor or carpet and for easier cleaning Wear comfortable good quality walking or running shoes and appropriate cloth ing Do not use this unit with bare...

Page 4: ... unit a part of your exercise program XMARK Fitness assures the very best in value appearance durability and biomechanics XMARK FITNESS SERIES This manual will guide you through the assembly process If at any time you are having trouble with the assembly or use of this product then please contact us at ourXMARK Fitness help line We have trained service technicians on site to take care of you our v...

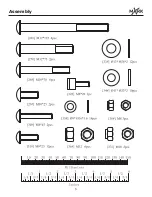
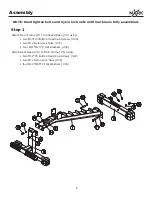
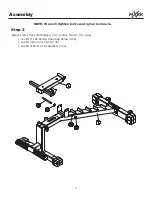
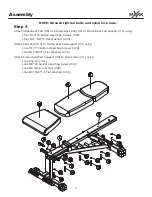
Page 5: ...Assembly 5 ...

Page 6: ...ed Step 1 Attach Main Frame 1 to Shaped Base 3 using two M10 25 Button Head Cap Screws 29 two M12 Nylon lock Nuts 37 four Φ11 Φ23 2 Flat Washers 34 Attach Rear Base 2 to Main Frame 1 using two M12 75 Button Head Cap Screws 27 two M12 Nylon Lock Nuts 36 four Φ13 Φ26 2 Flat Washers 33 6 ...

Page 7: ...mbly Step 2 Attach Frame Seat Pad Support 4 to Main Frame 1 using one M12 125 Button Head Cap Screw 26 one M12 Nylon lock Nut 36 two Φ13 Φ26 2 Flat Washers 33 NOTE Wrench tighten bolts and nylon lock nuts 7 ...

Page 8: ...ton Head Cap Screw 26 one M12 Nylon Lock Nut 36 two Φ13 Φ26 2 Flat Washers 33 Attach Frame Adjustable Back Pad 6 to Frame Back Pad Support 5 using one M12 125 Button Head Cap Screw 26 one M12 Nylon Lock Nut 36 two Φ13 Φ26 2 Flat Washers 33 NOTE Wrench tighten bolts and nylon lock nuts 8 ...

Page 9: ... 2 Flat Washers 34 Attach Seat Pad 10 to Frame Seat Pad Support 4 using two M10 70 Button Head Cap Screws 28 two Φ11 Φ23 2 Flat Washers 34 Attach Frame Seat Pad Support 4 to Main Frame 1 using one Pop Pin 11 one M8 20 Socket Head Cap Screw 32 one M8 Nylon Lock Nut 38 two Φ9 Φ16 1 6 Flat Washers 35 NOTE Wrench tighten bolts and nylon lock nuts 9 ...

Page 10: ...Seat Pad Support Frame Back Pad Support Frame Adjustable Back Pad Nylon Spacer Upper Back Pad Lower Back Pad Seat Pad Pop Pin Small Grips Iron Bushing 25 12 2 8 Foot Sleeve Plug Plug 40 80 Plug 50 8 76 2 Foot Cap 2 Right 50 8 76 2 XM Series Foot Cap Left 50 8 76 2 XM Series Foot Cap Right 50 8 XM Series Foot Cap Left 50 8 XM Series Rubber Pad Wheel Spacer Non Skid Pid Button Head Cap Screw M12 125...

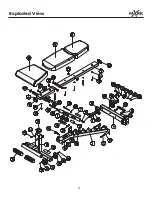
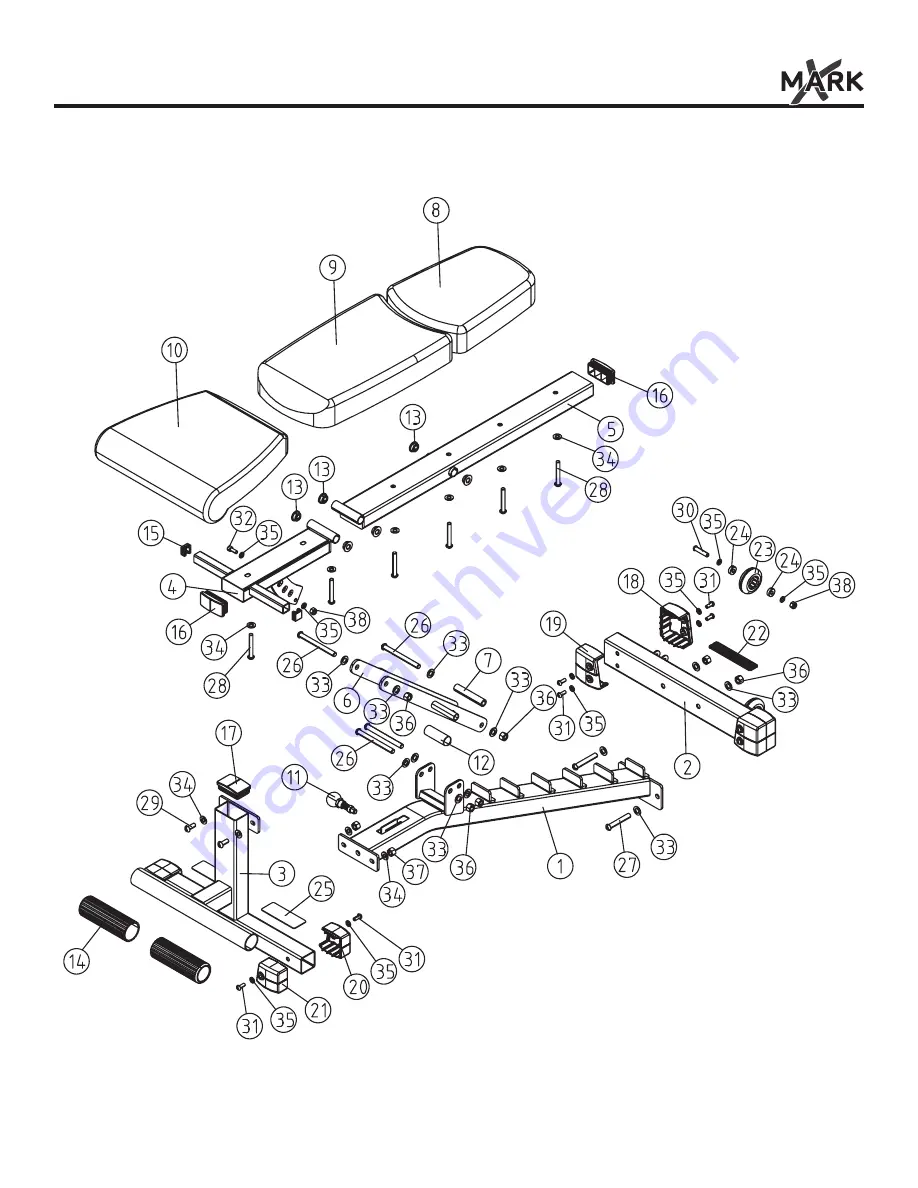
Page 11: ...Exploded View 11 ...

Page 12: ...Customer Service 1 800 719 4605 ...

Reviews: