background image

2-4

Basic Operation

Mark Levinson

Front-Panel Display

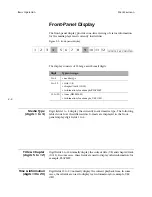
The front-panel display provides one-line viewing of status information 
for the media player and currently loaded disc.

Figure 2-2: front-panel display

The display consists of 12 large and 8 small digits. 

Media Type

(digits 1 to 4)

Digit fields 1 to 4 display the currently loaded media type. The following 
table shows how the different disc formats are displayed in the front-
panel display digit fields 1 to 4.

Title & Chapter
(digits 5 to 12)

Digit fields 5 to 12 normally display the current title (7-8) and chapter/track 
(10-12). In some cases, these fields are used to display other information; for 
example, PLAYLIST.

Time & Information

(digits 13 to 20)

Digit fields 13 to 20 normally display the current playback time. In some 
cases, these fields are used to display text information; for example, USE 
OSD.

13 14 15 16 17 18 19 20

1  2  3  4   5  6  7  8   9  10 11 12 

Digit

Typical usage

1 to 4

• media type

5 to 12

• title (7-8) 

• chapter/track (10-12)

• information; for example PLAYLIST

13 to 20

• time (HH:MM:SS)

• information; for example, USE OSD

Summary of Contents for Media Player N51

Page 1: ...No 51 Media Player Owner s Manual...

Page 2: ...long periods of time 12 Refer all servicing to qualified service personnel Servicing is required when the apparatus has been damaged in any way such as when the power cord or plug has been damaged liq...

Page 3: ...ii...

Page 4: ...dicate important operation and maintenance instructions included in the accompanying documentation Appears on the component to indicate compliance with the EMC Electromagnetic Compatibility and LVD Lo...

Page 5: ...Power On from Standby 1 12 Warm up Break in Period 1 12 Disc Compatibility 1 13 Special Concerns for Writable Media 1 13 Discs to Avoid 1 14 Disc Care and Handling 1 14 Section 2 Basic Operation Fron...

Page 6: ...kmarks 3 32 Angle Indicator Icon 3 32 General Parameters 3 33 Screen Saver 3 33 Rest Fact Defaults 3 33 Section 4 Playback Controls Navigating Disc Menus 4 1 Disc Menu Navigation 4 2 Selecting Disc Se...

Page 7: ...ontents Restoring Factory default Settings 5 3 Care Maintenance 5 4 Appendix Specifications A 1 Declaration of Conformity A 4 Audio Menu Tree A 5 Video Menu Tree A 6 Disc Menu Tree A 7 General Menu Tr...

Page 8: ......

Page 9: ...num which incorporates a secondary shield to provide a seamless electro magnetic barrier The chassis itself is partitioned to provide electrical isolation for critical circuits where needed In every r...

Page 10: ...ny single circuit Another advantage is the efficient distribution of power reducing thermal dissipation to provide a more stable operating environment The Video Processor The N 51 Media Player provide...

Page 11: ...ical performance In addition to the multi bit architecture these DACs have a differential current output which allows optimization of the critical current to voltage conversion stage with dedicated op...

Page 12: ...arries digital video only No51 HDMI Video and Analog Audio Output No 51 Media Player Processor with HDMI or HDMI display with speakers HDMI Output HDMI can carry digital audio and digital video signal...

Page 13: ...output always provides video output at 480i or 576i depending on the disc with no OSD regardless of the position of the rear panel Video switch AV pin 8 No 51 Media Player SCART equipped device RGB S...

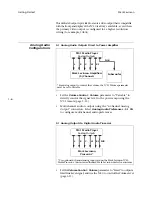
Page 14: ...t using the 6 Channel Analog Output connectors Select Analog Audio Preferences 5 1 CH to configure multichannel audio preferences 5 1 Analog Outputs to Digital Audio Processor Set the Volume Control V...

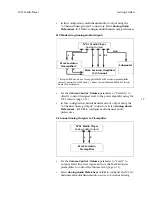
Page 15: ...5 1 CH to configure multichannel audio preferences 2 Channel Analog Outputs to Preamplifier Set the Volume Control Volume parameter to Fixed to output a fixed line level signal and use the Mark Levin...

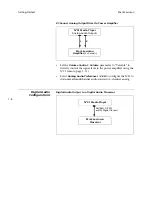
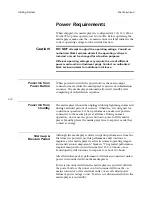
Page 16: ...r using the N 51 remote page 3 11 Select Analog Audio Preferences 2 CH to configure the N 51 to downmix all multichannel audio sources to 2 channel analog Digital Audio Configurations Digital Audio Ou...

Page 17: ...not contact an authorized Mark Levinson dealer The remote control comes with two AAA alkaline batteries that should be replaced as needed One pair of white gloves is provided to assist with the initia...

Page 18: ...t DO NOT obstruct the IR infrared receiver transmitter located on the front panel display The remote control IR transmitter must be in line of sight with the front panel display IR receiver transmitte...

Page 19: ...over 3 Remove the old batteries in the battery compartment 4 Insert two AAA alkaline batteries Make sure the batteries are correctly inserted observing the proper polarity 5 Align the battery compartm...

Page 20: ...ed during lightning storms and during extended periods of non use Otherwise it is designed for continuous operation For best performance make sure power is connected to the media player at all times D...

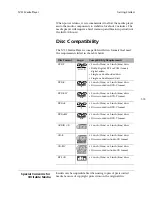
Page 21: ...on on the original disc Disc Format Logo Compatibility Requirements DVD V 5 inch 12cm or 3 inch 8cm discs Dolby Digital DTS or PCM Linear digital audio Single or double sided discs Single or dual laye...

Page 22: ...ck facing downward All loaded discs must align with the circular guide inside the disc drawer DO return discs to their cases when not in use Discs should be stored in an upright position out of direct...

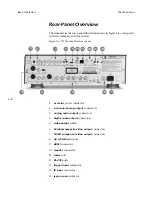
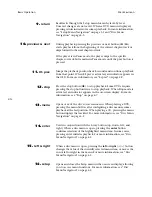
Page 23: ...items below Figure 2 1 N 51 Media Player front panel 1 power button 2 standby button and LED 3 display intensity button 4 pause button 5 play button 6 next button 7 front panel display 8 top menu butt...

Page 24: ...the standby button to place the media player into or out of standby mode When powered off pressing the standby button has no effect The standby red LED remains lit when the media player is receiving p...

Page 25: ...r track Press and hold the previous button to search backward at 4x speed release the button to resume playback at normal speed 11 stop button Stops playback When playing a DVD it is necessary to pres...

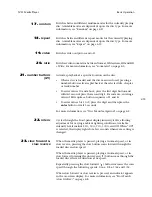
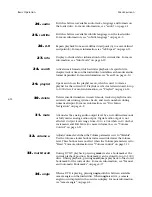
Page 26: ...nel display digit fields 1 to 4 Title Chapter digits 5 to 12 Digit fields 5 to 12 normally display the current title 7 8 and chapter track 10 12 In some cases these fields are used to display other in...

Page 27: ...nt panel display after pressing stop once with a DVD V with resume mode Figure 2 5 Front panel display showing a DVD disc menu RDM PLAY Random Play RDM OFF Random Off RDM TRK Random Track RPT CHP Repe...

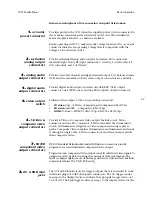
Page 28: ...connector 2 6 channel analog output connectors 3 analog audio output connectors 4 digital audio output connectors 5 video output switch 6 S Video composite video output connectors 7 SD ED component vi...

Page 29: ...onnectors SD video top S Video Composite and Component 480 576i ED video middle Component 480 576p HDMI bottom HDMI 1080i 720p 480 576i 480 576p 6 S Video composite video output connectors Provide S V...

Page 30: ...ed for RS 232 control are provided 13 trigger input connector One 1 8 inch 3 5mm mini jack labeled trigger input is available to receive trigger signals The mini jack requires a mini plug Tip Sleeve c...

Page 31: ...At more severe angles attempt to bounce the remote control signal off a wall or another surface so the signal is received at the IR receiver at a reasonable angle DO position the remote control within...

Page 32: ...the disc For more information see Manual and Automatic Bookmarks on page 4 17 4 1 3 2 10 11 12 6 13 5 7 16 9 14 15 8 17 18 26 27 28 19 20 22 23 21 25 34 29 30 31 32 33 24 drawer 1 light 2 standby 3 se...

Page 33: ...edia player into or out of standby mode When in standby mode the media player is placed in a low power mode that conserves energy 4 search forward reverse When the media player is playing pressing the...

Page 34: ...button twice to stop playback When Stop mode is activated an indicator appears in the on screen display For more information see Stop on page 4 7 13 menu Opens or exits the disc s on screen menu When...

Page 35: ...a value of 14 requires a button sequence of 1 and 4 To enter values for 1 to 9 press the digit and then press the enter button or wait 3 seconds For more information see Disc Menu Navigation on page 4...

Page 36: ...mode entered codes during system checks and resets numbers during numerical input For more information see Disc Menu Navigation on page 4 2 31 mute Attenuates the analog audio output level by a user...

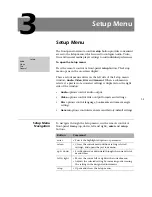
Page 37: ...o options control video output formats and settings Disc options control language bookmarks and camera angle settings General options control screen saver and factory default settings Setup Menu Navig...

Page 38: ...le selecting the audio option from the Setup menu opens the Audio menu Parameters utilizing a horizontal slider indicate the parameter s current position within the entire parameter range To adjust a...

Page 39: ...he remote control up or down button highlight the desired setting and press enter Select Encoded if the associated component is compatible with Dolby Digital encoded sources The N 51 Media Player will...

Page 40: ...the associated component Select PCM if the associated component cannot accept a DTS encoded audio format The N 51 Media Player will downmix DTS signals to 2 channel PCM Enable Setup Audio Outputs HDM...

Page 41: ...and press enter Select Encoded if the associated component is compatible with Dolby Digital sources The N 51 Media Player will pass Dolby Digital encoded signals directly to the associated component...

Page 42: ...m to the associated component PCM Out Rate Setup Audio Outputs S PDIF Audio Preferences PCM Out Rate Use the PCM Out Rate to adjust the PCM output rate of the N 51 Media Player Check the owner s manua...

Page 43: ...sover points for each of the 6 channel audio output connectors The table below indicates default and possible crossover ranges for each speaker parameter Low frequencies are redirected from speakers w...

Page 44: ......

Page 45: ...peaker parameter These parameters are not available when the Volume parameter is set to Fixed Before calibrating output levels consider the following Using a Sound Pressure Level SPL meter to calibrat...

Page 46: ...on highlight the desired speaker parameter then press enter to select the parameter A slider opens in the on screen display 4 Using the remote control left or right buttons adjust the parameter then p...

Page 47: ...when connected directly to power amplifiers When set to Variable the N 51 Media Player allows precise steps of 1dB over the range of 20 to 80 and 1dB steps from 0 to 20 Adjusting the volume above 69 2...

Page 48: ...you to customize the amount of atten uation that occurs when the Mute button is pressed The factory default setting is 30dB You can select a value between 10 to 40dB in 10dB increments or Full Mute T...

Page 49: ...e surround processor that receives the encoded data stream from the N 51 Media Player Reset Audio Settings Use the Reset Audio Settings option to reset all audio settings in the Audio setup menu to th...

Page 50: ...are controlled by a video output switch on the back panel of the N 51 Media Player The three position video output switch selects between SD video top position Analog Composite S Video and Component S...

Page 51: ...e are several operational features of HDMI An electronic EDID Extended Display Identification Data connected to the HDMI output port via the associated device allows the N 51 Media Player to automatic...

Page 52: ...ion to adjust the profile parameters of a source profile The table below lists each available parameter its function and possible settings Parameter Default Possible Settings Select Source Profile Nor...

Page 53: ...ginal source You can use automatic mode or force it to use a specific mode Chroma Sharpness Controls image sharpness using the color portion of the video signal For more information see Chroma Sharpne...

Page 54: ...saw edges and feath ering effects on moving objects Motion Adaptive This method applies the Bob method for moving objects and the weave method for still areas In other words for one created frame some...

Page 55: ...ch improves the sharpness of edges The Peaking setting is used to linearly process the data and is mostly suitable for small signal amplitudes Transient Improvement a non linear method of processing i...

Page 56: ...ayer is using the HDMI output connector The HDMI output port produces the cleanest and sharpest images for your display Select the HDMI video output format that best matches your system configuration...

Page 57: ...e conversion matrix within your display or sink device Note RGB Normal and RGB Expand can be selected for DVI output intercon nections between your No51 and your display or sink device Resolution Setu...

Page 58: ...s sent as a single entity Progressive Scan picture quality has more detail and less flicker than Standard Definition Progressive Scan displays at a resolution of 480p progressive at 60 frames per seco...

Page 59: ...the N 51 Media Player 4 3 Displays normal 4 3 content as full frame with no black bars Displays widescreen content with black bars on the top and bottom of the screen letterboxing Select 4 3 when a st...

Page 60: ...es of the image and a small amount of resolution loss due to image scaling however there are no geometric distortions and the source material appears without letterboxing Fill For 16 9 displays Select...

Page 61: ...t Ratio Setup Video Edit Display Profile Comp Out Prog Scan Display Aspect Ratio See Display Aspect Ratio on page 3 22 Zoom Ratio Setup Video Edit Display Profile Comp Out Prog Scan Zoom Ratio See Zoo...

Page 62: ...Sc in addition to R G and B To select a video format Press the remote control up or down button to highlight the desired setting and press enter Display Aspect Ratio Setup Video Edit Display Profile A...

Page 63: ...he display s brightness and contrast To set black level compensation Use the remote control up or down button to select the desired setting and press enter For Component video select 0 IRE if the disp...

Page 64: ...video output port in the selected output format Each test image is technically perfect conforms to video industry standards at the output of the N 51 Media Player and can be used as a system diagnosti...

Page 65: ...controls using the Color Bars test image Activate a source profile see Select Source Profile on page 3 16 Set the N 51 Media Player s Brightness and Contrast parameters to 0 To adjust color controls u...

Page 66: ...al and horizontal lines appear to have color edges adjust the display s RGB gun controls until the white lines are aligned and appear to be white To adjust display geometry 1 Select the Crosshatch tes...

Page 67: ...l encoded audio source DRC is used to maintain the clarity of dialogue when played at low volume and is most often used during night time viewing when a quieter viewing environment is desired Note The...

Page 68: ...ure playback Playback is automatically activated from the bookmarked playback time when the disc is loaded For more infor mation see Manual and Automatic Bookmarks on page 4 17 To enable disable autom...

Page 69: ...to prevent the appearance of ghost images on the screen To enable disable the screen saver Press the remote control up or down button to highlight the desired setting and press enter Rest Fact Defaul...

Page 70: ......

Page 71: ...riptions may differ for some discs within each format DVD V Includes menus that can be used to activate playback of specific scenes and to select disc settings such as audio track audio language and o...

Page 72: ...u in hierarchy Initiates playback beginning with the selected track return Closes the current menu without activating unsaved settings and opens the previous menu When the first menu screen is open pr...

Page 73: ...all audio tracks 3 When the desired audio track is selected in the on screen display press enter or return to close the status menu or wait a few seconds and the menu will automatically close and play...

Page 74: ...s menu indicates the number of the selected camera angle and the number of camera angles from which the currently playing scene was recorded For instance angle 1 2 indicates that camera angle 1 of 2 i...

Page 75: ...cture Zooming results in a slight cropping of the left and right sides of the image and a small amount of resolution loss due to image scaling however there are no geometric distortions and the source...

Page 76: ...e discs automatically start playback when switching titles chapters or tracks even if a different playback mode i e random playback was activated before the switch To begin playback Press the play but...

Page 77: ...mote control stop button is used to stop playback of the loaded disc To activate Stop mode When DVD playback is activated press the stop button In some cases pressing the stop button activates Resume...

Page 78: ...ss the or button to activate reverse slow search at 1 2 regular playback speed or forward slow search at 1 16 1 8 1 4 or 1 2 regular playback speed To deactivate slow search Press play to deactivate s...

Page 79: ...frame The remote control pause and fwd buttons can be used to activate frame by frame playback which plays the loaded disc one frame at a time in the forward direction Audio automatically mutes when...

Page 80: ...e on page 4 6 indicates the Search modes available for each disc format 3 When the desired Search mode is selected press the remote control number buttons to enter a search value For example To enter...

Page 81: ...ck or Playlist mode is activated The stop repeat A B drawer standby or power button is pressed To activate random playback 1 When playback is activated press the remote control random button Random tr...

Page 82: ...on is pressed and a CD is playing The remote control stop or Resume mode previous next fwd rev slow fwd rev 8s prev drawer random A B standby or power button is pressed To activate repeat playback 1 M...

Page 83: ...B button is used to activate A B repeat playback from a user defined start time point A to a user defined end time point B To activate A B repeat playback 1 When playback is activated press the A B b...

Page 84: ...rectly inputs files into the playlist The entered numbers correspond to files or files within a selected group play Saves and activates playback of the current playlist beginning with the first entry...

Page 85: ...sired track is highlighted Entering the desired track number using the remote control number buttons 3 When the desired track is highlighted press the remote control enter button to add the selection...

Page 86: ...there is more than one track in the playlist 5 Using the remote control up and down buttons move the cursor to the desired position and press the enter button to reposition the track and deactivate so...

Page 87: ...button creates an automatic bookmark at the current playback time whenever the media player is in Play Pause or Resume mode Bookmarks allow DVD viewing from the last playback location When an automati...

Page 88: ...rforming this step will have no effect To start DVD or CD playback using a manual bookmark Option 2 1 Place the bookmarked disc in the open drawer Do not close the drawer 2 Press the recall button The...

Page 89: ...isc is a DVD V Info status is not available for other disc types in resume mode When an Info status bar is displayed repeatedly pressing the Info button cycles through the available disc specific and...

Page 90: ...d 96 Bit Rate x kbps SAMPL xxK PCM Sampling xxK values for kHz 48 and 96 Bit Rate x kbps SAMPL xxK Repeat Title Repeat Chapter A B Repeat Normal Playback REPEAT TITLE REPEAT CHAPT A B REPEAT NORMAL PL...

Page 91: ...Sampling xxK values for xxK 44 1 SAMPL xxK Repeat Disc Repeat Track A B Repeat Random Track Normal Playback REPEAT DISC REPEAT TRACK A B REPEAT RANDOM TRACK NORMAL PLAY Total Disc Time xx xx xx Track...

Page 92: ......

Page 93: ...r cord for your area country No Remote Control Operation 1 Eliminate obstructions between the remote control IR transmitter and the front panel display IR receiver transmitter 2 Make sure the IR input...

Page 94: ...lay to ensure the correct settings and or inputs are utilized 3 Make sure that the three position video output switch on the rear panel of the N 51 is in the correct position for the video output that...

Page 95: ...control up down buttons to highlight the Rest Fact Defaults option then press the enter button 4 Use the left or right remote control button to highlight Yes then press the remote control enter button...

Page 96: ...ove dirt and fingerprints from the N 51 exterior surface use a soft lint free cloth DO NOT use metal polish or a cloth made with steel wool If needed this cloth can be dampened with isopropyl alcohol...

Page 97: ...on Distortion SMPTE IMD 0 005 Maximum Output XLR 0dBFS signal 4V Fixed volume mode 14V Variable volume mode Maximum Output RCA 0dBFS signal 2V Fixed volume mode 7V Variable volume mode Dynamic Range 1...

Page 98: ...SCART RGB Sync SD Impedance 75 Y Output Levels 1 0V p p with 75 load 700mV p p video Pb Pr Output Levels 350mV with 75 load 700mV p p RGB Output Levels 1 0V p p with 75 load 700mV p p video Y Bandwidt...

Page 99: ...tts Operating Temperature 0 C to 35 C Overall Dimensions Width 17 75 inches 450 85mm Height 5 864 inches 148 95mm Depth 19 20 inches 487 68mm Weight Weight 46 5 lb 21 09kg Rack Mounting Refer to the r...

Page 100: ...identified here conforms to the Directive s and Standard s specified above Type of Equipment media player Model s Mark Levinson N 51 Date August 2005 Harman Specialty Group Vice President of Engineeri...

Page 101: ...et Audio Settings to Default Values Yes No On Off Encoded 2 ch PCM 10 to 40dB in 10dB steps Full Mute 30dB def Setup Audio Volume Control Volume Fixed Power On Volume 50dB Mute Level Reduction 30dB Fi...

Page 102: ...Out Comp Out Prog Scan Analog Out Stand Def Setup Video HDMI Output Video Format YCbCr4 Resolution PS Display Aspect Ratio 16 9 Zoom Ratio Normal Reset Display Profile Setup Video Comp Out Prog Scan D...

Page 103: ...ands Norwegian Polish Portugues Russian Svenska Thai Turkce On Off Setup Disc Default Language English DRC On Play Auto Bookmarks Disable Angle Indicator Icon Off Enable Disable On Off NOTE Defaults a...

Page 104: ...nput Output Display Aspect Ratio Setting in No51 Setup Menu see note 1 Aspect Ratio on DVD Resolution see note 2 Output on Display see note 3 Notes 1 16 9 Widescreen 16 9 SD See note 4 2 HD 3 Fullscre...

Page 105: ...other widescreen formats such as 2 35 1 black bars will always be present even on a 16 9 display For examples that already show black bars they will be wider when playing a 2 35 1 DVD than they will w...

Page 106: ......

Page 107: ...dio setup 3 3 AV RGB mini jacks 2 7 B black level 3 21 Black Level parameter 3 26 3 27 Bookmarks 4 17 break in period 1 12 Brightness parameter 3 16 C calibrating output levels 3 9 CD Info status 4 21...

Page 108: ...2 1 fwd rev 4 8 G General menu tree A 7 General parameters 3 33 getting started 1 1 H HD 1080i 3 22 HD 720p 3 22 HDCP 3 26 HDMI Audio Preferences 3 3 Dolby Digital 3 3 DTS 3 4 Enable 3 4 HDMI configu...

Page 109: ...h button 2 14 setup button 2 12 slow forward button 2 13 slow reverse button 2 13 standby button 2 11 stop button 2 12 subtitle button 2 14 top menu button 2 11 up down buttons 2 11 video button 2 13...

Page 110: ...2 4 transport 1 1 trigger input connector 2 8 trigger outputs 2 7 troubleshooting if all else fails 5 3 no HDMI output 5 2 no main output 5 2 no power 5 1 no remote control operation 5 1 no video out...

Page 111: ......

Page 112: ...lephone 781 280 0300 Fax 781 280 0490 www marklevinson com Customer Service Telephone 781 280 0300 Sales Fax 781 280 0495 Service Fax 781 280 0499 Product Shipments 16 Progress Road Billerica MA 01821...

Reviews: