background image

To switch the eBike system on/
off, hold the POWER/MODE 
bottom for 2 seconds. The default 
value for power assistance (PAS) 
is “1”.

To change PAS level, press the + 
/ - to increase and decrease until 
the desired assistance level is 
displayed. 

Press ”-”, until the PAS become “0” 
to ride without motor assistance.

(!!!)

 Safety Tip: When beginning your ride set 

PAS to 0 and pedal away in first gear. When 
assistance is required press “+” to increase the 
PAS to 1 or more as required.

Meter instruction

Meter Operation 

| Page 21

Summary of Contents for Step Thru

Page 1: ...USER MANUAL...

Page 2: ......

Page 3: ...attery and charger overview 13 Battery installation 15 Charging instruction 16 Charging care 17 Range and storage 18 Meter Operation Meter instruction 21 Safety Safety 22 Practical Emergency 30 Cleani...

Page 4: ......

Page 5: ...nt that you read this User Manual before you operate the bike as it contains some important information concerning the use and maintenance of your new eBike Improper handling can reduce its riding per...

Page 6: ...produced and CE approved according to the guidelines in Standard ISO4210 and EPAC EN 15194 The frame is manufactured from aluminium which provides a strong rigid and lightweight construction To achie...

Page 7: ...material damages that they suffer due to extreme or improper use of the product or when used for purposes which the eBike has not been designed and built for If the purchased eBike is intended to be u...

Page 8: ...ed throughout the manual and it may be useful to bookmark this page for quick reference 1 Handlebar 2 Display 3 Front fork 4 Mud guard 5 Tyre Inner tube 6 Spokes 7 Disc Brake 8 Hub 9 Brake Caliper 10...

Page 9: ...Overview Page 5 1 2 3 4 5 6 7 8 9 10 12 11 13 14 15 16 18 17 19...

Page 10: ...ay be entangled with the spokes and if you are not careful you may bend them Please remove all the packaging parts carefully especially if you use a knife or a blade Proceed in such a way as to avoid...

Page 11: ...y fixed For further help with the Quick Release QR mechanism please go to page 3X Make sure the front wheel is accurately centred between the fork blades and ensure the QR lever is properly closed Aft...

Page 12: ...ft and the right crank Position the right pedal in the right crank and screw the bolt by hand in a clockwise direction Position the left pedal in the left crank and screw the bolt by hand in an anticl...

Page 13: ...t and tighten quick release Ensure that the quick release is tightened firmly The nut on the opposite side of the quick release is used to tighten or loosen the quick release 4 Attaching the handlebar...

Page 14: ...image on the right The handlebars may be at the incorrect angle along the axis running between the ends of the grips for your personal comfort and safety To angle the handlebars loosen the four bolts...

Page 15: ...und with the tips of your toes on both feet at the same time To make sure that the saddle is locked test if your hand experiences some resistance when closing the QR lever If this did not leave a mark...

Page 16: ...mity It is recommended to use a bicycle pump with built in air pressure gauge to ensure that your tyre always has the correct pressure Gears The gears should be used as with a conventional bicycle For...

Page 17: ...harger Page 13 Battery and charger overview 1 Battery 2 Battery port 3 Charging socket 1 Mains plug 240V 2 Charging plug 3 Charger 4 LED charging indicator RED charging GREEN charged Battery charger 1...

Page 18: ...ur Mark2 uses maintenance free Lithium Ion batteries The battery is delivered with a capacity of approximately 40 60 charge from the factory Before riding it is necessary to charge the battery to full...

Page 19: ...g point accessed through rubber cover 2 Battery Removal Insert key and turn to unlock battery Gripping firmly near the top pull away from the frame There will be some resistance and it will click as i...

Page 20: ...your convenience The LED light indicates it is in charging mode The RED light indicates the battery is being charged The GREEN light indicates the battery is fully charged unplug from wall before unp...

Page 21: ...not expose the battery or the charger to shocks such as dropping Stop charging immediately if you notice something unusual Charging Care When the battery is lower than 1bar on the meter the motor wil...

Page 22: ...th Failure to do so may damage the battery and void the warranty Storage Range The range of a battery charge depends heavily on various conditions such as but not limited to Road conditions such as ro...

Page 23: ...nclosed battery charger Do not charge the battery at a temperature below 0 C or above 45 C Disposal of battery Batteries contain substances that can be harmful to human health and the environment if n...

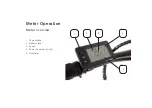
Page 24: ...Meter overview 1 Power Mode 2 Batterry level 3 Speed 4 Power Assistance Level 5 Odometer Meter Operation 2 1 4 5 3...

Page 25: ...press the to increase and decrease until the desired assistance level is displayed Press until the PAS become 0 to ride without motor assistance Safety Tip When beginning your ride set PAS to 0 and pe...

Page 26: ...r when you are sharing roads or path with other users as it greatly increases the likelihood of you being seen When purchasing a helmet for an eBike it is important to check whether it is in accordanc...

Page 27: ...her traffic participants Before each use Check the reliability of the eBike including the stability and the proper installation of the saddle the handlebar the wheels and tyres the pedals and the cran...

Page 28: ...s you have discovered signs of wear or damage Before replacing the tubes tyres and rim tape you must make sure that the new components are compatible with the old ones Preferably have this operation c...

Page 29: ...advised to contact a specialist service centre to have the necessary repairs and adjustments carried out Night Riding It is UK law to always use electrical lighting when riding at night Even if you c...

Page 30: ...basket you must take into consideration the maximum permissible weight of the luggage This guarantees stability in riding stopping turning and changing directions Under no circumstances should you exc...

Page 31: ...view and can cause accidents with potentially serious consequences Be very careful when riding in areas with a limited view such as slopes bends or obstructions If the eBike is fitted with battery pow...

Page 32: ...ive sensitivity for the intensity of the power and pressure on the lever and therefore on the brakes of each wheel at different speeds and different types of terrains To acquire this sensitivity compl...

Page 33: ...o avoid wheel lock up and proper weight shift Practice the techniques of stopping and shifting the weight on safe areas where there is no traffic hazards or other distractions while acquiring the righ...

Page 34: ...ve the tyre from the rim If the Practical edge of the tyre proves too hard to remove by hand use special tyre levers Remove the inner tube Inspect the external and internal surface of the tyre careful...

Page 35: ...ore vulnerable compared to a wheel with well tensioned spokes If during a cycling a spoke gets broken you should return home at a very low speed and ride very carefully as the wheel is unbalanced due...

Page 36: ...ncy of these actions Clean your eBike with a water moistened cloth or sponge Use warm water with a detergent or car shampoo Do not use a high pressure jet washer gasoline strong alkalis aggressive or...

Page 37: ...Storage indoors with high humidity outdoors at high or low temperature is not recommended Maintenance recommendations After the first ride of the eBike its nuts bolts cables and wheel spokes undergo...

Page 38: ...end you Clean the eBike and carefully lubricate the chain and gear unit always making sure to remove the excess oil Inspect the frame particularly in the tube joint areas the handlebar the handlebar s...

Page 39: ...any loose component WARNING The eBike and its components experience high loads and wear Materials and mechanisms respond differently to wear or load fatigue If the eBike component design life is overd...

Page 40: ...isms are properly adjusted and levers are in the close position To make sure that the wheel is locked test if your hand experiences some resistance at the time of closing the lever If the closing oper...

Page 41: ...nder voltage overheating automatic shutoff Watt hours 374 4WH Derailleur Shimano 7 speed Brake Mechanical Disc brake Tektro Display Meter LCD Front fork Front fork Aluminum front fork with lock out fu...

Page 42: ...110kg Speed 25kph based on terrain rider weight Range With PAS 35 55km Suitable terrain Hard surface flat road ramp under 20 C Working temp 0 C to 40 C Storage temp 20 C to 50 C Vehicle weight Net wei...

Page 43: ...ower needed for an eBike is abstracted from a carbon heavy national grid the amount of power needed is relatively minimal As a result the carbon footprint compared to a fossil fuel or even an electric...

Page 44: ...on due to the entanglement of the pack around the child or external obstruction of the airway through the mouth or nose Mark2 Guarantee Programme Mark2 Bikes guarantees that all of our bikes are free...

Page 45: ...been used for rental or any other professional purposes The eBike has been subject to damage due to use in competitions jumping downhill trial or due to exposing riding the eBike in severe conditions...

Page 46: ...the legal rights in your respective country Battery Registration Your Mark2 uses a Promovec manufactured battery which comes with a 2 year capacity guarantee The guarantee covers a guaranteed minimum...

Page 47: ...Notes...

Page 48: ...www mark2 co uk May 2020 Version 1 1...

Reviews: