


10
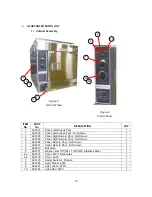
hole, fits over the pre-installed rack screws at the top of the cooking chamber wall. The
curved wires on the rack should be facing to the front of the steamer. Repeat this process
for the rack mounted on the other side. These racks are designed to be removed easily
for cleaning.
13) Function tests / inspection:
Once your steamer is in place and properly leveled,
plumbed and wired, test unit to make sure it is functioning properly.
D
STARTUP PROCEDURE
1)
Using a soft sponge and mild detergent, wipe out the interior of the cooking chamber to
remove shipping debris prior to use. Rinse with clean water.
2)
Make sure drain valve is in the
CLOSE
position. Fill the cooking chamber with 2 ½
gallons of water – or to about 1” below the door opening. Make sure water is above the
level of the water probe on the lower left side of the cooking chamber.
3)
Power on/heat up: Make sure the door is closed and turn the cooking mode selector to
the
1
position. The Amber
HEAT
light on the upper left corner of the control panel will
turn on. You may smell smoke from oils left from manufacturing – don’t be alarmed, they
will burn off quickly. When the
HEAT
light goes out you are ready to test the steamer.
4)
Turn the cooking mode selector switch to the
2
position. The
HEATING
light will go on as
heat is called for. You may open the door and inspect the steaming process (note that the
HEAT
light goes out and the heaters are turned off when the door is opened).
5)
Connect the drain hose and put the open end in a bucket or near a floor drain. With the
door shut, open the drain and allow the water to drain below the water level probe. The
ADD WATER
light should illuminate.
6)
To shut down your steamer, turn the cooking mode selector to the
OFF
position (
).
7) Open the steamer door to allow it to cool and complete draining the cooking chamber. If
draining into a bucket, remember that the cooking chamber can hold 2 ½ gallons of hot
water.
E
OPERATION
1) Electrical Connection:
Make sure unit is plugged into a proper receptacle or wired
properly and the breaker for the circuit is on.
2) Add water:
Make sure drain valve is in the
CLOSE
position. Pour 2 ½ gallons of water
into the cooking chamber through the door opening – or to about 1” below the door
opening. Make sure water is above the level of the water probe on the lower left side of
the cooking chamber. Water should not touch the bottom of the lowest pan. If the
steamer is hot from prior use DO NOT add water to a hot, dry cooking chamber. Allow
cooking chamber to cool with the door open first.
3) Reservoir fill / Add Water light:
During the course of the day, as the water level
decreases, the
ADD WATER
light (green) on the control panel will come on. If this light is
on for more than one minute a safety sensor will shut down power to the heaters. The
light will remain on until water is added. When water is added the cooking chamber will
come back to the set temperature and resume cooking. If water is added and the
ADD
WATER
light remains on, the water level sensing probe must be cleaned. Lower the
water level until the probe is above water and clean probe with a sponge or cloth. Refill
the cooking chamber. The
ADD WATER
light should go out. If water is not added or the
probe is not cleaned within 15 minutes, the
CLEAN PROBE
light (red) will come on.
When water is added, both
CLEAN PROBE
and
ADD WATER
light should go out. If the
CAUTION:
Do not use any abrasive cleaners, utensils or scrubbers on the non-stick coating. Use
vinegar and water to clean reservoir. Nylon bristle brushes or soft sponges are recommended.
WARNING:
The water hose or ball valve may be very hot. It is advisable to allow the water to
cool down before draining. Leaving the door open will aid in cooling.


