


10
Kamera
Camera
Caméra
Camera
m
ärklin
m
obile
v
ision
2
3
4
5
6
7
1
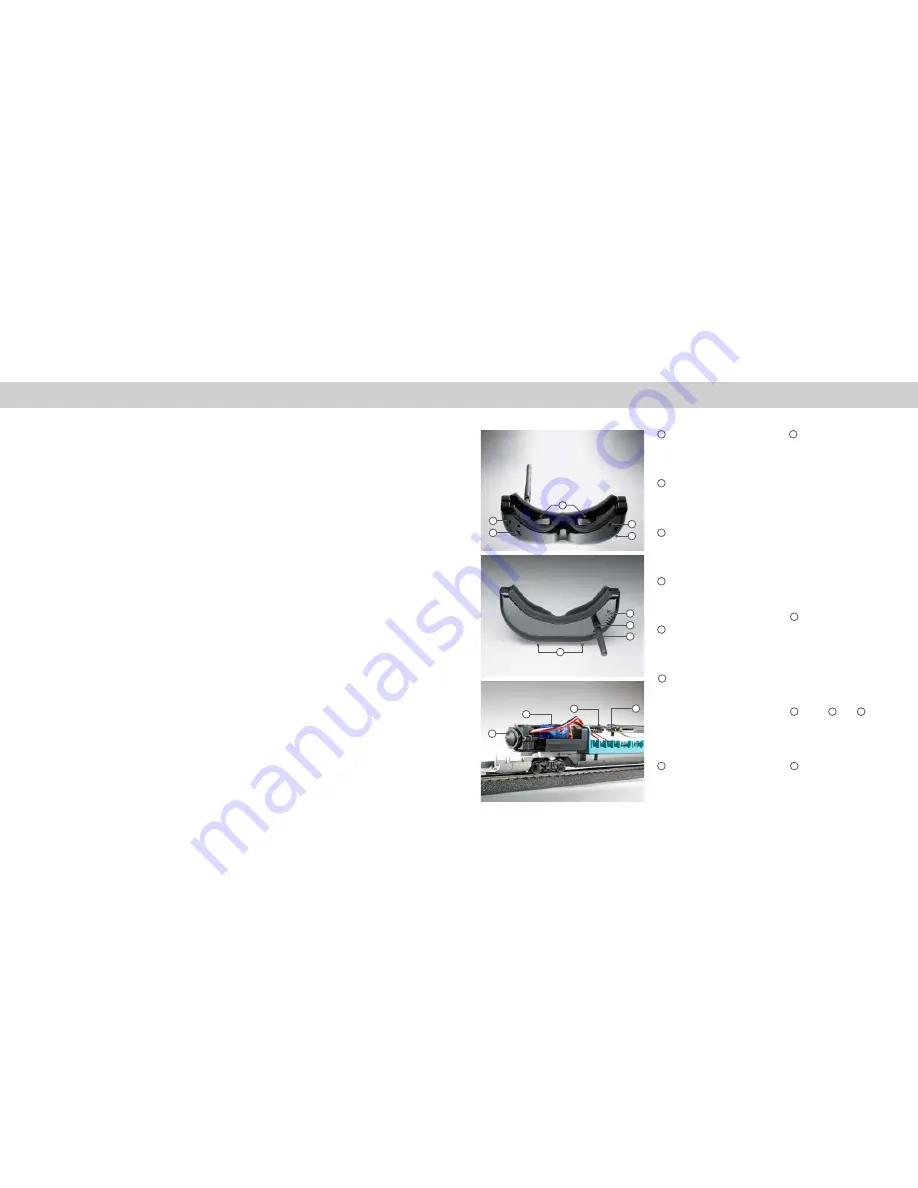
LCD-Displays
LCD Displays
Ecran LCS
LCD Displays
8
Schalter 3: Displayoptionen:
• Kontrast (vor/zurück)
• Helligkeit (rechts/links)
• Gyro-Aktivierung
(drücken, bis Signalton ertönt)
Switch 3: display options:
• Contrast (back/forth)
• Brightness (right/left)
• Gyro-activation
(push down until signal sounds)
Commutateur 3: options d’affichage
• contraste (avant/arrière)
• luminosité (gauche/droite)
• activation gyro
(appuyer jusqu’au signal)
Schakelaar 3: Displayopties:
• contrast (naar voren/ achteren)
• helderheid (rechts/links)
• gyro-activering (indrukken tot toon
hoorbaar wordt)
7
Antenne
Antenna
Antenne
Antenne
5
Stromanschluss an der Seite
Power connection on the side
Racordement electrique
Stroomaansluiting aan de zijkant
4
Kopfhöreranschluss
Earplug connection
Connexion écouteurs
Hoofdtelefoonaansluiting
13
Schalter 4: Kanalauswahl ICE
Switch 4: channel selection ICE
Commutateur 4: sélection du canal ICE
Schakelaar 4: kanaalkeuze ICE
12
Leiterplatte
Pcb board
Circuit imprime
Printplaat
11
Servo
Servo
Servo
Servo
3
Schalter 1: Brillenfunktionen
Switch 1: headset function
Commutateur 1: fonctions lunnettes
Schakelaar 1: brilfuncties
2
AV in/out-Anschluss
AV in/out-connector
Connexion AV in/outAV in/out-
AV in/out-aansluiting
1
6
Schalter 2: Kanalauswahl Brille
(4 Kanäle)
Switch 2: channel selection headset
(4 channels)
Commutateur 2: selction du canal
lunnettes (4 canaux)
Schakelaar 2: kanaalkeuze bril
(4 kanalen)
(4 Kanäle)
9
Schieberegler zum Einstellen
des LCD-Bildschirm-Abstandes
Pushbuttons for spacing of
LCD screens
Réglage écartement des écran
LCS (horizontal)
Schuifregelaars voor instellen van de
afstand van de LCD-schermen
Auf die Brille, fertig, los:
Ihr Märklin Mobile Vision-Fahrplan im Überblick.
1. ICE-Zugteile auf dem Gleis zusammenkuppeln und fahren lassen.
2. Antenne auf die Märklin Mobile Vision-Brille schrauben.
3. An der Brille (Schalter 1) Kanalauswahl Brille auf „Norm“ stellen.
4. Drei Micro-Batterien (AAA) in Batterie-Pack einsetzen und Kabel an die
Brille anschließen.
5. Batteriepack an den Haltegummi der Brille stecken.
6. Seitliche Kamerasteuerung aktivieren. Dazu den Schalter Displayoptionen
(Schalter 3) von oben so lange gedrückt halten, bis ein Signalton ertönt.
7. Die Märklin Mobile Vision-Brille aufsetzen.
8. Mithilfe des Schalters Displayoptionen (Schalter 3) Farbsättigung (vor und
zurück) und Helligkeit (nach rechts und links) des Bildes einstellen.
9. Innovatives Modellbahnfahren aus dem Führerstand genießen.
Bril op, klaar, starten maar: Een beknopt overzicht
van uw Märklin Mobile Vision handleiding.
1. De ICE-rijtuigen op de rails plaatsen, aan elkaar koppelen en laten rijden.
2. De antenne op de Märklin Mobile Vision-bril schroeven.
3. Schakelaar 1 op de bril op “Norm” instellen.
4. Drie microbatterijen (AAA) in de batterijhouder plaatsen en de kabel op de
bril aansluiten.
5. De batterijhouder in de rubberen houder van de bril klemmen.
6. Om de zijdelinkse camerasturing te activeren, de schakelaar displayopties
(schakelaar 3) bavenaan indruckken tot u en signaaltoon hoort.
7. De Märklin Mobile Vision-bril opzetten.
8. Met behulp van de schakelaar displayopties (schakelaar 3) kleurstelling
(naar voren /naar achteren) en helderheid (links en rechts) van het beeld
instellen.
9. Nu kan u innovatief met de modeltrein rijden en genieten vanuit de cabine.
8
9
11
12
13
10
Goggles on, ready, go: An Overview of Your
Märklin Mobile Vision Roadmap.
1. Couple the cars together for the ICE train on the track and let it run.
2. Screw the antenna on the Märklin Mobile Vision goggles.
3. Set the channel selector on the goggles (switch 1) to „Norm“.
4. Put three micro-batteries (AAA) into the battery pack and connect the cable
to the goggles.
5. Press the battery pack onto the rubber mount on the goggles.
6. Activate the side camera control. To do this, press from above on the
display options switch (switch 3) until you hear a sound.
7. Put the Märklin Mobile Vision goggles on.
8. Set the color saturation (up and down) and the brightness (to the right and
left) for the picture with the help of the display options switch (switch 3).
9. Enjoy innovative model railroad operations from the engineer‘s cab.
Enfilez vos lunettes et c’est parti ! Vue d’ensemble
sur votre itinéraire Märklin Mobile Vision.
1. Attelez les éléments du train ICE sur la voie et faites rouler le train.
2. Vissez l’antenne sur les lunettes Märklin Mobile Vision.
3. Sur les lunettes, sélectionnez le canal « Norm » (commutateur 1).
4. Insérez trois micro-piles (AAA) dans le boîtier prévu à cet effet et raccordez
le câble aux lunettes.
5. Fixez le boîtier de piles sur l‘élastique de maintien des lunettes.
6. Activez la commande latérale de la caméra. A cet effet, maintenez le
commutateur relatifs aux options d’affichage (commutateur 3) enfoncé
jusqu’à l’émission d‘un signal sonore.
7. Enfilez les lunettes Märklin Mobile Vision.
8. A l’aide du commutateur correspondant aux options d’affichage
(commutateur 3), réglez la saturation des couleurs (d’avant en arrière) et la
luminosité (vers la droite ou vers la gauche) de l‘image.
9. Appréciez la conduite innovante d’un train miniature à partir de la cabine de
conduite!


