background image

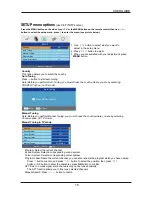
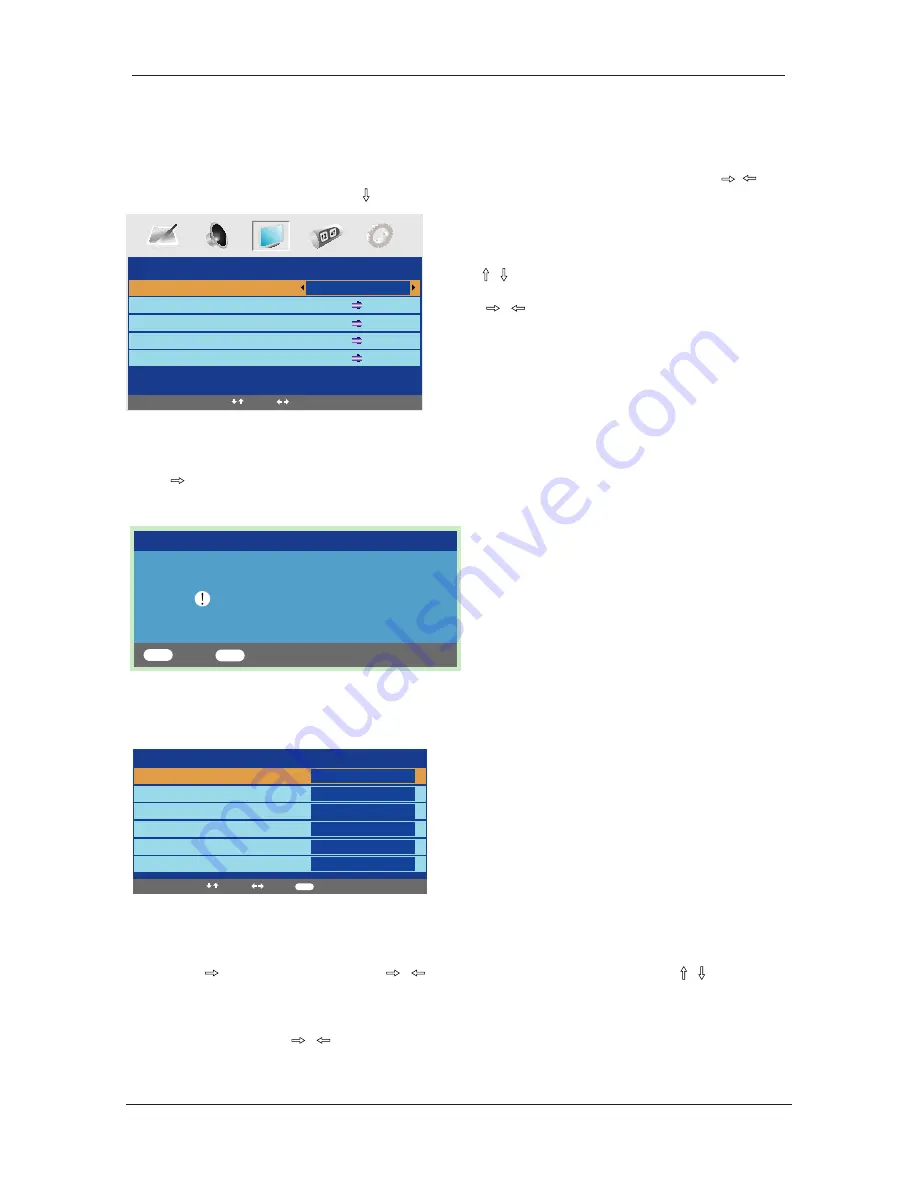
1. Use  /  button to select what you want to 

    adjust in the setup menu.

2. Press 

/

button to adjust.

3. When you are satisfied with your adjustment, press 

 MENU

 button.

Country

This option allows you to select the country.

Auto Tuning

Press

button to start auto tuning.

Note: Before you perform Auto Tuning, you must choose the country where you are by selecting 

COUNTRY option. (In TV mode)

Manual Tuning

Note: Before you perform Manual Tuning, you must choose the country where you are by selecting 

Country option. (In TV mode)

SETUP menu options


(used in TV/DTV source)

Manual Tuning

Program
Sound System
Colour System
Program Label
AFT
Manual Search

1

I

PAL

Off

471.43MHz

Select

Adjust

Input

SETUP

Country
Auto Tuning
Manual Tuning
Program Edit
Common Interface

UK

Select

Adjust

Auto tuning

Press OK key to start

Enter

Return

OK

MENU

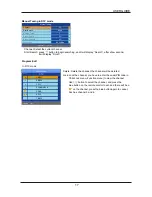
Program: Select the current channel.

Sound System: Select a corresponding sound system.

Colour System: Select a corresponding colour system.

Program Label: Name the current channel, you can also rename the program which you have named.

    Press  button to enter, and press 

/

button to select the position, then press  /

    button or 0-9 button to enter the character, press 

OK

 button to confirm.

AFT: Due to a weak signal some channels may not be tuned optimally.

    The AFT function allows you to fine tune selected channels.

Manual Search: Press      /      button to search.

0-9

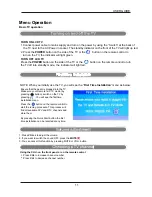
Manual Tuning in TV mode

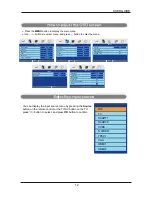
Press the MENU button on the side of your  TV  or the MENU button on the remote control then use 

/

button to select the setup menu, press  to enter the menu. (see picture below).

USER GUIDE

16

Summary of Contents for MS3770DVB

Page 1: ...LCD digital colour TV MS3770DVB USER GUIDE...

Page 2: ...next generation of digital interface Unlike conventional connections it transmits uncompressed digital and audio signals using a single cable This TV supports high definition video input via the HDMI...

Page 3: ...n PICTURE menu options SOUND menu options TIMER menu options FUNCTION menu options SETUP menu options 4 Unit and Accessories 3 5 7 5 6 7 10 11 17 USING YOUR COMMON INTERFACE SLOT 18 11 12 13 14 14 15...

Page 4: ...ect the power chord from being walked on or pinched particularly at plugs and the point where it exits from the TV Do not allow the power chord to overhang the edge of a table Unplug this TV during li...

Page 5: ...or relocate the receiving antenna Increase the separation between the external device and the TV Connect the external device into an outlet on a circuit different from that which the TV is connected C...

Page 6: ...nd Accessories TV set Batteries Source Menu Help Quick Start Guide OK Search Info Exit VOL Picture IP Setup Sound Day abc def ghi jkl mno pqrs tuv wxyz Day CH DVD Menu 1 2 3 4 5 6 7 8 9 0 SUB TXT SD1...

Page 7: ...est and most effective way of connecting your TV to ancillary equipment Alternate methods are listed below HDMI Lead You can connect this TV to a compatible device using a HDMI lead This method will g...

Page 8: ...from the remote control Power on Standby LED Indicator Press POWER to turn on and off Press to display the input source menu Indicator on RED Standby mode Indicator on GREEN Power on mode skip USER GU...

Page 9: ...ct to AV connector of DVD or similar equipment Video only 7 L R in Connect to audio output connectors of DVD or similar equipment when using S Video connectors 8 SCART 1 2 Connect to Scart connector o...

Page 10: ...enter of the TV NOTE Sunshine or other strong light sources may interfere with the signal from the remote control In this situation turn the TV away from the light source WARNING DO NOT LEAVE BATTERIE...

Page 11: ...the remote to work a Satellite receiver the remote controls only the Satellite receiver and not the TV when you press Press to control the TV again Used on TVs with DVD or PVR Used on TVs with PVR or...

Page 12: ...d to be recorded Help This displays a page that gives telephone numbers for service Press to enter press again to exit Quick Start Searches all ATV and DTV channels by a single key can take up to 10 M...

Page 13: ...USER GUIDE 10...
Page 14: ...time installation menu Press the button on the remote control to start the tuning procedure This process will find all available ATV and DTV channels and store them By pressing the Quick Start button...

Page 15: ...TUP Country Auto tuning Manual tuning Program Edit UK FUNCTION Language Video Size Blue Screen Child Lock First Time Installation Reset English Auto On Select Enter Select Enter Select Enter Select En...

Page 16: ...ure Mode in Picture menu You may select the picture mode directly by pressing the PICTURE button on the remote control Contrast Adjust the contrast of the picture Brightness Adjust the brightness of t...

Page 17: ...de after a specified period of time The period of time for automatic switch off can be selected in steps 15 30 45 60 75 90 105 120 and 0 Min Off You can also select the automatic sleep time by pressin...

Page 18: ...code Old PIN Code The default is no password press OK to confirm If the pin code is changed it must enter the old code to change New PIN Code Enter the new password Enter Again Enter the same passwor...

Page 19: ...try Auto Tuning Manual Tuning Program Edit Common Interface UK Select Adjust Auto tuning Press OK key to start Enter Return OK MENU Program Select the current channel Sound System Select a correspondi...

Page 20: ...provider who can supply a viewing card cam unit and instructions for their use Program Edit Channel list Flags X X X X 1 BBC1 2 BBC2 3 ITV1 4 CHANNEL 4 5 FIVE 6 ITV2 7 BBC3 Delete Lock DTV In DTV mod...

Page 21: ...S INSERTED INTO THE COMMON INTERFACE SLOT THEN ADD THE SMART CARD TO THE CAM 1 Turn on the TV and ensure DTV Source is selected 2 If the CAM is detected the TV will display the following message on th...

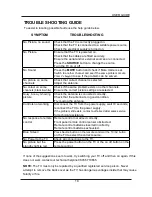
Page 22: ...na is connected correctly Check that the antenna Is in good condition Try moving the antenna Controls not working Disconnect the TV from the power supply wait 10 seconds reconnect the TV to the power...

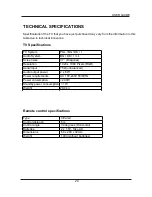
Page 23: ...Screen size 37 Diagonal Resolution 1920 x 1080 Pixels RGB Aerial input 75 unbalanced Audio output power 2 x 6 W Power requirements AC 100 240V 50 60Hz Power consumption 240W Standby power consumption...

Page 24: ...ling site for waste electrical and electronic items visit www recycle more co uk and simply type your postcode into the recycling bank locator You ll find advice and tips on other aspects of recycling...

Page 25: ...change your mind or if you damage the goods after you buy them Should a repair not be possible we will exchange the product for a new or nearest equivalent product In the unlikely event of being unabl...

Reviews: