Combimatic_v2_EN_210315 21
Combimatic
Installation
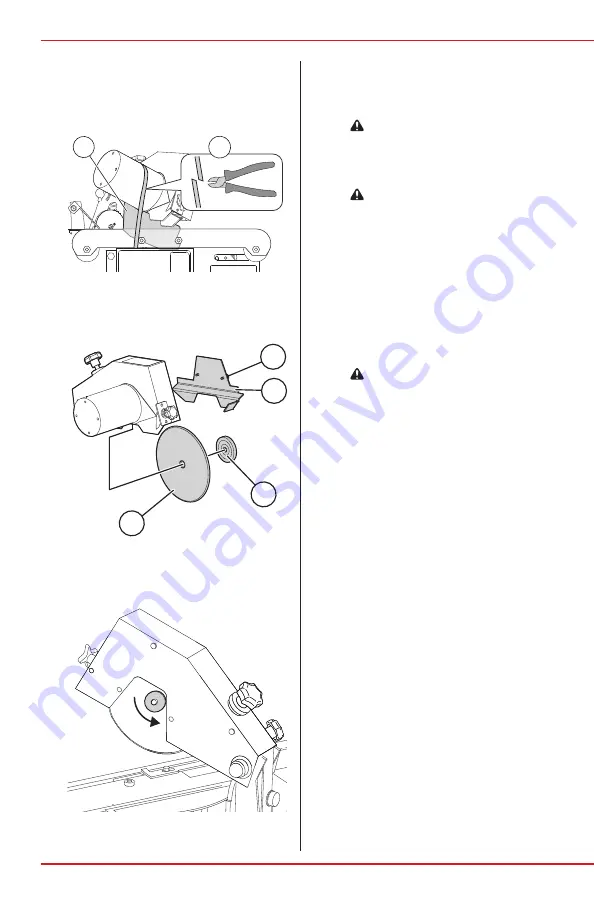
1 . Remove the transportation lock (A) and the
cable ties (B) that hold the grinding head in
place .
2 . Remove the grinding wheel guard (C) to access
the wheel attachment nut (B) . Turn the two
attachment knobs (D) to remove the guard .
3 . Remove the wheel attachment nut from the
hub .
A
B
C
D
B
A
4 . Next, insert the appropriate wheel onto the hub
and, using moderate pressure with your hands,
secure the wheel attachment nut to hold the
wheel in place .
WARNING Over-tightening the wheel can
cause it to break .
5 . Finally, reposition the guard and secure it in
place with the knobs .
WARNING Never start the grinder without
the wheel guards in place .
6 . Before using the grinder, you’ll need to check to
ensure the wheel is properly installed .
7 . With the power off, gently spin the grinding
wheel and check for wheel wobble .
8 . Conduct a final check for proper assembly by
turning on the main power and switching on the
wheel power switch while standing to the side .
Look for vibrations due to wheel oscillation or
other interference .
WARNING Always keep bystanders at a
safe distance from a grinder while in operation .
Note: To get the best performance from your
grinder, ensure the grinding wheel is centered
over the vise . Refer to this user manual or the
provided video for specific instructions .
4 .8 Test the machine before first use
1 . Make sure that all packing materials are
removed .
2 . Make sure that the air hoses and wires are
correctly connected .
3 . Make sure that the machine is securely
fastened to the stand .
4 . Make sure that the machine is on a level
surface; if the machine wobbles, or if the
surface is not level, attach the stand to the floor
with screws .
5 . Perform a sharpening test on the machine to
ensure it functions correctly . See section 7 .2,


