Marsh Shipping Supply Co. LLC; Collinsville, IL 62234 U.S.A.; Tel: 618.343.1006 Fax: 618.343.1016
51
Replacing the Free Spin
Roller Assembly
To replace the free spin roller assembly, see Fig 29 and follow the steps below.
1.
Turn the switch to OFF and unplug the machine.
2.
Remove the right side cover (refer to Removing the Right Side Cover
[p. 20]).
3.
Remove the left side cover (refer to Removing the Left Side Cover [p.
22]).
4.
Remove the e-clips from the free spin roller shaft.
5.
Remove the free spin roller shaft.
6.
Remove the free spin roller tube.
7.
Place the new free spin roller tube into the middle of the chassis and
hold.
8.
Insert the new free spin roller shaft into the chassis and the free spin
roller tube and through the other side of the chassis.
9.
Attach the e-clips to each side of the free spin roller shaft.
10.
Attach the left side cover (refer to Attaching the Left Side Cover [p.
22]).
11.
Attach the right side cover (refer to Attaching the Right Side Cover
[p. 20]).
The machine is now ready to continue normal operation.
Replacing the Ramp
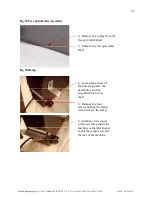
To replace the ramp, see Fig 30 and follow the steps below.
1.
Turn the switch to OFF and unplug the machine.
2.
Remove the right side cover (refer to Removing the Right Side Cover
[p. 20]).
3.
Remove the left side cover (refer to Removing the Left Side Cover [p.
22]).
4.
Loosen the screws of the following parts: the dead roller, and the
weighted brush cover shaft.
5.
Remove the four screws holding the ramp in and remove the ramp.
6.
Attach the four screws to the new ramp inside the machine so that the
thicker end of the ramp is toward the rear of the machine.
7.
Tighten the screws of the following parts: the dead roller, and the
weighted brush cover shaft.
8.
Attach the left side cover (refer to Attaching the Left Side Cover [p.
22]).
9.
Attach the right side cover (refer to Attaching the Right Side Cover
[p. 20]).
The machine is now ready to continue normal operation.
41910
09
/
21
/201
6


