background image

OWNER’S MANUAL 


MODEL HT18 AUTOTOAST™ HORIZONTAL TOASTER 


144328 RV121814 

Copyright 

 2013 Marshall Air Systems, Inc. 

All Rights Reserved. 


toaster belt is 8 – 70 seconds; the MM2B and MM2G series is 9 – 105 seconds. 


14. 

Test at least 3 buns before putting the toaster into service.  Uniform surface toasting and bun temperature 
are achieved when the gap described in step 12 is set correctly. 


15. 

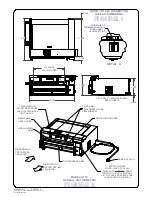
If necessary, the speed of the conveyor can be changed. The speed control is located behind a box on the 
front of the unit. (See Figure 2) which can be removed using a 5/32 Allen wrench through the hole in the 
front. Adjust as needed and reinstall box.  


OPERATION (OPTIONAL PUSH BUTTON MM2A SERIES) 


1.  The toaster is operated by pressing and releasing the button on the right side of the unit. 


2.  Allow the toaster to heat up for at least 15 minutes prior to use. 


3.  For proper operation, insert heels cut side up on the side of the toaster marked "HEEL", and crowns on 

the opposite side. 


4.  To turn off, press and hold the button on right side of toaster for three (3) seconds.  The toaster will cool 

enough to remove parts after at least 30 minutes. 


OPERATION (OPTIONAL 3 DIGIT CONTROL) 


1.  The toaster is operated by pressing and releasing the “I/O” Button of the control.  “Lo” will be displayed. 


2.  The display of the control will show “Rdy” once the toaster is up to temperature.  (Approximately 15 

minutes.) 
 

3.  For proper operation, insert heels cut side up on the side of the toaster marked "HEEL", and crowns on 

the opposite side. 


4.  To turn off, press and hold the “I/O” Button for three (3) seconds.  “Hi” will be displayed which means unit 

is still too hot to remove any parts.  Once the toaster has cooled (approximately 30 minutes), the display 
will show “Off.” 

 
5.  The LED Control will indicate important information: 


A.  Press and release either the Heat 1(Crown) or the Heat 2 (Booster) Button, the pre-programmed 

temperature settings will flash.  This will display for 5 seconds or until another button is pressed. 


B.  Press and hold either the Heat 1(Crown) or the Heat 2 (Booster) Button for 3 seconds, the actual 

platen temperatures will be displayed.  This will display until another button is pressed. 

 
6. 

Definitions of various displays: 


“Off” 

Unit is off and not operating. 


“Lo” 

Heater platens have not reached programmed set temperature. 


“Rdy” 

Unit has reached programmed set temperature and is ready to toast. 


“Hi” 

Unit is off and too hot to touch most removable parts. 


“AL1” 

This is an alarm message that indicates the Left Platen Probe is disconnected or 
defective.  Contact your local qualified service agency. 


“AL2” 

This is an alarm message that indicates the Right Platen Probe is disconnected or 
defective.  Contact your local qualified service agency. 


“AL3” 

This is an alarm message that indicates the Left Platen is too hot.  Unit shuts off. 


Contact your local qualified service agency.

Summary of Contents for AUTOTOAST HT18

Page 1: ...er is adjustable for various crown and heel bread thickness The multi control feature options of this toaster produce and deliver the hottest buns in the shortest time Supplier Name MARSHALL AIR SYSTE...

Page 2: ...NY OTHER APPLIANCE AVERTISSEMENT Ne pas entreposer ni utiliser de l essence ni d autres vapeurs ou liquides inflammables dans le voisinage de cet appareil ni de tout autre appareil WARNING IMPROPER IN...

Page 3: ...ROL GENERATION 2 ELECTRICAL REPLACEMENT PARTS 12 ILLUSTRATIONS OVERALL DIMENSIONS FIGURE 1 2 HANG ON PARTS FIGURE 3 TOASTER PLATEN SHEET FIGURE 4 CARRIAGE ASSEMBLY FIGURE 5 DRIVE MOTOR ASSEMBLY FIGURE...

Page 4: ...MM2B MM2C MM2 EP DWG 152229 WIRING SCH 240V 50 60HZ 1PH VARIABLE SPEED MM2BINTL MM2BINTLCE DWG 158451 WIRING SCHEMATIC 240V 50 60HZ 1PH VARIABLE SPEED MM2B 1 DWG 159717 WIRING SCHEMATIC 240V 50 60HZ...

Page 5: ...platens facing top of toaster USE ONLY MARSHALL APPROVED PLATEN SHEETS OR TOASTER WARRANTY IS VOID 6 Reinstall conveyor carriage and latch 7 Connect the toaster to the power supply 8 Press the on off...

Page 6: ...the toaster is up to temperature Approximately 15 minutes 3 For proper operation insert heels cut side up on the side of the toaster marked HEEL and crowns on the opposite side 4 To turn off press an...

Page 7: ...ove sheet from toaster Place on a flat surface and clean using a damp cloth or non abrasive pad If sheet has black butter buildup it must be wiped off Make sure to install sheet seam again platen faci...

Page 8: ...INSTALLATION OR REPAIR OF ELECTRICAL APPLIANCES WHO IS EXPERIENCED IN SUCH WORK FAMILIAR WITH ALL PRECAUTIONS REQUIRED AND HAS COMPLIED WITH ALL THE REQUIREMENTS OF THE AUTHORITY HAVING JURISDICTION W...

Page 9: ...n 18 Vac on 11 and 12 If 208 volts is present and no 18 Vac output replace transformer 2 PROBLEM Conveyor belts move but no heat SOLUTION QUALIFIED TECHNICIAN CHECK A Check that there is power at rece...

Page 10: ...voltage to motor out of board 90VDC Motor D Check motor ohms Should be approximately 60 ohms E If red light on board is on disconnect load from motor by removing conveyor carriage If it goes out look...

Page 11: ...eck that heaters are cycling Do this by using an amp clamp on either of the wires from the controller to the platen You are looking for cycling Also verify that the temperature controller has power B...

Page 12: ...ge C Check bottom rail flange for bending Refer to the Technical Bulletin at the end of this manual for instructions D Tighten latch mechanism Use a screwdriver and 7 16 wrench It is necessary to remo...

Page 13: ...matic 150425 Butterwheel MM2B MM2BINTL MM2F MMM2 EP 10 144444 Carriage Conveyor Asby MM2A MM2G 3 5 150939 Carriage Conveyor Asby MM2H 3 5 150873 Carriage Conveyor Asby MM2B MM2BINTL MM2J 3 9 160726 Ca...

Page 14: ...Product Return MM2B MM2BINTL MM2 EP 10 164652 Sheet Product Return MM2B ARB 10 150418 Sheet Teflon Loading MM2B MM2BINTL MM2H MM2J 9 149280 Sheet Toaster Platen 4 Pack 4 158454 Slide Product Return M...

Page 15: ...158450 Control ECM3 Module MM2BINTL MM2BINTLCE Schematic 504011 Cord 12 3 w 6 20 Plug MM2A MM2B MM2B ARB MM2H MM2J MM2 EP Schematic 150483 Cord 12 3 w 6 20 Plug MM2G Schematic 504237 Cord Only 12 3 In...

Page 16: ...MM2A MM2B MM2B ARB MM2G NC MM2H MM2J MM2 EP Schematic 150483 Cord 12 3 w 6 20 Plug MM2G Schematic 504237 Cord Only 12 3 Int l MM2BINTL MM2BINTLCE NC MM2GINTL NC Schematic 144139 Fan Cooling 240 Vac Sc...

Page 17: ...OMETRIC FIGURE 2 REMOVABLE HEAT GUARD HEEL LOADING AREA CROWN LOADING AREA BUN DISCHARGE AREA PLATEN GAP ADJUSTMENT GAUGE VIEW WINDOW NEMA 6 20 PLUG 23 375 21 000 1 750 0 625 17 000 BUN LOADING AREA 2...

Page 18: ...H SIDE PART 144016 MM2A MM2G MM2H PART 150887 MM2J MM2B MM2BINTL CE HEEL SIDE OF CONVEYOR CROWN SIDE OF CONVEYOR BUN DISCHARGE COVER SPEED CONTROL PART 144436 S N 1036 AND AFTER PLATE COVER PART 14402...

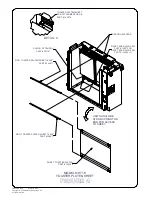
Page 19: ...PART 144077 SHEET TOASTER PLATEN PART 149280 ROD TOASTER PLATEN SHEET 18 250 PART 144077 TOASTER PLATEN SHEET ROD ATTACHMENT HOOK PART 144074 MODELS HT18 TOASTER PLATEN SHEET FIGURE 4 UNIT SHOULD BE...

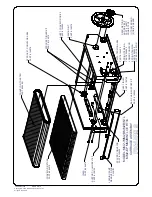
Page 20: ...ONVEYOR ASBY PART 144078 SPROCKET IDLER KIT PART 149276 SHAFT CONVEYOR DRIVE PART 144004 BEARING KIT PART 149275 GEAR RETURN AND DRIVE KIT PART 149277 CONSISTS OF 1 TOASTER AND 2 DRIVE GEARS PLATE TEN...

Page 21: ...MODELS HT18 DRIVE MOTOR ASSEMBLY FIGURE 6 GEAR RETURN AND DRIVE KIT PART 149277 CONSISTS OF 1 TOASTER AND 2 DRIVE GEARS MOTOR RIGHT ANGLE DRIVE PART 503985 NOTE UNIT SHOWN IN UPRIGHT POSITION AS SHOWN...

Page 22: ...IG7 RV062707 MODELS HT18 HEATING PLATEN ASSEMBLY FIGURE 7 PLATEN SUPPORT PLATE ELEMENT TERMINAL COVER PLATEN PART 503981 PLATEN MOUNTING PLATE PLATEN ADJUSTMENT LINKAGE ARMS TOP PANEL TOASTER FRAME TO...

Page 23: ...THE 208V PIN AND MOVE IT DOWN TO THE 230V PIN DO NOT USE TOP PIN WITH 208 OR 230V OR DAMAGE WILL OCCUR STEP 3 USING A SMALL FLAT HEAD SCREW DRIVER REMOVE JUMPER COVER CONTROL ECM3 MODULE PART 144779...

Page 24: ...LCE MM2B ARB ONLY CONVEYOR TOASTER ROD PART 150878 SPROCKET CONVEYOR ASBY PART 144078 SHAFT CONVEYOR DRIVE PART 144004 BEARING KIT PART 149275 GEAR RETURN AND DRIVE KIT PART 149277 CONSISTS OF 1 TOAST...

Page 25: ...TL MM2BINTLCE MM2 EP FIGURE 10 MM2H WRAP BUN TRAY PART 150941 MM2H ONLY MM2J MM2B MM2BINTL MM2BINTLCE MM2 EP SLIDE PRODUCT RETURN PART 158454 SLIDE SHEET ONLY 158195 MM2B ARB SLIDE PRODUCT RETURN PART...

Page 26: ......

Page 27: ......

Page 28: ......

Page 29: ......

Page 30: ......

Page 31: ......

Page 32: ......

Page 33: ......

Page 34: ......

Page 35: ......

Page 36: ......

Page 37: ......

Reviews: