background image


4


Phone 800-888-0127 / 641-753-0127 • Fax 800-477-6341 / 641-753-6341  • www

.MARSHALLTOWN.

com


4


Phone 800-888-0127 / 641-753-0127 • Fax 800-477-6341 / 641-753-6341  • www

.MARSHALLTOWN.

com


5


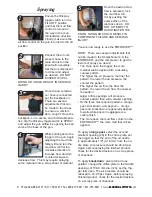
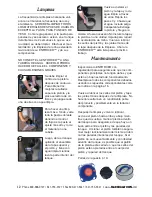
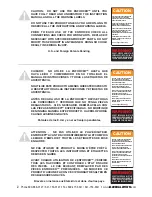
To apply 

popcorn: 

ceiling texture, use one 

of the largest openings (#1, 2, or 3) - Which 

one will depend on the size of the acoustic 

aggregate. The trigger setting should be fully 

open. The air pressure should be 30–40 psi. 

NOTE:  The textures described above are 

made using either a 3/8" or 1/2" I.D. hose. If 

you are using a 1/4" I.D. hose, use greater 

air pressures than specified.

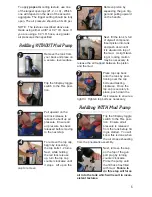
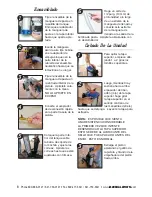
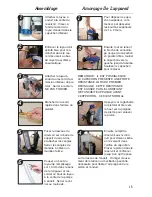
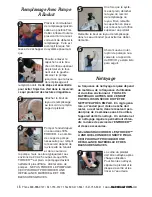
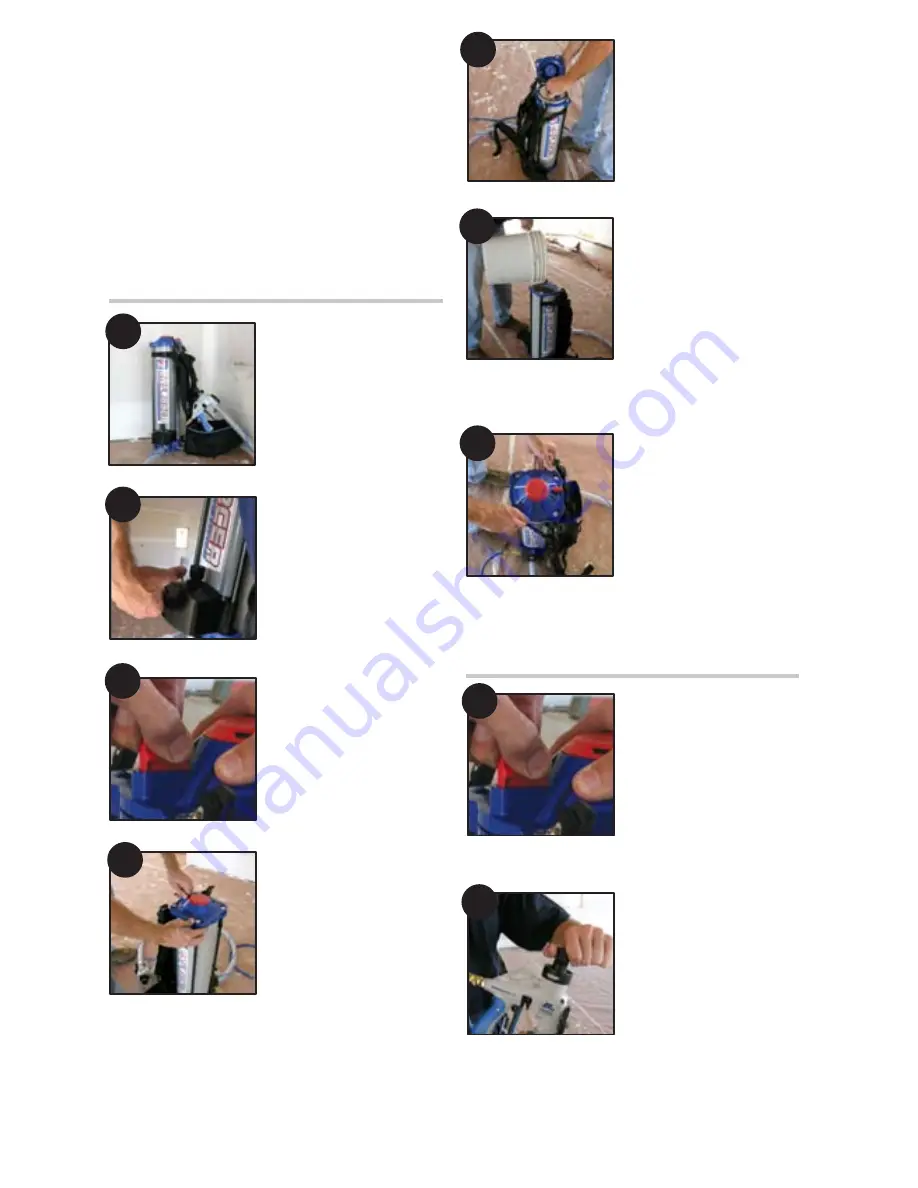
Refilling WITHOUT Mud Pump

Remove the tank from 

your back and place on 

a secure, level surface.

Flip the fill/spray toggle 

switch to the FILL posi-

tion.

Pull upward on the 

red lock release to 

relieve the built up air 

pressure.  Ensure all 

air pressure has been 

released before moving 

to the next step.

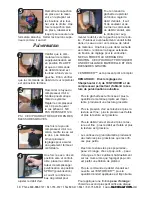
To remove the top cap, 

begin by loosening 

the top bolts 1-2 turns.  

Next, while holding 

the red lock release 

up, turn the top cap 

counter clockwise until 

it stops.  Lift up on the 

cap to remove.

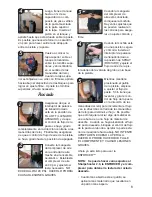
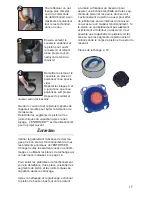
Remove piston by 

squeezing the gun trig-

ger and pulling upward 

on the handle.

Next, fill the tank ¾ full 

of drywall compound.  

Insert piston into tank 

and push down until 

it is situated on top of 

the mud.  A slight twist-

ing or rocking motion 

may be necessary to 

release the air trapped between the piston 

and the mud.

Place top cap back 

onto the tank by posi-

tioning over the top 

bolts and twisting 

clockwise.  Once the 

top cap is securely in 

place, push down the 

lock release to ensure a 

tight fit.  Tighten top bolts as necessary.

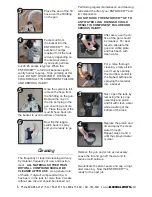
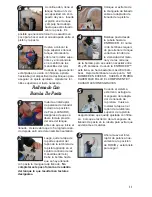
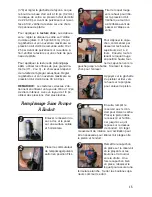
Refilling WITH Mud Pump

Flip the fill/spray toggle 

switch to the FILL posi-

tion.  Ensure all air 

pressure is released 

from the tank before fill-

ing is started.  You will 

know this is done when 

the air stops exhausting 

from the pneumatic assembly.

Next, remove the cap 

on the top of the gun 

port plug by turning 

counter clockwise.

Prime the pump until 

the fill hose has filled 

with mud.  

Failure to 

do this step will force 

air into the tank which will result in incon-

sistent textures.

1

2

3

4

5

6

7

8

9

1

2

3

4

5

6

7

8

9

1

2

3

4

5

6

7

8

9

1

2

3

4

5

6

7

8

9

1

2

3

4

5

6

7

8

9

1

2

3

4

5

6

7

8

9

1

2

3

4

5

6

7

8

9

1

2

3

4

5

6

7

8

9
1

2

3

4

5

6

7

8

9
Summary of Contents for Enforcer E400

Page 1: ...Instruction Manual Instructivo Fiche D instructions by E400 EDI 10400...

Page 2: ...EN DES BLESSURES GRAVES Brevets en instance aux tats Unis et dans d autres pays CAUTION CAUTION DO NOT USE THE ENFORCER UNTIL YOU HAVE FULLY READ AND UNDERSTOOD THE INSTRUCTION MANUAL AND ALL WARNING...

Page 3: ...2 turns Next while pulling and holding the top cap release pin up red turn the top cap coun ter clockwise until it stops Lift up on the cap to remove NOTE YOU MAY FEEL SUBSTANTIAL RESISTENCE THE FIRST...

Page 4: ...DOING SO COULD RESULT IN COMPONENT FAILURE AND SERIOUS INJURY You are now ready to use the ENFORCER NOTE There are several adjustments that can be made to the Sharpshooter 2 0 the ENFORCER and the co...

Page 5: ...pulling upward on the handle Next fill the tank full of drywall compound Insert piston into tank and push down until it is situated on top of the mud A slight twist ing or rocking motion may be neces...

Page 6: ...D AFTER USE As a general rule of thumb if drywall compound will be or has been in the tank for more than 2 weeks without use the unit should be cleaned out Performing regular maintenance and cleaning...

Page 7: ...onent failure After cleaning and re lubrication cycle the piston up and down while twisting the piston by hand within the tank to ensure a good seal between the piston seals and tank walls Cycling thi...

Page 8: ...que est n ajustadas con firmeza Haga un corte de 1 2 pulg 13 mm de profundidad a lo largo de un extremo de la manguera de llenado y conecte este extremo de la manguera de llenado a la salida de la bom...

Page 9: ...o la manguera del compresor de aire est conectada col quese la mochila Hay varios ajustes que se pueden realizar en las correas para asegu rar un ajuste c modo y firme Cuando la mochila est en una pos...

Page 10: ...selec tora a la abertura media 0 315 pulg 8 mm de di metro No 4 y coloque el gatillo en la posici n de totalmente abierto La presi n del aire deber reducirse a 18 o 25 psi Una vez m s antes de aplica...

Page 11: ...de las manecillas del reloj Cebe la bomba hasta que se haya llenado con pasta la manguera de llenado No completar este paso forzar aire adentro del tanque lo que resultar en texturas desiguales Coloqu...

Page 12: ...ia a trav s de ellos Repita los pasos 3 y 4 hasta que el agua rociada salga transparente Extraiga la pistola y friegue la misma si fuera necesario No instale la tapa y la pistola en una unidad mojada...

Page 13: ...serrer les boulons sup rieurs de 1 2 tours Ensuite tout en tenant la broche de verrouilla ge rouge du capuchon en position tir e tourner le capuchon vers la gauche jusqu la but e Soulever le capuchon...

Page 14: ...la commande de d bit d enduit vers la droite pour aug menter le d bit vers la gauche pour le r du ire Pulv riser ventuellement l enduit initial dans un seau ou sur un morceau de rebut de mat riau Une...

Page 15: ...oir du sac dos et le poser sur une surface solide et horizontale Placer le commutateur de remplissage pulv ri sation en position FILL Tirer le loquet rouge vers le haut pour lib rer la pression d air...

Page 16: ...LE POMPAGE CECI POURRAIT PROVOQUER UNE D FAILLANCE MAT RIELLE ET DES BLESSURES GRAVES Une fois que le syst me est plein d tacher le tuyau du raccord de remplissage du tuyau Bien remettre le capuchon...

Page 17: ...tat de fonctionnement de tous les l ments principaux de l ENFORCER Changer toutes les l ments us s ou endom mag s en utilisant les pi ces de rechange qui conviennent indiqu es la page 16 Pour viter le...

Page 18: ...nduit 10413 Seal Kit Juego de sellos Trousse d tanch it 10411 Backpack Tank Straps Correas del tanque para mochila Sangles de r servoir pour sac dos 10408 Top Cap Bolt Set Tornillos para la tapa super...

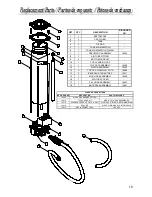
Page 19: ...1 2 15 6 9 17 OTHER RE ORDER ITEMS RE ORDER DESCRIPTION PARTS INCLUDED 10410 TOTAL HOSE KIT MUD HOSE ASSEMBLY FILL HOSE ASSEMBLY 10413 SEAL KIT 2 CAP O RINGS 2 PISTON SEALS DET QTY DESCRIPTION RE ORDE...

Page 20: ...104 South 8th Ave Marshalltown IA 50158 WS137...

Reviews: