15
RED
CABLE
DRUM
STEP
25
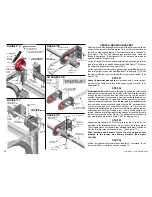
WA R N I N G ! TO R S I O N S P R I N G S C A N C A U S E
SERIOUS INJURY OR DEATH! KEEP HANDS CLEAR OF
WINDING CONES. IF NOT SURE, STOP NOW!
CALL A TRAINED MARTIN DOOR DEALER.
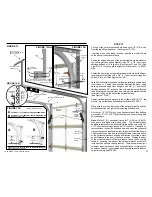
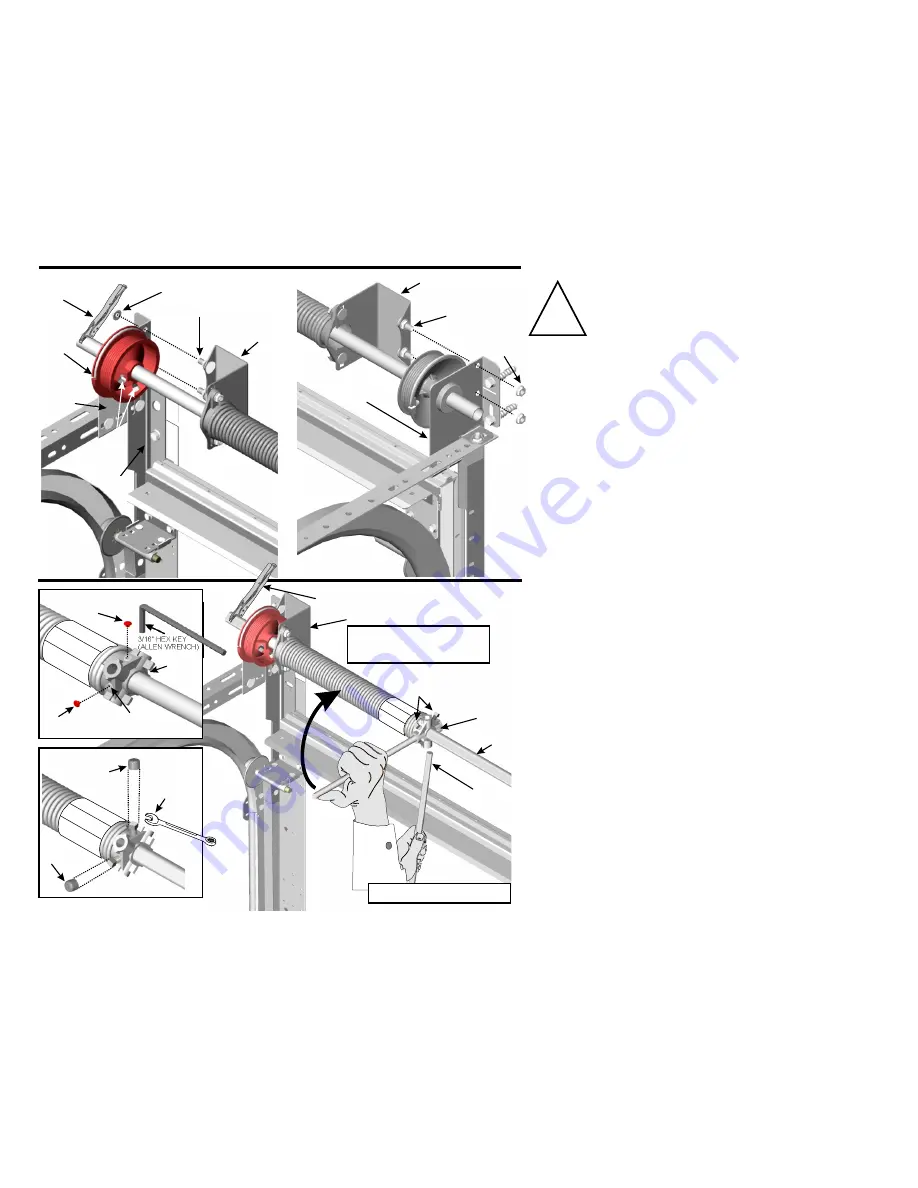
Check to make sure the lock is engaged, or that the door is
clamped down so it will not open. If using 4" (102) cable
drums, wind the torsion springs about 8 ¼ turns for 7' (2130)
high doors or 9 ¼ turns for 8' (2440) high doors. The
horizontal paint stripe on each torsion spring will rotate and
match each turn. Use only 1/2" (12.7) dia. high carbon steel
bars or tubes that closely fit the spring winding cone holes.
Insert the bars or tubes completely to the bottom of the
holes. (DO NOT use screw driver, etc.) Wind each torsion
spring in an upward direction 1/4 of a turn at a time. When
fully wound, tighten down the two 3/8" set screws 1/2” to 1
turn into the torsion tube. Caution: The set screws should
dimple slightly but not puncture the torsion tube. (See
Figure 19A, 19B, 19C).
To reduce the friction on the rotating spring coils, oil the
spring coils during “Final Check List”.
STEP
26
Remove the locking pliers on the torsion tube. Release the
lock or remove the clamp holding the door in place. Slowly
raise the door part way to check for balance. Be sure the
door is rolling free and not binding or rubbing. If the door is
heavy to lift, increase the torsion spring tension. If the door
goes up too fast, decrease the torsion spring tension. It is
better for the door to open a little fast than be too heavy. If
additional torsion spring adjustment is made, follow the
procedures and cautions outlined in STEP 25. Add or delete
1/4 turn at a time, alternating torsion springs. Recheck the
balance. Repeat this procedure until the door rolls smoothly
with a satisfactory balance. Be sure to clamp locking pliers
on the torsion tube and clamp or lock the door in the closed
position before each adjustment. Also read "NOTE" in
STEP 17.
After the final spring adjustment, push the GREY STEALTH
PLUGS in the HEX SOCKET SET SCREWS or the RED
SAFETY CAPS over the SQUARE HEAD SET SCREWS.
Note: Grey stealth plugs are only in 2”(51) winding cones
and 4” (102) cable drums.(See Figures 19B and 19C)
FIGURE 18A
!!
FIGURE 18B
3/8“ LOCK NUT
3/8“ X 1” SHORT
NECK CARRIAGE BOLT
LOCKING PLIERS
SIDE SPRING
ANCHOR BRACKET
LEFT LOCK-ON
SIDE BEARING
BRACKET
LIFT CABLE
3/8“ LOCK
NUT
3/8“ X 1” SHORT NECK
CARRIAGE BOLT
RIGHT LOCK-ON
SIDE BEARING
BRACKET
SIDE SPRING ANCHOR BRACKET
SET
SCREWS
SIDE SPRING ANCHOR BRACKET
LOCKING PLIERS
BLACK
SPRING
WINDING CONE
TORSION TUBE
FIGURE 19A
1/2” DIAMETER
HIGH CARBON
STEEL TUBES
OR BARS
W
NI
AR
NG
WA
RN
IN
G
W
AR
NIN
G
DANGER!
DRILLING HOLES IN THE SIDE
SPRING ANCHOR BRACKET, FOR EXTRA
FASTENING, MAY CAUSE FAILURE.
BRACKET FLEXING IS NORMAL.
HEX SOCKET OR SQUARE
HEAD SET SCREWS
RN
ING
WA
W
AR
N
NG
I
WA
RN
ING
N
WA
RN
I
G
W
AR
NIN
G
WA
RN
NG
I
FIGURE 19C
FIGURE 19B
RED SAFETY CAP
GREY
STEALTH PLUG
GREY
PLUG
STEALTH
HEX SOCKET
SET SCREW
FOR SQUARE
HEAD SET
SCREW USE
END WRENCH
ONLY
3/16” HEX KEY
(ALLEN WRENCH)
RED
SAFETY CAP
TEMPORARILY REMOVE STRUT IF MORE
SPACE IS NEEDED TO WIND SPRINGS
2” (51)
WINDING
CONES
ONLY
COPYRIGHT © 2004 MARTIN DOOR


