background image

4

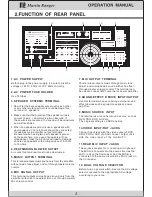
3. SPEAKER SYSTEMS TERMINAL

1.Do not let the bare speaker wires touch each other

or any other metal part as this could damage this
unit and / or speakers.

2.Make sure that the polarity of the speaker wires is

correct. that is : +and-marking are observed. If
these wires are reversed, the sound will be unnatural
and will lack bass.

3.When one speaker system is used, speakers with

an impedance of 4 to 8 ohms should be connected
for used as main amplifier output terminals.
Be careful when using two pairs speaker system
at the same time, since use of speakers with an
impedance of less than 8 ohms will lead to damage,
should use speakers with an impedance of 8 ohms
to 16 ohms.

2. AC POWER FUSE HOLDER

Use T4A fuse.

5.MUSIC OUTPUT TERMINAL

This terminal outputs music sound only from the amplifier.
without music tone adjust, and not through master volume
control.

6.MIC SIGNAL OUTPUT

This terminal outputs microphones' sound only from the
amplifier with mike tone adjust. But not through master
Mic volume control.

Before plug-in the power supply, be sure to pick the
voltage of 230V 50Hz or 115V 60Hz correctly.

1. AC POWER SUPPLY

10

2

3

4

5

6

7

8

11

1

12

9

4. HEATSINKING BLOWER OUTLET

Air vents front and rear must not be obstructed.

600 WATTS

600 WATTS

MUSIC POWER

MUSIC POWER

INPUT VOLTAGE

T. H. D.

T. H. D.

AC 230V /115V

AC 230V /115V

0.05%

RIGHT

LEFT

Pure Sound 55

Pure Sound 55

Recording

LEFT

RIGHT

KOD

KOD

DO NOT REMOVE COVER (OR BACK),
NO USER-SERVICEABLE PARTS INSIDE,
REFER SERVICING TO QUALIFIED
SERVICE PERSONNEL.

DO NOT REMOVE COVER (OR BACK),
NO USER-SERVICEABLE PARTS INSIDE,
REFER SERVICING TO QUALIFIED
SERVICE PERSONNEL.

CAUTION

CA

UT

ION

:

AIR VENTS FRONT A

ND

RE

AR

MUST NOT BE OBST

RU

CT

ED

8.SOUND-EFFECT DEVICE INPUT/OUTPUT

Use this terminal when connecting external sound
effect devices such as graphic equalizer, power
amplifier.

9.MUSIC SOURCE INPUT

The terminal use to connect sound source, such as
DVD CDG KOD AUX etc.
The original setting is on DVD position.

11.REAR MIC INPUT JACKS

These jacks are also for connecting microphones.
The MIC A is connected to the same circuit as the
MIC 1 jack on the front panel. And the MIC B is
connected to the same circuit as the MIC 2 jack on
the front panel.

12. DUAL VOLTAGE SELECTOR

10.VIDEO INPUT/OUT JACKS

Connect input jack with the video output of DVD
CDG KOD or AUX etc. And connect output jack
with the video input of the monitor/TV.

Before turn on power switch, be sure the AC voltage
selector is seted to the appropriate AC voltage
according to your area.

7. MIX OUTPUT TERMINAL

This terminal outputs music through music tone
adjust and microphone's sound with echo effect,
through master volume control. The terminal can
be used to connect MP3 recorder or power amplifier.

Summary of Contents for Pure Sound 55

Page 1: ...TIPLEX b5 b4 b3 b2 b1 1 2 3 4 5 AUT S V C S BASS DVD KOD AUX USB NEXT RECORDER PLAYER BACK PLAY PAUSE STOP REC DELE MP PROFESSIONAL DIGITAL MIXING AMPLIFIER WITH RECORDER Pure Sound 55 Recording LOW LOW LOW LOW LOW OWNER S MANUAL PROFESSIONAL DIGITAL ECHO MIXING AMPLIFIER WITH KARAOKE RECORDER ...

Page 2: ...ar smooth and sound surround music In addition with the advanced Echo and Music Mixed Circuit System the set offers high sensitivity of the echo effect clearness of the sound The lowest signal noise ratio guarantees natural clear sound effects These systems help the singer sing with great ease The set is equipped with advanced Channel Heatsink Blow System and Overheat Protecting which guarantee th...

Page 3: ...rization Precautions should be taken so that the grounding or polarization is not defeated 8 Ventilation The unit should be situated so that its location or position does not interfere with its proper ventilation For example the unit should not be situated on a bed sofa rug or similar surface that may block the ventilation openings or placed in a built in installation such as a bookcase or cabinet...

Page 4: ...3 format 30 Play Pause 31 Stop 32 Record 33 Next 34 Back Previous 35 Circulate Broadcast 36 Delete 9 Echo volume control 11 Echo treble control 12 Repeat length control 13 Delay time control 14 Music volume control 15 Balance control 16 Bass adjust 17 Mid range adjust 18 Treble adjust FUNCTION CONTROL 19 Remote control sensor 22 Key control button 25 Key Display MICROPHONES MUSIC ECHO 10 Echo bass...

Page 5: ...WER MUSIC POWER INPUT VOLTAGE T H D T H D AC 230V 115V AC 230V 115V 0 05 RIGHT LEFT Pure Sound 55 Pure Sound 55Recording LEFT RIGHT KOD KOD DO NOT REMOVE COVER OR BACK NO USER SERVICEABLE PARTS INSIDE REFER SERVICING TO QUALIFIED SERVICE PERSONNEL DO NOT REMOVE COVER OR BACK NO USER SERVICEABLE PARTS INSIDE REFER SERVICING TO QUALIFIED SERVICE PERSONNEL CAUTION CAUTION AIR VENTS FRONT AND REAR MUS...

Page 6: ...on 5 BACK The previous selection 6 PLAY MODE Press the button the selection is circulated Press and hold for 3 seconds the whole folder is circulated 7 DELE Delete button Press the button to delete the current selection in play ORIGINAL SETTING FUNCTION The set is built with original setting function When playing the whole folder is circulated INDICATOR 1 Play Pause indicator In play mode the indi...

Page 7: ...FRONT AND REAR MUST NOT BE OBSTRUCTED 6 TV MONITOR MAIN SPEAKER A MAIN SPEAKER B L R L R AUXILIARY WIRED WIRELESS MICROPHONE KOD DVD CDG SOUND EFFECTOR ACTIVE SUB WOOFER POWER AMPLIFIER POWER AMPLIFIER GRAPHIC EQUALIZER Do not power on the unit until all the connections are completed When the pin plug cords are employed always connect the White plug to the left channel and Red plug to the right ch...

Page 8: ...Hz Mic Tone adjustment 80Hz 15dB 3 5KHz 5dB 12KHz 15dB Echo tone adjustment 80Hz 15dB 12KHz 15dB Power source AC115V 60Hz AC230V 50Hz Net Weight 33Lbs Dimension WxHxD 430x155x355mm Mute switch Key control Input source select Auto singing mate switch Microphone master volume control Music volume control Super Bass switch MUTE INPUT SELECT DVD KOD AUX MIC MUSIC b AUT S MULTIPLEX V C SUPER BASS K E Y...

Page 9: ...position on microphone Do not cover the lower wind screen of the microphone which may interrupt the audio sound and may cause howling Keep apart approx 5 10cm Leave the proper space Martin Roland is constantly striving to maintain the highest quality and standards As a result of these efforts modifications may be made to this product without notice 8 ...

Page 10: ...PROFESSIONAL KARAOKE ...
Reviews: