background image

30

Stand-Alone programming overview


Programming methods

The Exterior 200 provides two stand-alone programming methods; using
the:

• Martin MUM application from a personal computer (recommend because it 

provides an intuitive, easy-to-use, graphical user interface), or an

• MP-2 Upload device. See the “Programming using an MP-2 Uploader” on 

page 37 for further information.

If you are programming a group of fixtures to perform the same scenes with
synchronized-triggering then we recommend that you either:

• Use an MP-2 Uploader to program the same show on all the fixtures on the 

network simultaneously (and then you can assign their individual DMX 
address afterwards), or

• Use MUM to program a single fixture, download and save the fixture 

settings to a file on your PC, and then upload the stand-alone program and 
fixture settings to each subsequent fixture that you connect to.

Summary of Contents for Exterior 200

Page 1: ...Exterior 200 user manual mar tinar chi tect ura l ...

Page 2: ...ny means without permission in writing from Martin Professional A S Denmark Information subject to change without notice Martin Professional A S and all affiliated companies disclaim liability for any injury damage direct or indirect loss consequential or economic loss or any other loss occasioned by the use of inability to use or reliance on the information contained in this manual P N 35000096 R...

Page 3: ...e operating status 25 Fixture control methods 26 Section 2 Stand Alone operation 27 Stand Alone programming overview 28 About scene timing 29 Synchronizing scene changes for multiple Exterior 200s 29 Programming methods 30 Programming from a PC using MUM 31 Getting started 31 Stand Alone Settings 32 Programming effects in scenes 34 Programming the same stand alone show on multiple fixtures 36 Prog...

Page 4: ...nchronous triggering during Stand Alone operation 46 Section 3 DMX control 49 DMX Controller operation 50 Lamp control 50 Effects 51 Section 4 Optics 53 Color matching Exterior 200s and 600s 54 Lens options 55 Changing the lens 55 Changing the front glass 56 Section 5 Service and troubleshooting 57 Service 58 Seal maintenance 58 Lamp replacement 60 Cleaning 61 Firmware updates 61 Fuse replacement ...

Page 5: ...5 SECTION 1 GETTING STARTED ...

Page 6: ...rior 600 FiberSource CMY150 Imager series Alien 02 series MiniMAC Maestro Exterior 200 models The Exterior 200 is available in three models Exterior 200 Long Barrel models The Exterior 200 Long Barrel is available in six models Optional beam angles The following optional lens are available for Exterior 200 models Fresnel lens provides a 34 beam angle in a standard Exterior 200 Micro diffuser lens ...

Page 7: ...er or call the Martin 24 hour service hotline at 45 70 200 201 Guarding against electric shock Disconnect the fixture from AC power before removing or installing the lamp fuses or any part Always ground earth the fixture electrically Use only a source of AC power that complies with local building and electrical codes and has both overload and ground fault protection Refer all service to a Martin s...

Page 8: ...lens The exterior of the fixture becomes very hot up to 90 C 194 F during normal operation Do not locate the fixture in areas where accidental contact is likely Do not modify the fixture or install other than genuine Martin parts Do not operate the fixture if the ambient temperature Ta exceeds 40 C 104 F Preventing injury due to falls When suspending the fixture above ground level verify that the ...

Page 9: ...ge lamp installed User manual Fastening method Notice It is the installer s responsibility to determine the anchoring method The Exterior 200 may be permanently fastened to any flat surface pedestal or other support that can safely bear the weight of all installed fixtures and hardware The mounting bracket provides 3 holes for 12 mm 1 2 in hardware spaced 100 mm on center and 2 quarter circle slot...

Page 10: ...e from low pressure water jets from any direction cannot get into the product However the product is not designed to withstand High pressure water jets from any direction Immersion in water or any other fluid Do not bury the Exterior 200 or otherwise locate it in an unventilated space Install the fixture in a location where it is at least 0 5 meters 20 inches away from the surface to be illuminate...

Page 11: ...uter discs on each side of the bracket Loosen but do not remove the bracket screws Slide the fixture to the desired position and retighten the bracket screws Replace the outer discs 2 To adjust the tilt angle loosen the tilt lock screws Turn the fixture to the desired angle and retighten the screws AC power Do not connect the Exterior 200 to an electrical dimmer system doing so can damage the elec...

Page 12: ...d by a qualified installer or technician Changing the power supply settings 1 Verify that the Exterior 200 is isolated from AC power Remove the rear cover 2 Find the correct transformer setting for the local AC voltage in Table 2 Move the brown transformer wire to the tap listed for the setting Voltage Frequency 230 V 50 Hz 245 V 50 Hz 210 V 60 Hz Table 1 Default Power Supply Settings Transformer ...

Page 13: ...proof power cable However note that if there is a breach or cut at any point along the power cable for example at a connection point and if this is exposed to water moisture can be drawn up the inside of the cables due to the vacuum effect from the heat generated during operation When installing the product outdoors always ensure that the fixture is protected from water ingression from inside its ...

Page 14: ...ble gland and connect the leads The live wire connects to PL3 the neutral wire connects to PL1 and the ground wire connects to the chassis screw terminal 4 Draw up the slack in the AC and data cables and replace the power section cover Tighten the cable gland cap nuts well to seal against moisture Installing a cord cap on the mains lead A non IP rated cord cap may be installed on the mains lead fo...

Page 15: ... 2 mm2 24 AWG for runs up to 300 meters 1000 ft and 0 35 mm2 22 AWG for runs up 500 meters 1640 ft Warning The fixture is not supplied with a weatherproof XLR connectors If these connectors are exposed to water moisture can be drawn up the inside of the cables due to the vacuum effect from the heat generated during operation When installing the product outdoors always ensure that the fixture is pr...

Page 16: ...an XLR connector with a 120 ohm resistor soldered across pins 2 and 3 For permanent terminations the link can be terminated with a 120 ohm resistor across the hot and cold data terminals at the main circuit board inside the last fixture in each chain Building a data link To build a data link 1 Connect a data cable to the controller s data output A male 5 pin to female 3 pin adaptor may be required...

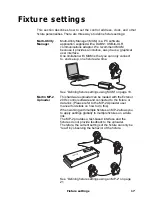
Page 17: ... one fixture at a time See Defining fixture settings using MUM on page 18 Martin MP 2 Uploader This hardware uploader can be loaded with the Exterior 200 s control software and connected to the fixture or data link Please refer to the MP 2 Uploader user manual for details on how to do this When working with multiple fixtures an MP 2 allows you to apply settings globally to multiple fixtures on a d...

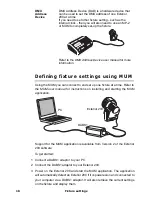
Page 18: ...200 and start the MUM application The application will automatically detect an Exterior 200 if it is powered on and connected to your computer via a DABS1 adaptor It will also retrieve the current settings on the fixture and display them DMX Address Device DMX Address Device DAD is a hardware device that can be used to set the DMX address of one Exterior 200 at a time If you need to set other fixt...

Page 19: ... start and stop stand alone operation To set the clock 1 Using MUM click on the Fixture information button 2 Using the two Fixture time spin buttons set the fixture to the current time expressed in the 24 hour clock in hours and minutes The time will be updated in the fixture in real time ...

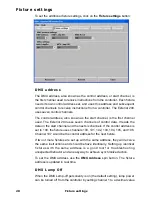
Page 20: ...trol data It reads the data on the start channel and the next six channels If the control address is set to 100 the fixture uses channels 100 101 102 103 104 105 and 106 Channel 107 would be the control address for the next fixture If two or more fixtures are set up with the same address they will receive the same instructions and should behave identically Setting up identical fixtures with the sa...

Page 21: ...e fixture turns on the lamp within 90 seconds of power on When set to off the default setting a lamp on command is required to turn on the lamp MC X Lamp Off By choosing the option MCX Preset 7 Key from the MCX Lamp off field you enable button 7 on an MC X controller to be used to control the lamp off function Defining fixture settings using an MP 2 This hardware uploader can be loaded with the Ex...

Page 22: ...Exterior 200 uses seven control channels The control address also known as the start channel is the first channel used The Exterior 200 uses seven channels of control data It reads the data on the start channel and the next six channels If the control address is set to 100 the fixture uses channels 100 101 102 103 104 105 and 106 Channel 107 would be the control address for the next fixture If two...

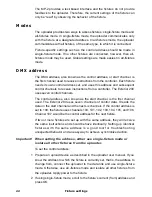
Page 23: ...e set to values from 230 to 232 Automatic Lamp on When the Automatic Lamp on personality is on the fixture turns on the lamp within 90 seconds of power on When set to off the default setting a lamp on command is required to turn on the lamp To set a personality setting 1 Prepare and connect an upload device as described in the uploader user manual Apply power to the fixture 2 Select single fixture...

Page 24: ...24 Fixture settings 4 Select Hour and scroll to the current hour 5 Press OK 6 Select Minute and scroll to the current minute 7 Press OK 8 Press Back to return to the main menu ...

Page 25: ...lamp to warm up fully before turning it off Avoid turning on several lamps at once The LEDs and fixture operating status Two LEDs on the rear panel display the fixture status Normal operation is indicated by two green LEDs See Table 4 for other status messages The LEDs flash off for a brief instant at regular intervals to prevent false readings when the light sensor samples the light level Appeara...

Page 26: ...nce and LED 2 flashes green three times Fixture control methods The Exterior 200 can be controlled With DMX signals from a DMX control device such as a DMX recorder or DMX controller This is described in Section 3 DMX control on page 49 Using stand alone programming There are two ways of programming and storing a show in the fixture itself 1 From a personal computer using the Martin MUM software a...

Page 27: ...General operation 27 SECTION 2 STAND ALONE OPERATION ...

Page 28: ...play continuously in a loop The term stand alone operation can be applied to a single fixture or to multiple fixtures operating synchronously An Exterior 200 running a stand alone show can perform synchronized scene changes triggered by a master fixture with up to 31 other Martin fixtures of the following types Exterior 200 Exterior 600 FiberSource CMY150 Imager series Alien 02 series MiniMAC Maes...

Page 29: ...programming in synchronous triggering situations keep in mind that in order to keep things as simple as possible there are two rules of thumb that will make life much easier try to ensure that 1 Every fixture has the same number of scenes 2 Respective scene times are a few seconds longer on the fixture that issues triggering commands The rules used in the algorithm are detailed in Synchronous trig...

Page 30: ...age 37 for further information If you are programming a group of fixtures to perform the same scenes with synchronized triggering then we recommend that you either Use an MP 2 Uploader to program the same show on all the fixtures on the network simultaneously and then you can assign their individual DMX address afterwards or Use MUM to program a single fixture download and save the fixture setting...

Page 31: ...program in a loop according to the triggering criteria you have specified time of day and or light level If you are not familiar with the use of MUM then it is recommend that you familiarize yourself with it by reading the MUM user manual Getting started To get started 1 Connect a DABS1 adaptor to your PC 2 Connect the DABS1 adaptor to your Exterior 200 3 Power on the Exterior 200 and start the MU...

Page 32: ... automatically when the fixture is powered on This will also cause the fixture to resume stand alone operation if a DMX signal is disconnected Master slave Specifies if the fixture is a single master triggering or slave receiving trigger signals fixture No more than one fixture may be the master Any fixture on the link however regardless of its position may be the master All other fixtures must be...

Page 33: ...ed with a show and that the only commands that are passed are scene change commands No data about the look of the scene is passed between fixtures Automatically triggering stand alone operation Stand alone operation can be set for one or two periods during a 24 hour period or for a light level Setting a light level trigger The option Lightlevel sensor trigger must be set to On Stand alone operatio...

Page 34: ...ample one period in the morning and one period in the evening Programming effects in scenes The programming of effects is performed using the Stand Alone program controls The following options are available Intensity The dimmer level Cyan Magenta Yellow The color Random colors A continuously changing and random mix of all three or any two of the primary subtractive colors CMY The speed of the effe...

Page 35: ...er fixture it will run these in a cycle continuously until the master fixture signals that the program should start from the beginning again More scenes than the master fixture then the additional scenes will never run because the program will reset to the first scene when the master starts its program from the beginning Scene wait time This is the duration a color is applied A wait time can be fr...

Page 36: ... a single fixture at a time using the MUM you can use it to program a single fixture download and save the fixture settings to a file on your PC and then upload the stand alone program and fixture settings to each subsequent fixture that you connect to This is useful if you have a group of fixtures that will run the same stand alone show ...

Page 37: ... to the triggering criteria you have specified time of day or light level To summarize you can use the MP 2 Uploader to program Individual fixtures one at a time The same program in multiple fixtures that are linked with data cables Individual programs in multiple fixtures that are linked with data cables If you are not familiar with the use of the MP 2 then it is recommend that you familiarize yo...

Page 38: ...ribed in DMX address on page 22 You have the option of programing all the Exterior 200s on a data link or an individual Exterior 200 Fixture specific settings such as the control address should be made in single fixture mode If no other fixtures are connected however then all fixtures mode may be used Global settings are made easiest in all fixtures mode For example it might be appropriate to prog...

Page 39: ...le Exterior 200s on a data link it is possible to synchronize scene changes Read this section if this applies in your case One controlling fixture triggers simultaneous program start and scene changes in the other fixtures Each fixture stores its own program and the controlling fixture triggers simultaneous program start and scene changes in a cycle based on its own program Each fixture will run i...

Page 40: ...ill respond to synchronization signals received from the master fixture Automatically triggering stand alone operation Stand alone operation can be set for one or two periods during a 24 hour period or for a light level Setting a light level trigger Stand alone operation can be set for a light level using the built in light sensor If the light levels fall below the specified level then operation s...

Page 41: ...imer trigger Stand alone operation can be set for one or two periods during a 24 hour period using the built in clock If both the clock and the light sensor are used operation starts within the times set and whenever it is darker than the light level setting Operation stops at the stop time provided that the ambient light is brighter than the light trigger setting The first thing to do is to set t...

Page 42: ...de for 15 seconds Scene management Once you have specified a mix of effects you can store the scene using the options available under the Program menu Dimmer The dimmer level Cyan Magenta Yellow The color Random colors A continuously changing and random mix of all three or any two of the primary subtractive colors CMY The speed of the effect can be set to slow medium or fast Fade time The fade tim...

Page 43: ...tart at power on You can specify that the program should start automatically when the fixture is powered on From the Stand alone menu select Auto prog on Then select On This will also cause the fixture to resume stand alone operation if a DMX signal is disconnected Disconnecting the MP 2 Uploader When all the settings have been made disconnect the data input cable from the MP 2 Reconnect the outpu...

Page 44: ...nd Alone Settings on page 32 if you are using MUM Scene execution using the optional MC X The MC X is an optional remote control unit that is available from Martin Once the remote controller is connected 7 scenes can be conveniently called up on the MC X s buttons Enabling MC X control Using an MP 2 For each fixture 1 Disable stand alone operation on each fixture select SA run OFF and press enter ...

Page 45: ...via an XLR to RJ 45 adaptor If multiple Exterior 200s are connected plug the controller into the first fixture in the link 2 To trigger scenes 00 06 press the numbered preset buttons on the MC X 3 To have each fixture run its own routine press Auto DMX controller override during stand alone show playback If an Exterior 200 is connected to a DMX controller and receives DMX signals during show playb...

Page 46: ...d by a wait section 4 When running synchronous triggering one Exterior 200 issues commands to the other Exterior 200s to go to scene xx where xx is the scene number that master will execute next 5 If a slave has fewer scenes than the master it will derive which scene to go to by dividing the number of the scene it has been commanded to go to scene 5 for example by the total number of scenes that t...

Page 47: ...s a longer scene time than master Note that in the following example the scenes in the Slave run out of their programmed sequence because scenes 0 and 2 on the Slave are longer than the corresponding scenes on the Master F fade W wait Timeline M0 M1 M2 M3 Programmed in Master F W F W F W F W S0 S1 S2 S3 S4 Programmed in Slave F W F W F W F W F W Result M0 M1 M2 M3 F W F W F W F W S0 S1 S2 S3 F W F...

Page 48: ...48 Synchronous triggering during Stand Alone operation ...

Page 49: ...Synchronous triggering during Stand Alone operation 49 SECTION 3 DMX CONTROL ...

Page 50: ...l stop running and the fixture will respond to the DMX controller DMX signals always have priority over the running of a stand alone show Lamp control Important Avoid striking several lamps at once The lamp can be turned on and off from the controller using the lamp on and lamp off commands on channel 1 If the DMX Lamp off personality is off the lamp off command on channel 1 executes only if each ...

Page 51: ...lters A continuous range of colors may be achieved by varying the amount of each filter from 0 to 100 on channels 3 4 and 5 To execute specific color values channel 6 random color mixing must be set to 0 Note that mixing 3 colors results in a loss of light the light is blacked out when all 3 colors are fully applied For maximum brightness mix only 2 colors at a time If you have Exterior 600 and Ex...

Page 52: ...speed channel to a decimal value from 0 to 2 Fades are then programmed using the controller s cross faders The Exterior 200 has a digital filter algorithm that averages several updates to ensure smooth movement Vector control provides a way to program fades on controllers without cross faders and may provide smoother fades than tracking control with some controllers particularly on very slow fades...

Page 53: ...DMX Controller operation 53 SECTION 4 OPTICS ...

Page 54: ...olors of the spectrum Lower powered lamp used in the Exterior 200 will give deeper colors in the warm colors of the spectrum The following table gives some approximate values for color matching Color Exterior 600 with MSD 575 lamp Exterior 200 with CDM lamp White Magenta 25 Yellow 44 Open White Open Cyan 74 Yellow Yellow 241 Magenta 16 Full yellow Magenta Magenta 100 Yellow 68 Full magenta Cyan Fu...

Page 55: ...s with the rough side out away from the lamp Fresnel lens The Fresnel lens is suitable for the standard Exterior 200 It provides a symmetric 34 field It installs with the ridges out away from the lamp Beam shaper lens The beam shaper lens provides a 83 x 91 beam angle in a standard Exterior 200 and a 14 x 69 beam angle in an Exterior 200 Long Barrel The lens should be installed with the ridges fac...

Page 56: ...overtighten 3 To replace the front cover a Drive all screws to the bottom without tightening finger tight only b Starting with one screw and working around in a circle tighten all screws partially with low torque c Gradually tighten to a maximum torque of 1 8 2 0 Nm 1 3 1 5 Ft Lbs still working around in a circle Note that if you tighten the screws to more than the maximum torque the front glass m...

Page 57: ...Lens options 57 SECTION 5 SERVICE AND TROUBLESHOOTING ...

Page 58: ... 0 Nm 0 8 1 5 Ft Lbs must be used to tighten screws to the torque settings specified in this manual Damage caused by incorrectly torqued screws is not covered by the product guarantee Cross tighten all cover screws gradually to a torque of 1 8 2 0 Nm 1 3 1 5 Ft Lbs At this torque the seal will be compressed by about one third Seals should stick out 0 5 1 mm 1 64 1 32 in beyond the outside of the c...

Page 59: ...that is cracked torn brittle or inflexible Replacement seals may be ordered as follows Front section seal for Exterior 200 300 P N 20600070 Lamp section seal for Exterior 200 300 P N 20600080 Power section seal for Exterior 200 300 P N 20600090 Cable glands The cable gland must be replaced if the power or data cable is replaced with a cable of a different diameter or if the data cable is replaced ...

Page 60: ...he lamp out of the housing 4 Remove the old lamp from the socket Holding the new lamp by its ceramic base do not touch the glass bulb insert it firmly and squarely into the lamp socket Clean the glass bulb with an alcohol wipe or a clean lint free cloth wetted with alcohol 5 Gently insert the lamp through the reflector opening without winding the wires around the lamp 6 Replace the Allen screws To...

Page 61: ...rd DJ and Club versions Note Intermediate control systems such as the Martin Lighting Director MLD and the Martin Matrix must be bypassed when updating fixture software via the DMX link These systems do not relay the update code correctly because it is not a DMX compliant signal Normal update To update fixture software connect an upload device to the fixture just like a DMX controller and perform ...

Page 62: ...3 5 To replace the cover see Seals and torque settings on page 58 Fuse replacement Warning Never replace fuses with ones of a different rating The Exterior 200 has 3 fuses located in the power section The main fuse is located on the small circuit board and the secondary fuses for the low voltage power supplies are located on the main circuit board Fuse replacement requires a 4 mm Allen wrench and ...

Page 63: ...se T2AT Bat 3V Lithium Bat 3V Lithium PL24 Ext Init Lock Boot Disable Enable Write Flash TX RX TX RX RX only RX only sensor Heat Details Protective Gnd Protective Gnd Hot Cold Protective Gnd Protective Gnd LED s 24V AC 24V AC 12V AC 12V AC 1 P N 33120026 B P N 33120026 B FAN FAN Effect module Effect module FAN Power module Power module PL 11 PL 17 PL 10 PL 24 PL 1 PL 2 1 1 1 12V 24V Light sensor L...

Page 64: ...een tracking and vector control Eliminate scene cross fade on controller or set ch 7 to 0 Data link not terminated Insert termination plug in output of last fixture Defective fixture or 2 devices transmitting on link Bypass fixtures one at a time until normal operation is regained unplug both connectors and connect them directly together Colors cannot be mixed Random color mixing is on Turn off ra...

Page 65: ...SECTION 6 REFERENCE ...

Page 66: ... Disable timer operation Timer 1 Use timer 1 to trigger start stop Timer 2 Use timer 2 to trigger start stop Both Timers Use timers 1 and 2 to trigger start stop Timer 1 Start Hour Set timer 1 start hour Minute Set timer 1 start minute Stop Hour Set timer 1 stop hour Minute Set timer 1 stop minute Timer 2 Start Hour Set timer 2 start hour Minute Set timer 2 start minute Stop Hour Set timer 2 stop ...

Page 67: ...edi Random greenish colors medium Cyan Yel fast Random greenish colors fast Fade time Snap Set scene fade time to zero so that scene changes are immediate 1 sec 2 min Set scene fade time from one second up to two minutes Wait trig time 0 s 10 m Set scene wait time up to 10 minutes Add scene Go Save new scene to end of sequence Next scene Go Call the next scene Previous scene Go Call the previous s...

Page 68: ...ial DMX lamp off Off Require confirmation of lamp off default On Enable lamp off without confirmation DMX reset Off Require confirmation of reset command On Enable reset without confirmation default Auto lamp on Off Strike lamp from controller default On Strike lamp automatically within 90 seconds of power on Version Leave The installed firmware version number is displayed by the LEDs at the rear ...

Page 69: ... 5 seconds 2 0 255 0 100 Dimmer Closed Æ open 3 0 255 0 100 Cyan White Æ Cyan 4 0 255 0 100 Magenta White Æ Magenta 5 0 255 0 100 Yellow White Æ Yellow 6 0 14 15 34 35 54 55 74 75 94 95 114 115 134 135 154 155 174 175 194 195 214 215 234 235 255 0 5 5 13 13 21 21 29 29 37 37 44 45 52 53 60 61 68 68 76 76 84 84 92 92 255 Random Color Mixing Off CMY slow CMY medium CMY fast MY slow MY medium MY mix ...

Page 70: ... update Serial upload MUF Stand alone trigger options Internal real time clock with timer and light level sensor Stand alone memory 20 scenes Data input output 1 8 m 5 9 ft trailing cable w 3 pin XLR male 3 pin XLR female Data pin out Pin 1 shield pin 2 cold pin 3 hot DMX channels 7 D yn a m ic e ffe ct s Cyan filter 0 100 Magenta filter 0 100 Yellow filter 0 100 Dimmer 0 100 I n st al lat io n Mi...

Page 71: ...a nd c u r r e n t 195 V 50 60 Hz 210 W 1 2 A 210 V 50 60 Hz 220 W 1 1 A 225 V 50 60 Hz 200 W 1 0 A 245 V 50 60 Hz 200 W 0 9 A 277 V 50 60 Hz 200 W 0 8 A These measurements have a margin of error of 10 C on s tr u c tio n Housing extruded aluminum Finish anodized natural aluminum color Front glass 6 mm 0 24 in anti reflection coated Mounting bracket 8 mm 0 3 in anodized aluminum Housing to bracket...

Page 72: ...ns 230V 50Hz no color applied Measurement source Philips CDM SA T 150W P ho t om e t ri cs E x te r i o r 20 0 w i th F r e sn e l l en s Efficiency 38 Half peak angle 21º One tenth peak angle 34º Illuminance 37721 distance lux Half peak diameter 0 35 x distance m One tenth peak diameter 0 58 x distance m Measurement conditions 230V 50Hz no color applied Measurement source Philips CDM SA T 150W P ...

Page 73: ...e P N 90758430 MUM Multi Utility Manager P N 90758090 MP 2 Uploader P N 90758420 O rde r i n g i n fo r m a t i o n Exterior 200 60 230V 50Hz P N 90509000 Exterior 200 60 245V 50Hz P N 90509002 Exterior 200 60 210V 60Hz P N 90509004 Exterior 200 Long Barrel 12 230V 50Hz P N 90509020 Exterior 200 Long Barrel 12 245V 50Hz P N 90509022 Exterior 200 Long Barrel 12 210V 60Hz P N 90509024 Exterior 200 L...

Page 74: ... and of the Council of the European Union on WEEE Waste Electrical and Electronic Equipment as amended by Directive 2003 108 EC where applicable Help preserve the environment Ensure that this product is recycled at the end of its life Your supplier can give details of local arrangements for the disposal of Martin products ...

Page 75: ......

Page 76: ...www martin architectural com Olof Palmes Allé 18 8200 Aarhus N Denmark Tel 45 8740 0000 Fax 45 8740 0010 ...

Reviews: