background image


RUSH MH 1 Profile User Manual 

11 


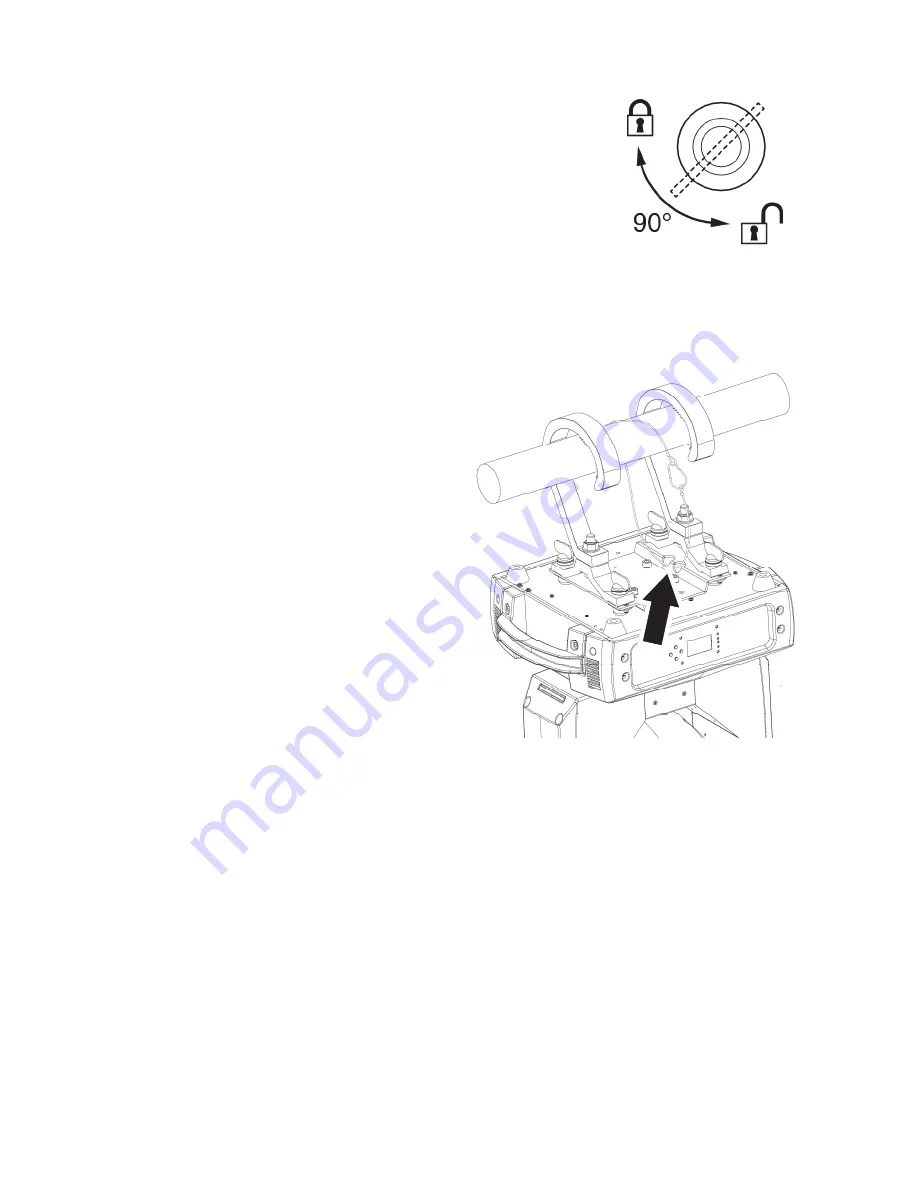
4.  Fasten the brackets 

A

 to the base of the fixture 

using their quarter-turn fasteners. Turn the 
quarter-turn screws a full 90° to lock them.  

5.  Working from a stable platform, hang the fixture on 

the truss and tighten the rigging clamps onto the 
truss. 

6.  Secure the fixture with a safety cable as directed below. 
7.  Check that the head will not collide with other fixtures or objects. 

Securing with a safety cable 

Secure the fixture with a safety cable 
(or other secondary attachment) that 
is approved for the weight of the 
fixture so that the safety cable will 
hold the fixture if a primary 
attachment fails. Loop the safety 
cable through the cutout in the 
fixture’s baseplate (arrowed in 
illustration on right) and around a 
secure anchoring point. 

Martin™ can supply suitable safety 
cables and rigging clamps (see 
‘Accessories’ on page 41). 


Summary of Contents for MH 1 Profile

Page 1: ...MH 1 Profile User Manual Professional Entertainment Technology ...

Page 2: ...nability to use or reliance on the information contained in this manual The Martin logo the RUSH by Martin logo the RUSH by Martin name the Martin name and all other trademarks in this document pertaining to services or products by Martin Professional or its affiliates and subsidiaries are trademarks owned or licensed by Martin Professional or its affiliates or subsidiaries Martin Professional Olo...

Page 3: ...ture setup Error Bookmark not defined Using the control menus 15 DMX function settings 16 Show settings 17 Fixture settings 18 Display settings 19 Fixture test 20 Fixture information 20 Reset functions or effects 21 Reset factory default settings 21 Effect home position adjustment Offset menu 21 Effects 23 Pan and tilt 23 Gobos 23 Iris 23 Motorized focus 23 Prism 24 Strobe effects 24 Electronic di...

Page 4: ...the beam Do not view the light output with optical instruments or any device that may concentrate the beam This lighting fixture is for professional use only and must be installed by a qualified technician It is not for household use It presents risks of severe injury or death due to fire hazards electric shock and falls It produces a powerful concentrated beam of light that can create a fire haza...

Page 5: ...se Ensure that the fixture is electrically connected to ground earth Use only a source of AC power that complies with local building and electrical codes and has both overload and ground fault earth fault protection Socket outlets or external power switches used to supply the fixture with power must be located near the fixture and easily accessible so that the fixture can easily be disconnected fr...

Page 6: ...mperature rated to suit the application In the USA and Canada the cables must be UL listed type SJT or equivalent In the EU the cables must be type H05VV F or equivalent Suitable cables with Neutrik PowerCon connectors are available from Martin see Accessories on page 41 If you use these cables you can connect fixtures to power in a linked chain MAINS OUT throughput socket to MAINS IN input socket...

Page 7: ...tems are selected To minimize the risk of eye irritation or injury disconnect the fixture from power at all times when the fixture is not in use and provide well lit conditions to reduce the pupil diameter of anyone working on or near the fixture Protection from injury Fasten the fixture securely to a fixed surface or structure when in use The fixture is not portable when installed Ensure that any...

Page 8: ...and work from a stable platform whenever installing servicing or moving the fixture Do not operate the fixture with missing or damaged covers shields or any optical component Do not lift or carry the fixture by its head Support the fixture by its base only In the event of an operating problem stop using the fixture immediately and disconnect it from power Do not attempt to use a fixture that is ob...

Page 9: ...cluded and two omega brackets for rigging clamp attachment Before using the product for the first time 1 Read Safety information on page 4 before installing operating or servicing the fixture 2 Unpack and ensure that there is no transportation damage before using the fixture Never attempt to operate a damaged fixture 3 If the fixture is not going to be hard wired to a mains supply attach a local p...

Page 10: ...r If you install the fixture in a location where it may cause injury or damage if it falls loop a securely anchored safety cable through the attachment point arrowed in illustration below in the base of the fixture to hold it if the primary fastening method fails Mounting the fixture on a truss The fixture can be clamped to a truss or similar rigging structure To clamp the fixture to a truss 1 Che...

Page 11: ...rected below 7 Check that the head will not collide with other fixtures or objects Securing with a safety cable Secure the fixture with a safety cable or other secondary attachment that is approved for the weight of the fixture so that the safety cable will hold the fixture if a primary attachment fails Loop the safety cable through the cutout in the fixture s baseplate arrowed in illustration on ...

Page 12: ... power Do not insert or remove live Neutrik PowerCon connectors to apply or cut power as this may cause arcing at the terminals that will damage the connectors Do not use an external dimming system to supply power to the fixture as this may cause damage to the fixture that is not covered by the product warranty The fixture can be hard wired to a building electrical installation if you want to inst...

Page 13: ...00 120 V or Maximum eight 8 RUSH MH 1 fixtures in total at 200 240 V If you install a power plug on the 14 AWG 1 5 mm2 power cable install a grounding type earthed plug with integral cable grip that is rated minimum 250 V 16 A Fixture overview 1 Display 2 LEDs The fixture has two LEDs on the front of the base with the following functions DMX On DMX input present SOUND Flashing Sound activation 3 B...

Page 14: ...is replaced as directed in this manual and safety limits are respected Control data link A DMX 512 data link is required in order to control the fixture via DMX The fixture has 3 pin and 5 pin XLR connectors for DMX data input and output The number of daisy chained fixtures is limited by the number of DMX channels required by the fixtures in relation to the maximum 512 channels available in one DM...

Page 15: ...tween pins 2 and 3 soaks up the control signal so it does not reflect and cause interference If a splitter is used terminate each branch of the link Connecting the DMX data link To connect the fixture to data 1 Connect the DMX data output from the controller to the first fixture s male XLR DMX input connector 2 Connect the first fixture s DMX output to the DMX input of the next fixture and continu...

Page 16: ...ses and symmetric control particularly when combined with the inverse pan and tilt options The DMX address is configured using the DMX FUNCTIONS menu in the control panel To set the fixture s DMX address 1 Select DMX FUNCTIONS and press ENTER 2 Use the UP and DOWN buttons to select DMX ADDRESS and press ENTER to confirm The present address will blink on the display 3 Use the UP and DOWN buttons to...

Page 17: ...how mode provides four preprogrammed shows These are not accessible via DMX Show mode can be combined with music trig sound activation to provide a synchronized light show To set a fixture s show mode 1 Select SHOW SETTINGS and press ENTER to confirm 2 Use the DOWN and UP buttons to select SHOW MODE and press ENTER to confirm 3 Use the DOWN and UP buttons to select SHOW 1 SHOW 2 SHOW 3 or SHOW 4 4...

Page 18: ...ust the sensitivity of the sound activation microphone 1 Select SHOW SETTINGS and press ENTER to confirm 2 Select SOUND SENSIVITY and press ENTER to confirm 3 Use the DOWN and UP buttons to change the microphone sensitivity from 0 100 low high 4 Once the level has been selected press ENTER to set it or press MENU to exit without saving any changes Fixture settings Pan and or tilt inversion The FIX...

Page 19: ...es color changes and or pan and tilt movement This feature is disabled by default To adjust the blackout during show playback settings 1 Select FIXTURE SETTINGS and press ENTER to confirm 2 Use the DOWN and UP buttons to select BL O P T MOVING BL O COLOR CHANGE or BL O GOBO CHANGE and press ENTER to confirm 3 Use the DOWN and UP buttons to select YES blackout during movement or change or NO normal...

Page 20: ...ETTINGS and press ENTER to confirm 2 Use the DOWN and UP buttons to select BACKLIGHT BRIGHTNESS and press ENTER to confirm 3 Use the DOWN and UP buttons to select a level from 1 to 10 4 Press ENTER to confirm or press MENU to exit without saving any changes Fixture test Automatic tests of all functions or manual test of individual functions can be run from the control menus Auto test To perform a ...

Page 21: ...Reset functions or effects The various effects pan tilt color gobos iris focus prism or all effects can be manually reset to their home positions 1 Select RESET FUNCTIONS and press ENTER to confirm 2 Use the DOWN and UP buttons to select the function or effect that is to be reset Press ENTER 3 Use the DOWN and UP buttons to select YES and press ENTER to confirm or press MENU to exit without saving...

Page 22: ...xed home position will appear blinking in the display Use the DOWN and UP buttons to adjust the home position of the function or effect 4 Once the correct position has been reached press ENTER to set this or press MENU to exit without saving any changes ...

Page 23: ...at if a pan or tilt position error is detected the shutter closes and the fixture resets to the correct pan tilt position This can be disabled if not required see Control menus on page 32 Gobos The fixture contains two gobo wheels Any gobo can be projected statically or the wheels can be rotated both clockwise and counter clockwise Individual gobos on wheel 1 can be rotated both clockwise and coun...

Page 24: ...he strobe effects provide instant open and blackout variable speed regular and random strobe Electronic dimming Overall intensity can be adjusted 0 100 Color wheels The fixture incorporates two color wheels each with seven colors plus open white These can be individually selected or the wheels can be rotated at varying speeds both clockwise and counter clockwise The fixture can be set to automatic...

Page 25: ...hest level of performance throughout the product s lifetime Please contact Martin for details Cleaning Excessive dust smoke fluid and particle buildup degrades performance causes overheating and will damage the fixture Damage caused by inadequate cleaning or maintenance is not covered by the product warranty The cleaning of external optical lenses must be carried out periodically to optimize light...

Page 26: ...th a soft repeated press Dry with a soft clean lint free cloth or low pressure compressed air Remove stuck particles with an unscented tissue or cotton swab moistened with glass cleaner or distilled water 4 Check that the fixture is dry before reapplying power Replacing the primary fuse If the fixture is completely dead the fixture s primary fuse F1 may have blown and it may be necessary to instal...

Page 27: ...om your fingers for example Handle and store them with care To replace a gobo 1 Disconnect the fixture from power and allow it to cool for at least 10 minutes 2 Remove the fixture head cover using a Phillips screwdriver 3 The rotating gobos sit in blades that slot into the rotating gobo wheel Lift out the blade that contains the gobo that is to be replaced 4 The gobo is held in place on the blade ...

Page 28: ...e slow open 182 189 Open 190 231 Slow close fast open 232 239 Open 240 247 Random strobe 248 255 Open 8 Color wheel 1 0 7 Color 1 Open 8 15 Color 2 Light Blue 16 23 Color 3 Green 24 31 Color 4 Orange 32 39 Color 5 Yellow 40 47 Color 6 Magenta 48 55 Color 7 Dark blue 56 63 Color 8 Red 64 127 Indexing 128 189 Clockwise fast slow 190 193 Stop 194 255 Counter clockwise slow fast 9 Color wheel 2 0 7 Co...

Page 29: ... 31 Gobo 3 32 39 Gobo 4 40 47 Gobo 5 48 55 Gobo 6 56 63 Gobo 7 64 73 Gobo 1 shake 74 82 Gobo 2 shake 83 91 Gobo 3 shake 92 100 Gobo 4 shake 101 109 Gobo 5 shake 110 118 Gobo 6 shake 119 127 Gobo 7 shake 128 189 Wheel rotation clockwise fast slow 190 193 Stop 194 255 Wheel rotation counter clockwise slow fast 11 Gobo rotation wheel 1 0 127 Indexed position 0 360 128 189 Clockwise rotation fast slow...

Page 30: ...12 119 Gobo 7 shake 120 127 Gobo 8 shake 128 189 Wheel rotation counter clockwise fast slow 190 193 Stop 194 255 Wheel rotation clockwise slow fast 13 Prism 0 127 No effect 128 255 Prism effect 14 Prism rotation 0 127 Indexed position 0 360 128 189 Clockwise rotation fast slow 190 193 Stop 194 255 Counter clockwise rotation slow fast 15 0 255 Iris maximum minimum 16 0 255 Focus close distant 17 Se...

Page 31: ...ing gobo change 120 129 Disable blackout during gobo change 130 139 No function 140 149 Pan tilt reset 150 159 Color reset 160 169 Gobo reset 170 179 No function 180 189 Focus reset 190 199 No function 200 209 Reset all 210 219 Blackout during pan tilt or color gobo change 220 229 Disable blackout during pan tilt or color gobo change 230 255 No function ...

Page 32: ...rk not defined Settings are retained when the fixture is powered off Using the control menus on page 15 Default fixture settings are shown in bold Menu Sub menu Setting value Explanation DMX Functions DMX Address 1 512 Fixture DMX address setting Mode 17 channel View DMX Value View values received on DMX channels Show settings Offline Mode M S When no DMX signal go to Show Mode Hold When no DMX si...

Page 33: ...3 Menu Sub menu Setting value Explanation Focus 2 0 255 Focus setting for gobo wheel 2 fixed gobos Sound Trigger Off Sound activation off On Sound activation on Sound Sensitivity 0 100 Sound activation microphone sensitivity low high ...

Page 34: ...y inverse Yes No Invert control panel display Backlight Auto Off Yes No Automatically turn off display backlight when not in use Backlight Brightness 1 10 Display panel backlight brightness Temperature Unit C F Celsius Fahrenheit Fixture Test Auto Test Automatic test of all functions Manual Test Manually test all functions Fixture Information Fixture Use Hour Fixture operating hour counter non res...

Page 35: ...ects To access the Offset menu press the MENU button to enter the menu structure and then press and hold the ENTER button for three seconds Menu Sub menu Setting Explanation Offset Pan 128 127 Tilt 128 127 Color 1 128 127 Color 2 128 127 Gobo 1 128 127 Wheel with rotating gobos R Gobo 1 128 127 Rotating gobos Gobo 2 128 127 Wheel with fixed gobos Iris 0 255 Prism 0 255 R prism 128 127 Focus 0 255 ...

Page 36: ...n 105º C detected Fixture runs at reduced power level Maintenance Fixture Service countdown timer has reached zero Check whether fixture requires maintenance such as cleaning then reset countdown timer in Fixture Information menu Memory Initial Fail Damaged memory IC Contact Martin support CPU B Error CPU C Error CPU D Error Board processor or fixture wiring is damaged Contact Martin support Pan R...

Page 37: ... cables Replace fixture fuse Fixture does not react to music beat Sound activation disabled Sound activation sensitivity too low for music source Ensure that fixture is not connected to a DMX signal Adjust sound activation microphone sensitivity Tap microphone to check correct functionality The fixture should react when in sound activation mode One of the control channels is unresponsive or only r...

Page 38: ...o a high voltage installation Ensure that fixture s DMX address matches address set on DMX control device Check that fixture DMX LED is on and if not check all DMX cables and connections Ensure that DMX link is terminated Check that all components on DMX link use standard DMX polarity Attempt to control the fixture with another DMX control device Move or shield link if it is close to an unshielded...

Page 39: ...s Dynamic Effects Color wheel 1 7 colors plus open rotation with variable direction and speed Color wheel 2 7 colors incl 1 x UV 2 x CTC plus open rotation with variable direction and speed Rotating gobo wheel 7 gobos plus open wheel rotation gobo indexing rotation and shake Static gobo wheel 8 gobos plus open wheel rotation and shake ...

Page 40: ...backlit LCD display DMX compliance USITT DMX512 1990 Optics and Photometric Data Light source 180 W LED engine Minimum LED lifetime 50 000 hours to 70 luminous output Rotating gobo size 26 8 mm 1 1 in Rotating gobo image size 22 mm 0 87 in Figure obtained under manufacturer s test conditions Construction Color Black Housing High impact flame retardant thermoplastic Protection rating IP 20 Installa...

Page 41: ...573 US EMC FCC Part 15 Class A Canadian safety pending CSA C22 2 No 166 Canadian EMC ICES 003 Class A Australia NZ C TICK N4241 Included Items Power cable 6 A 18 AWG 0 75 mm2 UL listed H05VV F 1 5 m without mains plug Accessories Cables 16 A for connection to power in chains Power input cable 14 AWG SJT 1 5 mm2 H05VV F with PowerCon input connector 3 m 9 8 ft P N 11541508 Power relay cable 14 AWG ...

Page 42: ...ring Information RUSH MH 1 Profile in cardboard box P N 90280000 Specifications are subject to change without notice For the latest product specifications see www martin com Disposing of this product RUSH by Martin products are supplied in compliance with Directive 2012 19 EC of the European Parliament and of the Council of the European Union on WEEE Waste Electrical and Electronic Equipment where...

Page 43: ......

Page 44: ......

Page 45: ...Innovation Quality Performance ...

Reviews: