- 9 -
hot drinks. Do not put loads of more than 0.2 Kg in
the hood pockets (if present).
_ Do not use the product near to stairs or steps, heat
sources, naked flames or dangerous objects within
reach of the child.
_ Only replacement parts supplied or recommended by
the manufacturer/distributor shall be used.
_ WARNING! Don't use the rain cover (if present)
on a product without a hood or parasol that can
hold it. Always use the rain cover only under adult
supervision. Don't use the rain cover indoors and
check to ensure the child is not to warm; do not
park the vehicle close to heat sources and keep well
away from the lighted cigarettes. Ensure that the rain
cover is not interfering with any moving parts of the
carriage/stroller. Always remove the rain cover before
folding your carriage/stroller.
_ WARNING! This product is not suitable for running or
skating.
_ Always apply the brake when loading or unloading
children.
_ WARNING! Do not add any mattress are not
approved by the manufacturer.
_ Do not use accessories which are not approved by
the manufacturer.
PRODUCT COMPONENTS
Inspect the content of the package and contact
our Customer Service in the event of a event of a
complaint.
_Classico Chassis: 4 wheels, handle bar, basket.
INSTRUCTIONS FOR USE
1 HANDLE ASSEMBLY: Using a screwdriver, unscrew the
two screws on both tubes of the chassis while closed
(fig_a). Insert the handle into the two tubes of the
chassis (fig_b), position the screws (fig_c) and screw all
the way without tightening excessively, being careful to
add the nuts.
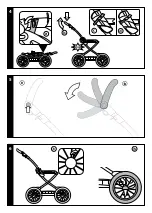
2 FITTING THE WHEELS: remove the 4 packing protector
caps from the chassis wheel spindles (fig_a). Insert the
two wheels on the handlebar side (fig_b) and the other
two wheels opposite the handlebar (fig_c), taking care
to insert the wheel spokes into the slots in the spindle.
Press the wheels until they click into position (fig_a)
and check that they are firmly attached.
3 BRAKE: to apply the chassis brake, lower the brake bar
(fig_a). To release the brake, raise the brake bar.
4 OPENING: before opening the chassis, apply the
brake. To open the chassis, release the closing
catches, pushing them towards the inside (fig_a), raise
the handlebar and rotate it upwards until it clicks into
position (fig_b). Look at the safety catch (fig_c) to
see if the chassis is open properly; if the colour red is
visible (fig_d), push the handlebar down further until
it clicks into position.
5 ADJUSTABLE HANDLEBAR: to adjust the height of the
handlebar, press both side buttons at the same time
(fig_a), and lock the handlebar in the desired position
(fig_b).
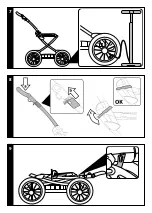
6 WHEEL REMOVAL: to remove the wheels, rotate the
lever in the centre of the wheel (fig_a) and at the
same time pull the wheel outwards (fig_b).
7 The tyres of the Carrello Classico chassis are inflatable.
To inflate them, unscrew the cap and use a pump.
8 FOLDING UP: To fold up the chassis, push the handle
down gently (Arrow_a), pull the two levers on the
handle upwards (Arrow_b), lift the safety clip on the side
(Arrow_c), then rotate the handle forwards and down until
it clicks.
9 When the chassis is closed, check that the closing
catches are correctly engaged.
GANCIOMATIC SYSTEM
10 Ganciomatic System is the quick, practical system that
makes it possible to attach a Primonido Elite bassinet
unit or a Primo Viaggio car seat, or Seggiolino Giro to
the Ganciomatic base of the Carrello Classico chassis
in a single step. The Primonido Elite and the Primo
Viaggio car seat are available for purchase separately.
Always apply the chassis or stroller brake before
attaching and removing products (consult the
respective instruction manuals).
Check that the child transport unit is properly attached.
SERIAL NUMBERS
11 Carrello Classico reports information as at the date of
manufacture of the product.
_ Product name, date of manufacture and serial number
of the product.
This information is essential in the event of any complaints.
CLEANING AND MAINTENANCE
PRODUCT MAINTENANCE: protect from the weather:
water, rain, or snow; prolonged and continuous exposure
to bright sunlight may give rise to colour changes of
various different materials; store this product in a dry place.
CLEANING THE CHASSIS: periodically clean all plastic parts
with a damp cloth. Do not use solvent or similar cleaning
products; keep all metal parts dry to prevent rusting; keep
moving parts clean (adjustment mechanisms, locking
mechanisms, wheels, ...) and free of dust and sand and, if
necessary, lubricate with light machine oil.
MARTINELLI IS A PEG-PÉREGO
TRADEMARK.
Peg Perego SpA adopts a quality management system
certified by TÜV Italia Srl in accordance with the ISO 9001
standard. Peg Pérego can make changes at any time to
the models described in this publication for technical or
commercial reasons.
CUSTOMER SERVICE
If any parts of the item get lost or damaged, only use
original spare parts. For any repairs, replacements,
product information, original spare parts and
accessories,
contact our Customer Service:
Tel.
0039/039/60.88.610
customer.service@martinellimilano.com
Summary of Contents for CARRELLO CLASSICO
Page 1: ...C A R R E L L O C L A S S I C O...
Page 2: ...1 2 3...
Page 3: ...4 5 6...
Page 4: ...7 8 9...
Page 5: ...10 11...
Page 13: ...13...
Page 14: ...14...
Page 15: ...15...

