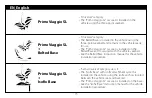
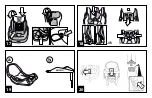
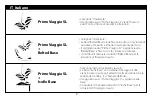
background image

20

   Accessories

 19• 

Belted Base:

 approved for children weighing 0-13 kg 

(0-12/14 months), used with car seats in Group 0+. It is 

installed using the vehicle's seat belt (Fig. a). 

 • 

Isofix Base 0+1 K:

 approved for children weighing 0-18 

kg (0-4 years approx.), used with car seats in Group 0+ 

and then Group 1 (Fig. b). 

    It fastens to the vehicle's Isofix attachments without 

using the seat belt. 
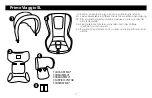
 

   Serial numbers

 20• A label on the front lateral side, under the fabric, 

contains the following information: product name, 

production date and serial number (Fig. a).

 • The type approval label can be found on the rear of the 

backrest, at the top (Fig. b).

 • Harness production date (Fig. c).


  In the event of problems with the product, these 

details will be of use to customers.


Product cleaning

  •  This product requires minimal maintenance. Cleaning 

and maintenance must only be carried out by adults.

  •  It is advisable to keep all the moving parts clean.

  •  Clean the plastic parts periodically with a damp cloth. 

Do not use solvents or similar substances.

  •  Brush the fabric parts to remove dust.

  •  Do not clean the polystyrene shock absorbing device 

with solvents or other similar products.

  •  Protect the product from atmospheric agents: humidity, 

rain or snow. Extended exposure to sunshine can cause 

colour changes in many materials.

  •  Store the product in a dry environment.


How to read the type approval label

    This paragraph explains how to interpret the type 

approval label (orange label).

  •  The label is double because this car seat is type 

approved for two types of installation in vehicles:

  •  With static or inertia-reel three-point seatbelts (the term 

UNIVERSAL indicates compatibility of the car seat with 

vehicles fitted with this type of seatbelt);

  •  ISOFIX attachment systems (the term SEMI-UNIVERSAL 

class E indicates compatibility of the car seat with 

vehicles fitted with this system).

  •  The top of the label displays the trademark of the 

manufacturing company and the name of the product. 

  •  The letter E in a circle indicates the European type 

approval mark and the number indicates the country 

that issued the type approval (1: Germany, 2: France, 3: 

Italy, 4: The Netherlands, 11: Great Britain, and 24: Ireland).

  •  Type approval number: if it starts with 04 this indicates 

the fourth amendment (the one currently in force) of 

Regulation R44.

  •  Reference standard: ECE R44/04.

  •  Production serial number: on issue of type approval 

each car seat is personalized with its own number.


Summary of Contents for PRIMO VIAGGIO SL

Page 1: ...P R I M O V I A G G I O S L...

Page 2: ...B A C B A 1 3 2 4...

Page 3: ...A B C D ok 5 7 6 8...

Page 4: ...ok 2 1 3 9 11 10 12...

Page 5: ...A B C A ok B 4 5 1 2 3 4 5 6 13 15 14 16...

Page 6: ...B 3 1 0 9 C A 1 3 2 A B C A D D C B ok 17 19 20 18...

Page 7: ...e nella richiesta EN Spare parts available in different colours to be specified when ordering FR Pi ces de rechange disponibles en plusieurs couleurs sp cifier dans la demande DE Ersatzteile in mehr F...

Page 8: ...l seggiolino auto Primo Viaggio SL si aggancia alla Belted Base e fissato con la cintura di sicurezza Consultare il manuale istruzioni Belted Base per le istruzioni di fissaggio in auto Categoria Semi...

Page 9: ...to Utilizzare sempre il sistema di ritenuta Le operazioni di montaggio e di installazione devono essere effettuate da adulti Evitare di introdurre le dita nei meccanismi Installare questo seggiolino a...

Page 10: ...ella vettura sotto l esposizione del sole alcune parti potrebbero essersi surriscaldate e nuocere alla pelle delicata del bambino controllare prima di collocare il bambino Non utilizzare il seggiolino...

Page 11: ...uto il tasto metallico e con l altra mano tirare i cinturini fig b Per far aderire le cinture di sicurezza al bambino tirare verso di s il laccetto di regolazione centrale fig c ATTENZIONE non stringe...

Page 12: ...Per rimuovere il rivestimento del seggiolino auto togliere la capottina premere il pulsante rosso sulla fibbia dello spartigambe per sganciare il cinturino di sicurezza 14 Rimuovere riduttore se pres...

Page 13: ...il prodotto dovesse presentare delle problematiche Pulizia del prodotto Il vostro prodotto necessita un minimo di manutenzione Le operazioni di pulizia e manutenzione devono essere effettuate solo da...

Page 14: ...nuno contraddistinto dal proprio numero MARTINELLI UN MARCHIO PEG P REGO Peg Perego SpA un azienda con sistema di gestione qualit certificato da T V Italia Srl in accordo alla norma ISO 9001 Peg P reg...

Page 15: ...y for use The Primo Viaggio SL car seat is installed on the Belted Base and is secured with the vehicle seatbelt See the Belted Base instruction manual for the vehicle installation procedure Semi Univ...

Page 16: ...system The assembly and installation operations must be conducted by adults Avoid inserting fingers into the mechanisms Install this group 0 car seat in a rearward facing position Death or serious in...

Page 17: ...ng the child in the seat Do not use the car seat without its fabric cover this must not be replaced with one not approved by the manufacturer since it is an integral part of the car seat and the safet...

Page 18: ...s and the Side Impact Protection headrest can be adjusted simultaneously to 5 different heights so as to follow the growth of the child To adjust the height press the rear height adjustment button on...

Page 19: ...en carefully over the two sides BE CAREFUL NOT TO BREAK POLYSTYRENE EPS PARTS Remove the soft cover in sequence as shown in the figure Maintenance of the padding Brush the fabric parts to remove dust...

Page 20: ...olvents or other similar products Protect the product from atmospheric agents humidity rain or snow Extended exposure to sunshine can cause colour changes in many materials Store the product in a dry...

Page 21: ...changes at any time to the models described in this publication for technical or commercial reasons CUSTOMER SERVICE If any parts of the item get lost or damaged only use original spare parts For any...

Page 22: ...Le si ge auto Primo Viaggio SL se fixe la base Belted Base l aide des ceintures de s curit Consulter le manuel d instructions de Belted Base pour prendre connaissance des instructions de montage dans...

Page 23: ...urir des risques l enfant Ne jamais laisser un enfant sans surveillance Toujours utiliser le syst me de retenue Les op rations de montage et d installation de la voiture doivent tre effectu es par des...

Page 24: ...cher Ne pas laisser le si ge auto dans le v hicule expos au soleil certaines parties pourraient chauffer et br ler la peau d licate de l enfant V rifier le si ge auto avant d y installer l enfant Ne p...

Page 25: ...l autre main tirer sur les sangles fig b Pour faire adh rer le harnais au corps de l enfant tirer vers soi la sangle de r glage centrale fig c ATTENTION ne pas trop serrer le harnais laisser un minim...

Page 26: ...la ceinture de s curit de la voiture D houssage Pour enlever la housse du si ge auto enlever la capote appuyer sur le bouton rouge situ sur la boucle de la sangle d entrejambe pour d tacher le harnai...

Page 27: ...roduit date de fabrication et num ro de s rie du produit Fig a Derri re le dossier en haut se trouve l tiquette d homologation Fig b Date de fabrication du harnais Fig c Ces informations sont indispen...

Page 28: ...e de r f rence ECE R44 04 Num ro de production progressif il permet de personnaliser le si ge auto d s la d livrance de l homologation sur chaque produit figure un num ro diff rent MARTINELLIESTUNEMAR...

Page 29: ...nt origin R44 04 Declaration du conformit La soci t PegPerego S p A d clare sous sa responsabili t que l article en question a fait l objet d essais de r ception par des labora toires externes et ind...

Page 30: ......

Page 31: ......

Page 32: ...P R I M O V I A G G I O S L FIMA1701I178...

Reviews: