background image

21

 • Never put hot drinks in the cup holder, if present.

  Components of the Product

    Inspect the content of the package and contact 

Customer Care if any items are missing.

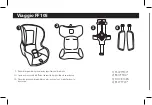
    The child car seat includes:

  a)  Booster Cushion

 b) Headrest

  c)  Harness tension release button

 d)  Adjustment of belt tightness 

  e)  Knob for adjusting inclination

  f )  Full 5-point safety harness with shoulder pads

 g)  Belt clip

 h)  Lever for release from base

  i)  Headrest height adjustment button

  l)  Instruction manual compartment.

 m)  Headrest covered with shock-absorbing expanded 

polystyrene (EPS) 

 n)  Cup holder.

 o)  Kinetic Pods: side protections

    The car seat is ready for use: no assembly required.

   Instructions for use with base

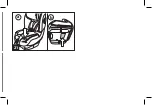
  1  Attach Viaggio FF105 in forward facing position 

by positioning it onto the i-Size Base on the 

attachment points and pushing down until it clicks 

(fig_a). Check that the red/green indicators, near 

the leg of the base, are in green position (fig_b).

  2  To detach Viaggio FF105 from the i-Size Base, pull 

the lever that is in the front and under the seat 

and, at the same time, lift the seat.

  3  To adjust the car seat’s inclination, rotate the knob 

until the seat is in the desired position

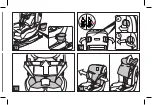
  4  Viaggio FF105 uses a 5-point harness to protect 

your child. Before placing the child on the seat. 

Act on the central release button and pull the 

straps, loosening the belts (fig_a). Do not pull the 

shoulder pads.

    Open the chest clip following the procedure 

shown (fig_b), unfasten the safety belts by acting 

on the red button of the crotch strap’s buckle 

(fig_c).

  5  Attach the buckles to the side elastics and pull the 

crotch strap towards the front of the seat to make 

room for the child. Make sure the sitting area is 

free.

  6  The headrest must be adjusted to match the 

child’s height. There are several positions.

    To switch from a low to a higher position: pull the 

tongue at the centre of the head rest (1) upward; 

the head rest simultaneously lifts (2).

    To switch from a high position to a lower one: pull 

the lever in the upper central part of the headrest 

upwards and, at the same time, push the headrest 

down to the desired position.

    When you have finished, slightly move the 

headrest to check it is properly locked into place.

  7  Place the child in the car seat and arrange the 

harness over the child’s shoulders and waist. The 

correct height for the safety belts is when the belt 

slots on the backrest are at the same height of the 

shoulders or above (green area), as shown in the 

picture.

    Make sure the straps are not in the red area.

  8  Attach the safety straps by overlapping the two 

belts (1) and inserting the metal hooks into the 

crotch strap buckle until it clicks (2). Attach the 

belt clip on the chest by combining the two parts 

as shown in the picture (3).

  9  Tighten the buckles by pulling the adjustment 

strap towards you, making sure they fit well 

against your child’s body at every point and that 

the clip is at the height of the sternum.


CAUTION: Do not over-tighten the straps, and 

ensure you leave minimum slack.

 10  When you have completed the operation, check 

the tension of the belts in every point (1-2-3-4-5). 

Check the shoulder pads fit well over the body.

 11  To slacken the harness, insert a finger through the 

seat opening (1), keep the metal button pressed, 

and with the other hand pull on the straps (2).

 12 

IMPORTANT!

 In the winter, do not dress your 

child in bulky clothing before strapping him/

her into the car seat. Do not position blankets 

between your child’s body and the safety belts. 

This could cause incorrect positioning of the safety 

harness, with serious consequences in the event of 

a collision.

    Use a blanket or an approved accessory to protect 

your child from the weather.

Summary of Contents for VIAGGIO FF105

Page 1: ...VIAGGIO FF105...

Page 2: ...The Viaggio FF105 car seat is secured in vehicles with the ISOFIX system See the BASE i SIZE instruction manual for the vehicle installation procedure prendre connaissance des instructions de fixation...

Page 3: ...PRODUCT OVERVIEW...

Page 4: ...b 2 1 1 2 2 a c 1 b 3 4 2 1 a b a b click 1 2 3 4 5...

Page 5: ...a 5 6 7 1 2 3 4 5 6 1 2 click 1 2 1 3 3 8...

Page 6: ...2 1 2 2 1 9 10 11 12 4 5 1 2 3 1...

Page 7: ...b a 2 1 13 14 15 16...

Page 8: ...1 2 2 1 2 3 a b a b 17 18 19 20 2...

Page 9: ...a b 21...

Page 10: ...n pi colori da specificare nella richiesta EN Spare parts available in different colours to be specified when ordering FR Pi ces de rechange disponibles en plusieurs couleurs sp cifier dans la demande...

Page 11: ...il bambino in auto in senso opposto al senso di marcia fino al raggiungimento dei limiti indicati Questo seggiolino auto un sistema di ritenuta per bambini del tipo i Size approvato in base al regolam...

Page 12: ...effettuate da adulti In vettura utilizzare sempre il seggiolino auto Se la vettura in movimento non togliere mai il bambino dal seggiolino auto Non lasciare il bambino incustodito in auto anche per b...

Page 13: ...etichette adesive e cucite potrebbero rendere il prodotto non conforme ai sensi di norma Per eventuali riparazioni sostituzioni di pezzi e informazioni sul prodotto contattare il servizio assistenza p...

Page 14: ...5 punti per proteggere il bambino Prima di posizionare il bambino sul seggiolino agire sul pulsante centrale di rilascio e tirare i cinturini allentando le cinture fig_a Non tirare gli spallacci Apri...

Page 15: ...lare il dito nell asola della seduta 1 tenere premuto il tasto metallico e con l altra mano tirare i cinturini 2 Non tirare gli spallacci 12 IMPORTANTE In inverno non allacciare il bambino sul seggiol...

Page 16: ...re al cloro non stirare non lavare a secco non smacchiare con solventi non asciugare a mezzo di asciugabiancheria a tamburo rotativo Come rivestire il seggiolino auto Procedere in senso contrario a qu...

Page 17: ...o da T V Italia Srl in accordo alla norma ISO 9001 Peg Perego potr apportare in qualunque momento modifiche ai modelli descritti in questa pubblicazione per ragioni di natura tecnica o commerciale Ser...

Page 18: ...e retailer This car seat can only be used with the i Size Base In this configuration the car seat can be fixed in vehicles with approved ISOFIX positions please read the instructions manual for detail...

Page 19: ...all this car seat only on seats facing the direction of travel If the vehicle has rotating or repositionable seats position them facing the direction of travel Check that the child car seat is not blo...

Page 20: ...4 5 6 7 the car seat and the safety system Do not remove or replace the white part in polystyrene in the headrest as it is essential for safety purposes Do not leave the car seat in the vehicle when e...

Page 21: ...he harness over the child s shoulders and waist The correct height for the safety belts is when the belt slots on the backrest are at the same height of the shoulders or above green area as shown in t...

Page 22: ...picture 14 To guarantee greater safety the car seat is equipped with Kinetic Pods Open the Kinetic Pod on the side near the car door fig_a To close it pull the Kinetic Pod and fold it down into the sp...

Page 23: ...now Extended exposure to sunshine can cause colour changes in many materials Store the product in a dry environment Martinelli is a Peg Perego trademark Peg Perego S p A adopts a quality management sy...

Page 24: ...doute s adresser au fabricant du dispositif de retenue ou au revendeur Ce si ge auto ne peut tre utilis qu en combinaison avec Base i Size Dans cette combinaison le si ge auto peut tre fix sur des v h...

Page 25: ...r le si ge auto Si la voiture est en mouvement ne jamais enlever l enfant du si ge auto Ne jamais laisser l enfant sans surveillance en voiture m me pour de courtes p riodes La temp rature interne de...

Page 26: ...contacter le service d assistance apr s vente Toutes les informations Ne pas utiliser d accessoires n ayant pas t approuv s par le fabricant ou les autorit s comp tentes Si le produit est d occasion...

Page 27: ...r que les sangles ne se trouvent pas dans la zone rouge 8 Accrocher les sangles de s curit en superposant les deux ceintures 1 et en enfilant la boucle de la m Appuie t te recouvert de mousse de polyp...

Page 28: ...auto fig_a et le sortir par le haut comme le montre la fig_b VEILLER A NE PAS ENDOMMAGER LES sangle d entrejambe jusqu au d clic 2 accrocher la clip du harnais en r unissant les deux parties comme le...

Page 29: ...ation The Original Accessory Les accessoires Martinelli ont t con us en tant que support utile et pratique pour simplifier la vie des parents D couvrez tous les accessoires consacr s votre produit Mar...

Page 30: ...rits dans cet ouvrage pour des raisons de nature technique ou commerciale Service apr s vente En cas de perte de pi ces ou de rupture de l une d elles utiliser exclusivement des pi ces de rechange ori...

Page 31: ...S p A declares under its sole responsibility that the article to which this declaration relates has undergone internal testing and has been approved in accordance with regulations in force by external...

Page 32: ...VIAGGIO FF105 FIMA2101I285...

Reviews: