background image

4     Introduction & Installation in Brief

I

ntroduCtIon

 & I

nstallatIon


In

 B

rIef

Congratulations! You have invested in one of the 
world's premier subwoofers.

The MartinLogan Dynamo 500 represents the extension 

of an intensive, dedicated team research program direct-

ed toward establishing a world class line of reference 

subwoofers using leading-edge technology, without com-

promising durability, reliability, craftsmanship or aesthetics. 

The Dynamo 500 subwoofer uses a 10-inch high-excur-

sion driver to achieve deep, tight, well-defined bass. A 

proprietary amplifier is used to drive the output stage with 

precision and extremely high efficiency. Low-pass filtering 

and phase control have been designed to make integrat-

ing the Dynamo 500 subwoofer with MartinLogan and 

non-MartinLogan products both seamless and simple. 

The materials in your new Dynamo 500 subwoofer are 

of the highest quality and will provide years of enduring 

enjoyment and deepening respect. The cabinet is con-

structed from the finest composite material for acoustical 

integrity and is finished with an attractive custom coating.

This User's Manual will explain in detail the operation of 

your Dynamo 500 subwoofer and the philosophy applied 

to its design. A clear understanding will insure that you 

obtain maximum performance and pleasure from this most 

exacting subwoofer.

We know that you are eager to hear your new Dynamo 

500 subwoofer, so this section is provided to allow fast 

and easy set up. Once you have it operational, please 

take the time to read, in depth, the rest of the informa-

tion in this manual. It will give you perspective on how 

to attain the greatest possible performance from this most 

exacting subwoofer system.

If you experience any difficulties in setup or operation of 

the Dynamo 500, please refer to the Placement, Room 

Acoustics and Connections and Control Settings sections.

Should you encounter a persistent problem that cannot 

be resolved, please contact your authorized MartinLogan 

dealer. They will provide you with the appropriate technical 

analysis to alleviate the situation.

Step 1: Unpacking

Remove your new subwoofer from its packing.

Step 2: Placement

Ideally, place the Dynamo 500 in a corner near the front 

of the room. This is a good place to start. Please see the 

Placement section (page 9) of this manual for more details.

Step 3: Signal Connection

Use the best cables you can. High quality cables, available  

from your specialty dealer, are recommended and will 

give you superior performance.

Attach your preamplifier/processor outputs through cables 

to the signal input area located on the Dynamo 500’s rear 

panel. Please see the Connections and Control Settings 

section (pages 6–8) of this manual for more details.

Step 4: Power Connection (AC) (see warning)

Make sure the level knob is set at 'Min'. Plug the Dynamo 

500 subwoofer into a wall outlet. Review the AC Power 

Connection section (page 8) of this manual for more details.

Step 5: Setting the Controls

Set the level knob to a medium volume position (12 o'clock). 

Set the power switch to ‘Auto On'.

Step 6: Listen and Enjoy

Now, you may adjust your system and enjoy!

Introduction

Installation in Brief

Summary of Contents for Dynamo 500

Page 1: ...tm Dy n a m o tm 500 u s e r s m a n u a l ...

Page 2: ...r us to do what we love Serial Numbers _______________ Record your serial numbers here for easy reference You will need this informa tion when filling out your warranty registration Dynamo 500 s serial number is located near the bottom of the backplate and on the shipping container ...

Page 3: ...troduction Installation in Brief 4 Introduction Installation in Brief About the Controls 5 Connections and Control Settings 6 Before Connecting the Dynamo 500 2 Channel Mode Multi Channel LFE Mode 7 AC Power Connection 8 Replacing the Fuse Break In Placement 9 Listening Position Ask Your Dealer Enjoy Yourself Installing in a Cabinet Room Acoustics 10 Your Room Terminology Home Theater 11 Frequentl...
Page 4: ... you have it operational please take the time to read in depth the rest of the informa tion in this manual It will give you perspective on how to attain the greatest possible performance from this most exacting subwoofer system If you experience any difficulties in setup or operation of the Dynamo 500 please refer to the Placement Room Acoustics and Connections and Control Settings sections Should...

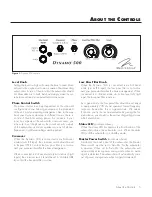
Page 5: ...ht inputs the crossover switch should be set to Variable L R In so that the low pass filter is active Low Pass Filter Knob When the Dynamo 500 is connected in multi channel mode via its LFE input the low pass filter is not active and your processor handles the bass management When connected in 2 channel mode via its line level left right input the low pass filter is active As a general rule the lo...

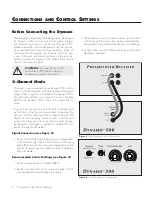
Page 6: ...nd connecting the Dynamo 500 as recommended in Multi Channel LFE Mode on the next page Some modern receivers and processors allow users to route left and right channel low frequency information in addition to discrete LFE infor mation through the LFE output Signal Connection see figure 2 1 Connect the left and right outputs of your preamplifier to the left and right inputs of the Dynamo 500 using ...

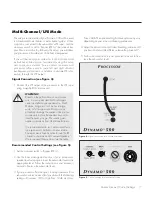
Page 7: ...aker beyond its rated frequency range This warning also applies to products from other manufacturers It is recommended to run center and effects type speakers in limited or narrow mode Some processors have an option to route the LFE channel to your main and or surround speakers We recommend that you do not use this option Recommended Control Settings see figure 5 1 Set the crossover switch to Bypa...

Page 8: ...to the subwoofer If you remove your Dynamo 500 subwoofer from the country of original sale be certain that AC power supplied in any subsequent location is suitable before connecting and oper ating the subwoofer Substantially impaired performance or severe damage may occur to the Dynamo 500 subwoofer if operation is attempted from an incorrect AC power source If the fuse in your Dynamo 500 should r...

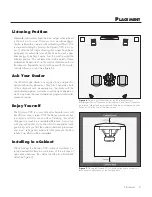
Page 9: ...task of determining optimal subwoofer placement easier Enjoy Yourself The Dynamo 500 is a very refined subwoofer and will benefit from care in setup With the above placement tips in mind you will find over months of listening that small changes can result in measurable differences As you live with your subwoofer do not be afraid to experiment with positioning until you find the optimal relationshi...

Page 10: ...ve Typically this is only a problem with frequencies below 100Hz When this happens different parts of your room experience either an excess or a lack of bass Some people believe that having a room without parallel walls will eliminate this effect The truth is that non parallel walls only generate different standing wave patterns than those that occur in rectangular rooms Usually you can excite mos...

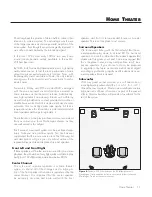
Page 11: ...nd descriptions will give you only a brief outline of the responsibilities and demands placed on each speaker Front Left and Front Right If these speakers will be the same two used for your stereo playback they should be of very high quality and able to play loudly over 102 dB and reproduce bass below 80 Hz Center Channel This is the most important speaker in a home theater system as almost all of...

Page 12: ...lding liquids Is there likely to be any interaction between my subwoofer and the television in my Audio Video system Yes The Dynamo 500 subwoofer doesn t use a shielded driver We recommend 3 feet between the Dynamo 500 subwoofer and video components that are susceptible to magnetic fields Will my electric bill go sky high by leaving my subwoofer plugged in all the time No The Dynamo 500 when the p...

Page 13: ... T 1 6A L 250V fuse T 0 8A L 250V if you are in a region using 230V If the problem persists contact your dealer Muddy Bass Check placement Try moving the subwoofer closer to the front and side walls Decrease the level Check your processor setup If the problem persists contact your dealer Hums or Unusual Sounds Turn the Dynamo 500 off unplug all signal inputs turn the Dynamo 500 back on and turn up...

Page 14: ...ceipt to MartinLogan within 30 days of purchase For your convenience MartinLogan also offers online warranty registration at www martinlogan com MartinLogan may not honor warranty service claims unless we have a completed Warranty Registration card on file If you did not receive a Certificate of Registration with your new Dynamo 500 subwoofer you cannot be assured of having received a new unit If ...

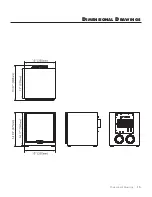
Page 15: ...15 Dimensional Drawings 15 Dimensional Drawings ...

Page 16: ... difference in decibels between two sounds is ten times the Base 10 logarithm of the ratio of their power levels DC Abbreviation for direct current Diffraction The breaking up of a sound wave caused by some type of mechanical interference such as a cabinet edge grill frame or other similar object Diaphragm A thin flexible membrane or cone that vibrates in response to electrical signals to produce ...

Page 17: ...e of the RMS sound pressure Resistance That property of a conductor by which it opposes the flow of electric current resulting in the generation of heat in the conducting material usually expressed in ohms Resistor A device used in a circuit to provide resistance Resonance The effect produced when the natural vibration frequency of a body is greatly amplified by reinforcing vibrations at the same ...

Page 18: ...speakers outside of the country of original sale voltage requirements vary by country Improper voltage can cause damage that will be potentially expensive to repair The Dynamo 500 is shipped to authorized MartinLogan distributors with the correct power supply for use in the country of intended sale A list of authorized distributors can be accessed at www martinlogan com or by emailing info martinl...

Reviews: