background image

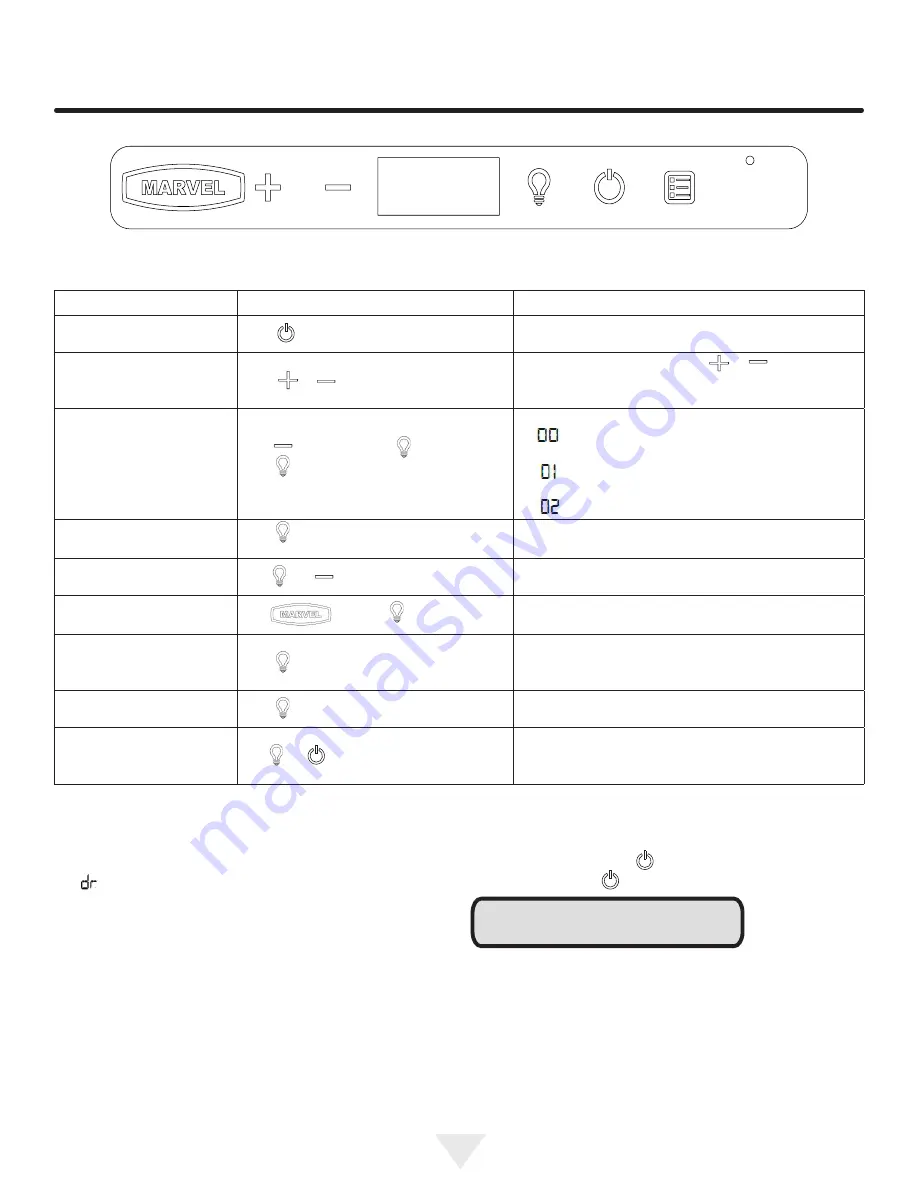
USING YOUR ELECTRONIC CONTROL

Control Function Guide

Function

Command

Notes

ON/OFF

Press       and release.

Unit will immediately turn ON or OFF.

Adjust Temperature

Press        or        and release.

When the display is flashing, press        or         to adjust the set 

point temperature. Note: Temperature displayed is the actual 
temperature inside the unit. 

Adjust light color press

Hold         press and release      and 

press      to scroll through lighting 

options.

   Option        Open Door          Closed Door

White

White

     BrightShield

TM

      BrightShield

TM

(default)

  White

BrightShield

TM

Toggle interior light -  Door 

Closed

Press      and release to toggle interior light op-
tion; press again to deactivate.

Toggle depends on light color option above. Light output 50%/

Toggle between 

o

F/

o

C

Hold      and         for 5 seconds. 

The display will change units.

Hide Display

Hold

and press     . 

Display will turn off when door is closed. Unit will continue to 

operate. Repeat command to turn on display. 

Enable Sabbath Mode

Press      and hold for 5 seconds and release

The 

o

F / 

o

C symbol will flash briefly after 5 seconds. Interior light 

and display will go dark and remain so until user resets mode - 

unit continues to operate

Disable Sabbath Mode

Press            and  release

Display and interior light return to normal operation

Showroom Mode

Hold     and       for 5 seconds

The ºF / º

C symbol will flash. Display will be lit and interior light 

will function. Unit will not cool. Repeat command to return to 
normal operation

Door Alert Notification

When the door is left open for more than 30 minutes:

A tone will sound for several seconds every minute

will appear in display

Close door to silence alert and reset

First Use

Initial startup requires no adjustments. When plugged in, the unit will 
begin operating under the factory default settings. If the unit was turned off 
during installation, simply press      and the unit will immediately switch on. 
To turn the unit off, press       .

Temperature displayed reflects actual temperature inside unit. If the 
temperature displayed is different than selected, the unit is progressing 
towards the selected temperature. Time to reach set point varies based 
upon ambient temperature, temperature of product loaded, door openings, 
etc. Marvel recommends allowing the unit to reach set points before 
loading.

NOTE

9

Summary of Contents for M PRE424-IS81A

Page 1: ...EFERENCE GUIDE MARVEL UNDERCOUNTER REFRIGERATION M P R E 4 2 4 S G 8 1 A M P R E 4 2 4 S S 8 1 A M P R E 4 2 4 I G 8 1 A M P R E 4 2 4 I S 8 1 A T H E O R I G I N A L R E F R I G E R A T I O N E X P E R T S S I N C E 1 8 9 2 ...

Page 2: ...ur home Important Safety Instructions Warnings and safety instructions appearing in this guide are not meant to cover all possible conditions and situa tions that may occur Common sense caution and care must be exercised when installing maintaining or operat ing this appliance Recognize Safety Symbols Words and Labels CAUTION Hazards or unsafe practices which could re sult in personal injury or pr...

Page 3: ... in ternal components in place The owners manual is shipped inside the product in a plastic bag along with the warranty registration card and other accessory items Important Keep your carton and packaging until your appliance has been thoroughly inspected and found to be in good condi tion If there is damage the packaging will be needed as proof of damage in transit Afterwards please dispose of al...

Page 4: ...nd Fault Circuit Interrupters GFCI are prone to nui sance tripping which will cause the appliance to shut down GFCI s are generally not used on circuits with power equip ment that must run unattended for long periods of time un less required to meet local building codes and ordinances ELECTRICAL Do not remove ground prong Electrical Shock Hazard Do not use an extension cord with this appliance The...

Page 5: ...ted INSTALLING YOUR APPLIANCE WARNING An optional stacking kit for 24 wide models is re quired to stack products Failure to use a stacking kit could result in personal injury Contact your dealer or Marvel customer service at 616 754 5601 to order For safety concerns 15 wide models should not be stacked Front Leveling Legs Leveling Legs Adjustable legs at the front and rear corners of the appli anc...

Page 6: ...located on bottom of door 4 Remove caps from top of door Using a Philips Screwdriver install magnet actuator on opposite side Install caps into opposite side 5 Remove caps from screw holes on opposite side 2 on top and bottom Using a Philips Screwdriver remove the 4 screws that you previously loosened 6 Reinstall screws and caps on opposite side 7 Once screws are partially installed rotate the doo...

Page 7: ...f cabinet line 5 Fasten the anti tip bracket to the floor using the supplied screw 6 Slide the cabinet back into position making sure the rear cabinet leveling leg slides under the anti tip bracket engag ing the slot Front of cabinet Step by step instructions for locating the po sition of the bracket 211 2 54 6 cm Anti Tip Bracket Leveling Leg Bottom View of Beverage Center WARNING ALL APPLIANCES ...

Page 8: ...or mounted anti tip bracket is used the mini mum adjusted height of the cabinet is increased by 3 8 9 mm V notches in bracket V notches in bracket 211 2 54 6 cm Front of cabinet line Rear Leveling leg Side of cabinet line Rear of cabinet line Screw 8 ...

Page 9: ...r 5 seconds Interior light and display will go dark and remain so until user resets mode unit continues to operate Disable Sabbath Mode Press and release Display and interior light return to normal operation Showroom Mode Hold and for 5 seconds The ºF ºC symbol will flash Display will be lit and interior light will function Unit will not cool Repeat command to return to normal operation Door Alert...

Page 10: ...perations sections for details and other options For more information about BrightShield visit www marvelrefrigeration com For more information about Vyv Antimicrobial Light Technology visit www vyv tech Testing on a non enveloped virus MS2 bacteriophage showed a 97 12 reduction in controlled laboratory testing in 8 hours on hard surfaces Testing on SARS CoV 2 enveloped virus showed a 98 45 reduct...

Page 11: ...rgent Care of Appliance 1 Avoid leaning on the door you may bend the door hinges or tip the appliance 2 Exercise caution when sweeping vacuuming or mop ping near the front of the appliance Damage to the grille can occur 3 Periodically clean the interior of the appliance as needed 4 Periodically check and or clean the front grille as needed In the Event of a Power Failure If a power failure occurs ...

Page 12: ...ence accident or improper use maintenance instal lation service repair acts of God fire flood or other natural disasters The product must be installed operated and maintained in accordance with the Marvel User Guide The remedies described above for each warranty are the only ones that Marvel will provide either under these warranties or under any warranty arising by operation of law Marvel will no...

Page 13: ...13 ...

Page 14: ...ch revisions do not entitle the buyer to corresponding changes improvements additions replacements or compensation for previously purchased products www marvelrefrigeration com Marvel Refrigeration 1260 E Van Deinse St Greenville MI 48838 616 754 5601 41016384 Rev A 4 1 2022 ...

Reviews: