background image


Marvelmind Indoor Navigation System


Operating manual 


v2020_12_14 


www.marvelmind.com


Summary of Contents for Mini-RX

Page 1: ...Marvelmind Indoor Navigation System Operating manual v2020_12_14 www marvelmind com ...

Page 2: ...4 9 24 3 6 Different types of beacons 25 Beacon comparison 25 Super Beacon 26 3 6 2 1 External microphone extension 28 3 6 2 2 External microphones schemes 29 Mini RX beacon 31 3 6 3 1 External microphone extension 32 3 6 3 2 Dual microphones modification 33 3 6 3 3 External microphones schemes 35 Mini TX beacon 37 Beacon Industrial TX Metal 38 Beacon Industrial RX 40 Industrial Super Beacon Metal...

Page 3: ...oard 151 6 12 Different beacons colors in the Dashboard 152 7 1 Super Modem s SW update and configuration description 153 Super Modem s SW update 153 How to update Super Modem s SW 154 Super Modem s configuration 155 7 2 SW update USB Radio DFU 157 SW update via USB 157 SW update via Radio 157 SW update via DFU Programming 158 7 3 Licenses 163 7 4 Dashboard Monitoring Mode 165 7 5 Geofencing zones...

Page 4: ...ut top view 206 8 4 Mini RX internal solderable pinouts for experienced users only 207 9 1 Building big maps in Inverse Architecture IA 209 9 2 TDMA Type 2 Full overlapping submaps 223 9 3 Increasing update rate 226 9 4 Reducing location update latency 227 9 5 How to Place Beacons 229 9 6 Using the Oscilloscope 230 9 7 Proper Ultrasonic Signal Detection 231 9 8 Using hedgehog log file 232 9 9 Syst...

Page 5: ...escribed SW update chapter added Paired beacons chapter improved Minor fixes and improvements V2020_08_07 Modem HW v5 1 described Minor fixes and improvements V2020_07_23 System elements chapter improved Industrial beacons transmitting reception diagram described Minor fixes and improvements V2020_07_15 Mini RX internal solderable pinouts Minor fixes and improvements V2020_05_21 Starting up Starte...

Page 6: ...l microphones connection for Mini RX and Super Beacon described Minor fixes and improvements V2019_12_10 Appendixes chapter improved Minor fixes and improvements V2019_12_03 Appendixes chapter added protocols Minor fixes and improvements V2019_11_18 Mini RX solderable pinouts described Industrial connectors pinouts improved Minor fixes and improvements V2019_10_31 Industrial Super Beacon Metal 25k...

Page 7: ... page 34 Minor fixes and improvements V2019_04_30 DFU programming described Magnetic reset for Industrial beacons and DFU programming described Minor fixes V2019_04_04 Starting up the system description for different Starter Sets NIA Industrial NIA and IA Sending path to robot described V2019_03_18 New names for beacons DSP Mini RX Mini beacon Mini TX Beacon TX 25 IMU IP67 RS485 Industrial TX Beac...

Page 8: ...nabled Improved only beacons with selected tick in the Dashboard lower menu will be accepted to the network not any addresses This improves predictability of the network when there many beacons that may not belong to the network Their attempts to join the network will be blocked Improved now submaps support up to 4 beacons only More than that build another submap Up to 250 beacons mobile stationar...

Page 9: ...gation delay of an ultrasonic pulses Time Of Flight or TOF between stationary and mobile beacons using trilateration algorithm The system can build the map of stationary beacons automatically For Non Inverse Architecture In simple cases no additional manual data input or any manual distance measurements are required This map formed once can be frozen and stored in modem s memory and the system bec...

Page 10: ...Depends on the distance between mobile and stationary beacons shorter distance higher update rate Depends on the number of mobile beacons Non Inverse Architecture for Inverse Architecture no such dependency Depends on the radio profile 500kbps vs 38kbps Slightly depends on the number of stationary beacons dependence is not the same as for mobile beacons Power supply Internal 1000mAh LiPo battery H...

Page 11: ...11 1 2 Legend Legend chapter contains small icons and signs to highlight some key points of the text Important For experienced users Demo or Help video Useful link ...

Page 12: ...tarter Set Super NIA 3D 5 x Super beacons 1 x Modem Router Mini RX Starter Set 4 x Mini RX beacons 1 x Mobile beacon HW v4 9 IMU aka hedgehog 1 x Modem Router This is just an example of two starter sets More options you can see on our site Products ...

Page 13: ... indoor coordinates for autonomous robots and systems indoor GPS A brief description of the key elements of the system is given on the scheme below IA and NIA SW differs For IA you should use stationary beacons with different frequencies Below you can see 2 types of architectures Non Inverse NIA and Inverse IA ...

Page 14: ...n the number of mobile beacons n as 1 n TDMA approach Slightly depends on the radio protocol if low speed profile 38kbps etc Depends on the sizes of submaps Larger submap lower update rate IMU fusion is HW and SW supported Does not directly depend on the number of mobile beacons Slightly depends on the radio protocol the same as NIA Depends on the sizes of submaps the same as NIA IMU fusion is HW ...

Page 15: ...15 2 3 Indoor GPS System close up and internal view Here you can see how system elements look like Super beacon HW v4 9 modem without housing Mini RX beacon Mini TX ...

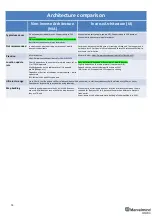
Page 16: ...16 HW v4 9 beacon with Mini TX size comparison Beacon Industrial RX Beacon Industrial Super ...

Page 17: ... also allows to get the tracking data General app for SW update and initial setting up the system Contains a lot of tracking display features Very deep tuning and setting abilities All new features available in the Dashboard app You can get data without the Dashboard the whole system after setting up can work without it ...

Page 18: ...ceived by stationary beacons Stationary beacons emit and receive ultrasound during the map configuration period Once the map is formed and frozen they only work as the receivers Stationary beacons have no exterior differences with regard to mobile beacons Inertial measurement unit IMU is not installed on the stationary beacons The mobile and stationary beacons can be easily interchanged during con...

Page 19: ...t implementation relies on a time division multiple access approach Thus if two mobile beacons are activated they share the same system bandwidth It means that if the 16 Hz update rate is selected in the Dashboard and there are 2 mobile beacons in the system each beacon s location will be updated with the rate of 16Hz 2 8Hz If there are 3 mobile beacons 16Hz 3 5Hz etc For 4 and more mobile beacons...

Page 20: ... It can be placed anywhere within radio coverage for permanent radio connection with all beacons usually in the radius of up to 100 meters with antennas from the Starter Set Radio coverage further extended to a few hundred meters by using a lower bitrate of 38kbps and full size 165mm for a 433MHz band antennas which have been tested to provide up to 400m in ideal conditions There are 433MHz and 91...

Page 21: ...ess protection up to IP67 optional Super Modem s HW supports Super Modem and Super Super Modem functionality for Multi Modem architecture https marvelmind com pics marvelmind_presentation pdf Designed for outdoor and industrial applications External bendable antennas with SMA connector for extended radio range included Currently supports license free 915MHz ISM band for example US Japan Korea and ...

Page 22: ...ctical for long term due to relatively high and constant power consumption of 1 5 2W For optional IP67 version extended working temperature range 40C 50C provided by design not tested not certified Embedded reset switch and DFU switch magnetic control or external pins on IP67 Supports both IA and NIA Can be easily switched between the modes in the Dashboard Radio range to beacons up to a few hundr...

Page 23: ...nce will not occur in a particular installation If this equipment does cause harmful interference to radio or television reception which can be determined by turning the equipment off and on the user is encouraged to try to correct the interference by one or more of the following measures Reorient or relocate the receiving antenna Increase the separation between the equipment and receiver Connect ...

Page 24: ...in radio coverage for permanent radio connection with all beacons usually in the radius of up to 100 meters with antennas from the Starter Set Radio coverage further extended to a few hundred meters by using a lower bitrate of 38kbps and full size 165mm for a 433MHz band antennas which have been tested to provide up to 400m in ideal conditions There are 433MHz and 915MHz versions available A propr...

Page 25: ...25 3 6 Different types of beacons Beacon comparison Here you can see more details about the different types of beacons https marvelmind com pics marvelmind_beacons_comparison pdf ...

Page 26: ...optimize coverage vs sensitivity The Super Beacon can receive any ultrasonic frequency from the bands 19kHz 25kHz 31kHz 37kHz 45kHz The filter can be simply selected in the Dashboard At the same time the ultrasonic frequency of Beacon HW v4 9 is HW defined by ultrasonic sensors and can t be changed The Super Beacon can receive several ultrasonic frequencies at once That is used in the Inverse Arch...

Page 27: ...27 Figure 4 Receiving diagram with digital microphone Figure 2 Transmitting diagram with sensors Figure 3 Transmitting diagram with sensors Figure 5 Receiving diagram with digital microphone ...

Page 28: ...ible It allows you to create more accurate implantation It is also possible to use 2 external microphones to calculate the direction or to improve and increase the reception area Length is 25cm default may be expanded up to 1m optional Be careful You should have soldering skills to solder external microphone on board Figure 2 Super Beacon with one external microphone connected Figure 3 Super Beaco...

Page 29: ...icrophones schemes There can be some beacons from one of the batches with mixed default microphone wires colors Figure 4 Connection for beacon with switched blue and yellow wires Figure 5 One external microphone connection ...

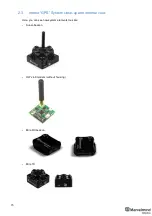
Page 30: ...30 Figure 6 Two external microphone connection ...

Page 31: ...d can t be changed Mini RX beacon can receive several ultrasonic frequencies at once That is used in Inverse Architecture See the comparison NIA and IA comparison The Mini RX Beacon is significantly smaller than Beacon HW v4 9 Can play a role of stationary beacon when imputing coordinates manually Can play a role of mobile beacon in IA system Has digital microphone which is more sensitive than reg...

Page 32: ...itself will not interfere and will not be visible It allows you to create more accurate implantation It is also possible to use 2 external microphones to calculate the direction or to improve and increase the reception area Length is 25cm default may be expanded up to 1m optional Be careful You should have soldering skills to solder external microphone on board Mini RX beacon External microphone ...

Page 33: ...al microphones modification Figure 7 One external microphone with housing Figure 8 Two external microphones with housing Mini RX beacon hidden inside External Microphone External Microphone 1 Robot s head 47mm 210mm ...

Page 34: ...34 Figure 9 One external microphone soldering Figure 10 Two external microphones soldering ...

Page 35: ...35 3 6 3 3 External microphones schemes Figure 11 One external microphone connection Figure 12 Two external microphones connection ...

Page 36: ...36 Figure 13 Two external microphones final view Figure 14 Two external microphones final view ...

Page 37: ...longer Very efficient ultrasonic TX module Mini TX has only USB virtual UART output no additional pins Mini TXs always have embedded IMU newer and better but it has 3D accelerometer and 3D gyroscope but no magnetometer which we do not recommend using indoors anyway due to magnetic field distortion indoor Embedded antenna smaller size but smaller radio coverage 50m with regular Modem HW v4 9 as com...

Page 38: ...ature range from 40 C to 50 C not tested provided by design Embedded reset switch and DFU switch magnetic control Two IP67 external connectors RS485 modification pinouts After Sep 2019 RS485 modification pinouts Before Sep 2019 CAN modification pinouts Can work with any Mini RX beacon or Beacon HW v4 9 with 25kHz ultrasonic sensors radio bands must match Most of all designed to work together with ...

Page 39: ...Determine carefully the version of your Industrial beacons it may be built before September 2019 and after September 2019 If it is beacon from the late batch you must use Industrial Super beacon SW if you have beacons from the early batch use Industrial RX or Industrial TX SW Stickers differences Later batch Ind RX S or Ind TX S Early batch Beacon Ind RX or Beacon Ind TX ...

Page 40: ... optional variant with internal battery is possible Two IP67 external connectors RS485 modification pinouts After Sep 2019 RS485 modification pinouts Before Sep 2019 CAN modification pinouts Extended working temperature range from 40 C to 50 C not tested provided by design only for the version without battery Embedded reset switch and DFU switch magnetic control Supports wide range of ultrasonic f...

Page 41: ...termine carefully the version of your Industrial beacons it may be built before September 2019 and after September 2019 If it is beacon from the late batch you must use Industrial Super beacon SW if you have beacons from the early batch use Industrial RX or Industrial TX SW Stickers differences Later batch Ind RX S or Ind TX S Early batch Beacon Ind RX or Beacon Ind TX ...

Page 42: ...Corresponding IP67 connectors male part included No battery inside Extended working temperature range from 40 C to 50 C not tested provided by design Embedded reset switch and DFU switch magnetic control Two IP67 external connectors RS485 modification pinouts Can work together with modems with corresponding radio radio bands must match Can work with any Mini RX beacon or Beacon HW v4 9 with 25kHz ...

Page 43: ...d in both the Non Inverse Architecture NIA and in the Inverse Architecture IA NIA and IA comparison Reception diagram Each sensor has about 90 reception angle Figure 1 Transmitting diagram with sensors Figure 15 Transmitting diagram with sensors ...

Page 44: ...he system Look at a similar unpacking video of HW v4 9 The videos have certain differences but the basic are the same https youtu be sOce7B2_6Sk Charge all the beacons using USB cable Full charging takes about 1 2 hours Turn the beacons on Place DIP switches as shown on the picture below Download SW Pack Update all the beacons HEX programming Reset button DIP switches ...

Page 45: ... use DFU programming DFU programming or SW uploading is used when HEX SW uploading in the Dashboard cannot be used For example when you are updating from a very old SW version or when the SW includes major changes to the system and the only possible way to update the SW is via DFU programming 4 1 5 1 After the DFU SW upgrade future SW upgrades can be done in a regular manner via the Dashboard 4 1 ...

Page 46: ...ly Otherwise the SW has not been uploaded correctly If the DFU appears to upload immediately check the Choose button you used or change the version of DfuSe SW you selected 4 1 5 15 Move the DIP switch into Power ON DFU OFF 4 1 5 16 Start the Dashboard and press the RESET button on the beacon 4 1 5 17 Check SW on the beacon afterwards 4 1 5 18 Everything should be OK with SW now DFU programming is...

Page 47: ...tton you used or change the version of DfuSe SW to a different one 4 1 5 24 Disconnect the short circuit 4 1 5 25 Start the Dashboard and press RESET button 4 1 5 26 If you experience difficulties in DFU programming please try the following 4 1 5 27 Use a different computer with a different version of Windows or another operating system 4 1 5 28 Install a different DfuSe version whichever works be...

Page 48: ... the latest software the modem and beacons are ready for use Place the stationary beacons high on the walls vertically in a way that will provide optimal ultrasonic coverage Write down the beacon s height for future change in the settings The help video on installation can be found here https youtu be WY0HkLzmjys Side view Stationary beacon Stationary beacon Stationary beacon Mobile beacon Modem b...

Page 49: ...istances It may take up to 7 10 seconds for the beacons to wake up Notice that if the modem is not active and is not powered the beacons will go into sleep mode automatically after 1 minute The system may run the frequency search if it is the very first time you are waking up the beacons If this step does not work disconnect the modem and connect that beacon again via USB Press the DEFAULT button ...

Page 50: ... modem supports 250 beacons mobile stationary combined If you do not see some of your connected beacons on the map you may need to scroll to find their addresses Double click on the device both to put it into sleep mode and to wake it up The map will form and zoom in automatically If the map does not form well check the table of distances in the left corner of the Dashboard The cells must be color...

Page 51: ... youtu be A4aRsjH2 _E If you see on the devices panel in the Dashboard that the beacon is colored orange it means there are some differences in some of the settings between beacons For example some sensors may be off or some ultrasonic or radio settings may be different You can change the settings for sensors manually by clicking on the panel on the upper right corner of the Dashboard to change th...

Page 52: ...em connection to computer through USB in the Dashboard or your PC does not recognize beacons modem it usually means that the STM32 driver is not installed To install the driver download it with link at top window in the Dashboard and run the installation file then click on the link under and install the driver Ensure that You are programming the modem s SW to the modem and the beacon s SW to the b...

Page 53: ...raph on DIP switch modes 4 2 5 3 Download the latest SW package unzip it and select the proper version of the SW for your HW and for your frequency variant Remember that for DFU programming you should use DFU SW DfuSe not Dashboard s hex file 4 2 5 4 Download DfuSe 4 2 5 5 Here you will find different versions of DfuSe v3 0 4 or v3 0 5 whichever works the best for your Windows DfuSe v3 0 4 or DfuS...

Page 54: ... the version of DfuSe SW you selected 4 2 5 15 Move the DIP switch into Power ON DFU OFF 4 2 5 16 Start the Dashboard and press the RESET button on the beacon 4 2 5 17 Check SW on the beacon afterwards 4 2 5 18 Everything should be OK with SW now DFU programming is complete 4 2 5 19 Follow the same scenario for the modem 4 2 5 20 Here is the link for the modem DFU programming The steps are similar...

Page 55: ...nt one 4 2 5 24 Disconnect the short circuit 4 2 5 25 Start the Dashboard and press RESET button 4 2 5 26 If you experience difficulties in DFU programming please try the following 4 2 5 27 Use a different computer with a different version of Windows or another operating system 4 2 5 28 Install a different DfuSe version whichever works best with your Windows If you have uploaded the latest firmwar...

Page 56: ... the latest software the modem and beacons are ready for use Place the stationary beacons high on the walls vertically in a way that will provide optimal ultrasonic coverage Write down the beacon s height for future change in the settings The help video on installation can be found here https youtu be WY0HkLzmjys Side view Stationary beacon Stationary beacon Stationary beacon Mobile beacon Modem b...

Page 57: ...istances It may take up to 7 10 seconds for the beacons to wake up Notice that if the modem is not active and is not powered the beacons will go into sleep mode automatically after 1 minute The system may run the frequency search if it is the very first time you are waking up the beacons If this step does not work disconnect the modem and connect that beacon again via USB Press the DEFAULT button ...

Page 58: ...ome of your connected beacons on the map you may need to scroll to find their addresses 4 2 2 Double click on the device both to put it into sleep mode and to wake it up 4 2 3 The map will form and zoom in automatically 4 2 4 If the map does not form well check the table of distances in the left corner of the Dashboard The cells must be colored in white it means the distances between stationary be...

Page 59: ...e devices panel in the Dashboard that the beacon is colored orange it means there are some differences in some of the settings between beacons For example some sensors may be off or some ultrasonic or radio settings may be different You can change the settings for sensors manually by clicking on the panel on the upper right corner of the Dashboard to change the cells from gray to green to turn on ...

Page 60: ...60 Help video https www youtube com watch v NHUnCtJIYXc ...

Page 61: ... be sOce7B2_6Sk Charge all the beacons using USB cable Full charging takes about 1 2 hours Turn the beacons on To turn Mini RXs on carefully disassemble its housing and find DIP switches inside It is necessary only for the first start You can also turn it off with switches for long term storage Place DIP switches as shown on the picture below Download SW Pack Update all the beacons Run the Dashboa...

Page 62: ... the only possible way to update the SW is via DFU programming 4 3 5 1 After the DFU SW upgrade futures SW upgrades can be done in a regular manner via the Dashboard 4 3 5 2 To start programming move the beacon s DIP switch to the DFU programming mode as described in the paragraph on DIP switch modes DIP switch in Mini RX and Mini TX situated inside the body Carefully disassemble the body to acces...

Page 63: ... the version of DfuSe SW you selected 4 3 5 15 Move the DIP switch into Power ON DFU OFF 4 3 5 16 Start the Dashboard and press the RESET button on the beacon 4 3 5 17 Check SW on the beacon afterwards 4 3 5 18 Everything should be OK with SW now DFU programming is complete 4 3 5 19 Follow the same scenario for the modem 4 3 5 20 Here is the link for the modem DFU programming The steps are similar...

Page 64: ... correctly If the DFU appears to upload immediately check the Choose button you used or change the version of DfuSe SW to a different one 4 3 5 24 Disconnect the short circuit 4 3 5 25 Start the Dashboard and press RESET button If you have uploaded the latest firmware for all the boards you can start to activate the system While the beacon or modem is connected to the Dashboard click the DEFAULT b...

Page 65: ... the latest software the modem and beacons are ready for use Place the stationary beacons high on the walls vertically in a way that will provide optimal ultrasonic coverage Write down the beacon s height for future change in the settings The help video on installation can be found here https youtu be WY0HkLzmjys Side view Stationary beacon Stationary beacon Stationary beacon Mobile beacon Modem b...

Page 66: ...s will go into sleep mode automatically after 1 minute The system may run the frequency search if it is the very first time you are waking up the beacons If this step does not work disconnect the modem and connect that beacon again via USB Press the DEFAULT button in the Dashboard and the Read All button to make sure that the radio settings are the default ones Check that the radio settings on the...

Page 67: ...to sleep mode or wake it up Only 4 stationary beacons may be in 1 submap If you wake up more beacons create a new submap for them otherwise it will not be displayed on the map and in the table of distances Build the map Mini RX beacons cannot build the map automatically manual inputting of the coordinates is required 4 3 22 1 Open the Dashboard You will see the table of distances 4 3 22 2 Use righ...

Page 68: ...s Turn on and wake up the mobile beacon following the same steps as with the stationary beacon https youtu be A4aRsjH2 _E If you see on the devices panel in the Dashboard that the beacon is colored orange it means there are some differences in some of the settings between beacons For example some sensors may be off or some ultrasonic or radio settings may be different You can change the settings f...

Page 69: ...69 The system is now fully operational ...

Page 70: ...he videos have certain differences but the basic are the same https youtu be sOce7B2_6Sk Charge all the beacons using USB cable Full charging takes about 1 2 hours Turn the beacons on To turn Mini RXs on carefully disassemble its housing and find DIP switches inside It is necessary only for the first start You can also turn it off with switches for long term storage Place DIP switches as shown on ...

Page 71: ...the Dashboard cannot be used For example when you are updating from a very old SW version or when the SW includes major changes to the system and the only possible way to update the SW is via DFU programming 4 4 5 1 After the DFU SW upgrade futures SW upgrades can be done in a regular manner via the Dashboard 4 4 5 2 To start programming move the beacon s DIP switch to the DFU programming mode as ...

Page 72: ...not happen instantly Otherwise the SW has not been uploaded correctly If the DFU appears to upload immediately check the Choose button you used or change the version of DfuSe SW you selected 4 4 5 14 Move the DIP switch into Power ON DFU OFF 4 4 5 15 Start the Dashboard and press the RESET button on the beacon 4 4 5 16 Check SW on the beacon afterwards 4 4 5 17 Everything should be OK with SW now ...

Page 73: ...not happen instantly Otherwise the SW has not been uploaded correctly If the DFU appears to upload immediately check the Choose button you used or change the version of DfuSe SW to a different one 4 4 5 21 Disconnect the short circuit 4 4 5 22 Start the Dashboard and press RESET button If you have uploaded the latest firmware for all of the boards you can start to activate the system While the bea...

Page 74: ... the latest software the modem and beacons are ready for use Place the stationary beacons high on the walls vertically in a way that will provide optimal ultrasonic coverage Write down the beacon s height for future change in the settings The help video on installation can be found here https youtu be WY0HkLzmjys Side view Stationary beacon Stationary beacon Stationary beacon Mobile beacon Modem b...

Page 75: ...r 1 minute The system may run the frequency search if it is the very first time you are waking up the beacons If this step does not work disconnect the modem and connect that beacon again via USB Press the DEFAULT button in the Dashboard and the Read All button to make sure that the radio settings are the default ones Check that the radio settings on the modem and the radio settings on the beacon ...

Page 76: ...u may need to scroll to find their addresses Double click on the device to put it into sleep mode or wake it up Only 4 stationary beacons may be in 1 submap If you wake up more beacons create a new submap for them otherwise it will not be displayed on the map and in the table of distances Build the map Mini RX beacons cannot build the map automatically manual inputting of the coordinates is requir...

Page 77: ...o value That values would not change until you unfreeze or clear it Even if beacons had been moved distance would stay Be careful with frozen cells because a small mistake can cause a significant impact on your tracking 4 4 22 4 Repeat for all cells Freeze the map by clicking the button Stationary beacons will stop measuring relative distances and will be ready to measure distance from the mobile ...

Page 78: ...can change the settings for sensors manually by clicking on the panel on the upper right corner of the Dashboard to change the cells from gray to green to turn on sensor It is recommended that the default settings on all beacons and the modem be used if this is your first time using the system After you freeze the map of stationary beacons wake up the mobile beacon After it wakes up it will be tra...

Page 79: ... videos have certain differences but the basic are the same https youtu be sOce7B2_6Sk Charge all the beacons using USB cable Full charging takes about 1 2 hours Turn the beacons on To turn Mini RXs on carefully disassemble its housing and find DIP switches inside It is necessary only for the first start You can also turn it off with switches for long term storage Place DIP switches as shown on th...

Page 80: ...d cannot be used For example when you are updating from a very old SW version or when the SW includes major changes to the system and the only possible way to update the SW is via DFU programming After the DFU SW upgrade futures SW upgrades can be done in a regular manner via the Dashboard To start programming move the beacon s DIP switch to the DFU programming mode as described in the paragraph o...

Page 81: ... immediately check the Choose button you used or change the version of DfuSe SW you selected 4 5 5 9 Move the DIP switch into Power ON DFU OFF 4 5 5 10 Start the Dashboard and press the RESET button on the beacon 4 5 5 11 Check SW on the beacon afterwards 4 5 5 12 Everything should be OK with SW now DFU programming is complete Follow the same scenario for the modem 4 5 5 13 Here is the link for th...

Page 82: ...correctly If the DFU appears to upload immediately check the Choose button you used or change the version of DfuSe SW to a different one 4 5 5 17 Disconnect the short circuit 4 5 5 18 Start the Dashboard and press RESET button If you have uploaded the latest firmware for all of the boards you can start to activate the system While the beacon or modem is connected to the Dashboard click the DEFAULT...

Page 83: ...ices with the latest software the modem and beacons are ready for use Place the stationary beacons high on the walls vertically in a way that will provide optimal ultrasonic coverage Write down the beacon s height for future change in the settings The help video on installation can be found here https youtu be WY0HkLzmjys Side view Stationary beacon Stationary beacon Mobile beacon Modem beacon ...

Page 84: ...s will go into sleep mode automatically after 1 minute The system may run the frequency search if it is the very first time you are waking up the beacons If this step does not work disconnect the modem and connect that beacon again via USB Press the DEFAULT button in the Dashboard and the Read All button to make sure that the radio settings are the default ones Check that the radio settings on the...

Page 85: ...to sleep mode or wake it up Only 4 stationary beacons may be in 1 submap If you wake up more beacons create a new submap for them otherwise it will not be displayed on the map and in the table of distances Build the map Mini RX beacons cannot build the map automatically manual inputting of the coordinates is required 4 5 22 1 Open the Dashboard You will see the table of distances 4 5 22 2 Use righ...

Page 86: ...e meter or so value That values would not change until you unfreeze or clear it Even if beacons had been moved distance would stay Be careful with frozen cells because a small mistake can cause a significant impact on your tracking 4 5 22 4 Repeat for all cells ...

Page 87: ...ences in some of the settings between beacons For example some sensors may be off or some ultrasonic or radio settings may be different You can change the settings for sensors manually by clicking on the panel on the upper right corner of the Dashboard to change the cells from gray to green to turn on sensor It is recommended that the default settings on all beacons and the modem be used if this i...

Page 88: ...ustrial beacons have no battery use power supply cable Use Industrial beacon s SW for Industrial beacons v4 9 for v4 9 Do not disassemble the Industrial beacons Otherwise warranty will be lost Unpack the system Take a look at the similar unpacking video of HW v4 9 They are different but have some similar basics https youtu be sOce7B2_6Sk You do not have to charge Industrial beacons they have no ba...

Page 89: ... modem SW and beacon SW must be from the same SW pack Don t mix SW releases If SW flashed SUCESSUFLY MOVE DIRECTLY TO 4 6 6 If you have some problems with HEX programming use DFU programming DFU programming or SW uploading is used when HEX SW uploading in the Dashboard cannot be used For example when you are updating from a very old SW version or when the SW includes major changes to the system an...

Page 90: ...5 1 Activate DFU mode and reset the beacon Industrial beacons have magnetic DFU mode and reset Place first magnet any strong and modern magnet to the right side of the beacon Step 1 After that place second magnet to the left side of the beacon and remove it in a second just to reset it Step 2 4 6 5 2 Connect the beacon via USB to your PC 4 6 5 3 Connect power supply cable to your beacon 4 6 5 4 Ru...

Page 91: ... the version of DfuSe SW you selected 4 6 5 9 Start the Dashboard 4 6 5 10 Reset the beacon again 4 6 5 11 Check SW on the beacon afterwards 4 6 5 12 Everything should be OK with SW now DFU programming is complete DFU Programming for the modem 4 6 5 13 Here is the link for the modem DFU programming The steps are similar to those for beacon DFU programming 4 6 5 14 After uploading DFU driver by Dfu...

Page 92: ...d immediately check the Choose button you used or change the version of DfuSe SW to a different one 4 6 5 17 Disconnect the short circuit 4 6 5 18 Start the Dashboard and press RESET button If you have uploaded the latest firmware for all the boards you can start to activate the system While the beacon or modem is connected to the Dashboard click the DEFAULT button on the Dashboard to upload the d...

Page 93: ...mming devices with the latest software the modem and beacons are ready for use Place the stationary beacons high on the walls vertically in a way that will provide optimal ultrasonic coverage Write down the beacon s height for future change in the settings The help video on installation can be found here https youtu be WY0HkLzmjys Side view Stationary beacon Stationary beacon Stationary beacon Mob...

Page 94: ...acons will go into sleep mode automatically after 1 minute The system may run the frequency search if it is the very first time you are waking up the beacons If this step does not work disconnect the modem and connect that beacon again via USB Press the DEFAULT button in the Dashboard and the Read All button to make sure that the radio settings are the default ones Check that the radio settings on...

Page 95: ...t into sleep mode or wake it up Only 4 stationary beacons may be in 1 submap If you wake up more beacons create new submap for them Or it won t be displayed on the map and in the table of distances Build the map Industrial RX beacons are not possible to build the map automatically so you have to build it manually 4 6 23 1 Open the Dashboard You will see the table of distances 4 6 23 2 Use right mo...

Page 96: ...s as with the stationary beacon https youtu be A4aRsjH2 _E If you see on the devices panel in the Dashboard that the beacon is colored orange it means there are some differences in some of the settings between beacons For example some sensors may be off or some ultrasonic or radio settings may be different You can change the settings for sensors manually by clicking on the panel on the upper right...

Page 97: ...97 The system is now fully operational ...

Page 98: ...quency it is HW depended Ultrasonic can t be changed to default You must check the frequency on the white sticker Unpack the system Take a look at the similar unpacking video of HW v4 9 They are different but have some similar basics https youtu be sOce7B2_6Sk Charge all the beacons using USB cable Full charging takes about 2 4 hours Turn the beacons on Place DIP switches as shown on the picture b...

Page 99: ...sed when HEX SW uploading in the Dashboard cannot be used For example when you are updating from a very old SW version or when the SW includes major changes to the system and the only possible way to update the SW is via DFU programming After the DFU SW upgrade futures SW upgrades can be done in a regular manner via the Dashboard To start programming move the beacon s DIP switch to the DFU program...

Page 100: ...ted 5 1 5 9 Move the DIP switch into Power ON DFU OFF 5 1 5 10 Start the Dashboard and press the RESET button on the beacon 5 1 5 11 Check SW on the beacon afterwards 5 1 5 12 Everything should be OK with SW now DFU programming is complete Follow the same scenario for the modem 5 1 5 13 Here is the link for the modem DFU programming The steps are similar to those for beacon DFU programming 5 1 5 1...

Page 101: ...mmediately check the Choose button you used or change the version of DfuSe SW to a different one 5 1 5 17 Disconnect the short circuit 5 1 5 18 Start the Dashboard and press RESET button If you have uploaded the latest firmware for all of the boards you can start to activate the system While the beacon or modem is connected to the Dashboard click the DEFAULT button on the Dashboard to upload the d...

Page 102: ... the latest software the modem and beacons are ready for use Place the stationary beacons high on the walls vertically in a way that will provide optimal ultrasonic coverage Write down the beacon s height for future change in the settings The help video on installation can be found here https youtu be WY0HkLzmjys Side view Stationary beacon Stationary beacon Stationary beacon Mobile beacon Modem b...

Page 103: ...eacons will go into sleep mode automatically after 1 minute The system may run the frequency search if it is the very first time you are waking up the beacons If this step does not work disconnect the modem and connect that beacon again via USB Press the DEFAULT button in the Dashboard and the Read All button to make sure that the radio settings are the default ones Check that the radio settings o...

Page 104: ...s may be in 1 submap If you wake up more beacons create new submap for them Or it won t be displayed on the map and in the table of distances Enter the height of stationary beacons Choose beacon in the list and enter height value ...

Page 105: ...nces chapter Make a service zone clicking on the map with Shift Left Mouse Button See Submaps chapter for more details Freeze submap and by clicking the button Stationary beacons will stop measuring relative distances and will be ready to measure distance from the mobile beacon s Turn on and wake up the mobile beacon following the same steps as with the stationary beacon https youtu be A4aRsjH2 _E...

Page 106: ...106 The system is now fully operational ...

Page 107: ...the white sticker Unpack the system Take a look at the similar unpacking video of HW v4 9 They are different but have some similar basics https youtu be sOce7B2_6Sk Charge all the beacons using USB cable Full charging takes about 1 2 hours Turn the beacons on To turn Mini RXs on carefully disassemble its housing and find DIP switches inside It is necessary only for the first start You can also tur...

Page 108: ...e problems with HEX programming use DFU programming DFU programming or SW uploading is used when HEX SW uploading in the Dashboard cannot be used For example when you are updating from a very old SW version or when the SW includes major changes to the system and the only possible way to update the SW is via DFU programming After the DFU SW upgrade futures SW upgrades can be done in a regular manne...

Page 109: ...ediately check the Choose button you used or change the version of DfuSe SW you selected Move the DIP switch into Power ON DFU OFF Start the Dashboard and press the RESET button on the beacon Check SW on the beacon afterwards Everything should be OK with SW now DFU programming is complete Follow the same scenario for the modem Here is the link for the modem DFU programming The steps are similar to...

Page 110: ...load immediately check the Choose button you used or change the version of DfuSe SW to a different one Disconnect the short circuit Start the Dashboard and press RESET button If you have uploaded the latest firmware for all the boards you can start to activate the system While the beacon or modem is connected to the Dashboard click the DEFAULT button on the Dashboard to upload the default settings...

Page 111: ...ices with the latest software the modem and beacons are ready for use Place the stationary beacons high on the walls vertically in a way that will provide optimal ultrasonic coverage Write down the beacon s height for future change in the settings The help video on installation can be found here https youtu be WY0HkLzmjys Side view Stationary beacon Stationary beacon Mobile beacon Modem beacon ...

Page 112: ...eacons will go into sleep mode automatically after 1 minute The system may run the frequency search if it is the very first time you are waking up the beacons If this step does not work disconnect the modem and connect that beacon again via USB Press the DEFAULT button in the Dashboard and the Read All button to make sure that the radio settings are the default ones Check that the radio settings o...

Page 113: ...onary beacons may be in 1 submap If you wake up more beacons create new submap for them Or it won t be displayed on the map and in the table of distances Build the map Beacons with different frequencies are not able to build the map automatically so you have to build it manually 5 2 21 1 Open the Dashboard You will see the table of distances 5 2 21 2 Use right mouse click on cell you want to enter...

Page 114: ...s with the stationary beacon https youtu be A4aRsjH2 _E If you see on the devices panel in the Dashboard that the beacon is colored orange it means there are some differences in some of the settings between beacons For example some sensors may be off or some ultrasonic or radio settings may be different You can change the settings for sensors manually by clicking on the panel on the upper right co...

Page 115: ...115 The system is now fully operational ...

Page 116: ...icker Unpack the system Take a look at the similar unpacking video of HW v4 9 They are different but have some similar basics https youtu be sOce7B2_6Sk Charge all the beacons using USB cable Full charging takes about 1 2 hours Turn the beacons on To turn Mini RXs on carefully disassemble its housing and find DIP switches inside It is necessary only for the first start You can also turn it off wit...

Page 117: ...ming DFU programming or SW uploading is used when HEX SW uploading in the Dashboard cannot be used For example when you are updating from a very old SW version or when the SW includes major changes to the system and the only possible way to update the SW is via DFU programming After the DFU SW upgrade futures SW upgrades can be done in a regular manner via the Dashboard To start programming move t...

Page 118: ... immediately check the Choose button you used or change the version of DfuSe SW you selected 5 3 5 9 Move the DIP switch into Power ON DFU OFF 5 3 5 10 Start the Dashboard and press the RESET button on the beacon 5 3 5 11 Check SW on the beacon afterwards 5 3 5 12 Everything should be OK with SW now DFU programming is complete Follow the same scenario for the modem 5 3 5 13 Here is the link for th...

Page 119: ...orrectly If the DFU appears to upload immediately check the Choose button you used or change the version of DfuSe SW to a different one 5 3 5 17 Disconnect the short circuit 5 3 5 18 Start the Dashboard and press RESET button If you have uploaded the latest firmware for all of the boards you can start to activate the system While the beacon or modem is connected to the Dashboard click the DEFAULT ...

Page 120: ... the latest software the modem and beacons are ready for use Place the stationary beacons high on the walls vertically in a way that will provide optimal ultrasonic coverage Write down the beacon s height for future change in the settings The help video on installation can be found here https youtu be WY0HkLzmjys Side view Stationary beacon Stationary beacon Stationary beacon Modem beacon Mobile b...

Page 121: ...eacons will go into sleep mode automatically after 1 minute The system may run the frequency search if it is the very first time you are waking up the beacons If this step does not work disconnect the modem and connect that beacon again via USB Press the DEFAULT button in the Dashboard and the Read All button to make sure that the radio settings are the default ones Check that the radio settings o...

Page 122: ...t and enter height value Enter the height for mobile beacon if you use 2D mode 5 3 1 In current version one modem supports 250 beacons mobile stationary combined If you do not see some of your connected beacons on the map you may need to scroll to find their addresses ...

Page 123: ...ll see the table of distances 5 3 21 2 Use right mouse click on cell you want to enter the distance Additional menu will open There you can control the table of distances Choose Enter distance for pair to enter the value 5 3 21 3 Now enter measured measure it with laser distance meter or so value That values would not change until you unfreeze or clear it Even if beacons had been moved distance wo...

Page 124: ... in some of the settings between beacons For example some sensors may be off or some ultrasonic or radio settings may be different You can change the settings for sensors manually by clicking on the panel on the upper right corner of the Dashboard to change the cells from gray to green to turn on sensor It is recommended that the default settings on all beacons and the modem be used if this is you...

Page 125: ...shows the Dashboard s general interface and items positions Modem beacon s settings bar Modem beacon s quick control panel Visualization window Table of distances Visualization settings Devices list Map settings Modem Ceiling and mirroring buttons Diagnostics messages window ...

Page 126: ... architecture can t be selected Upload NIA firmware to modem Orange Modem HW v4 9 doesn t support MF NIA Orange You need at least 3 beacons for MF NIA Add beacons Red Same ultrasonic frequency in submap xx beacons b1 b2 use beacons with different frequencies in IA submaps Red Paired beacons ultrasonic and IMU fusion not completed Angular difference XX degrees Green Paired beacons ultrasonic and IM...

Page 127: ...ls they would be changing a little the color of each cell would be white If color differs check the colors definitions next page and solve the problem Freeze the map only if cells are white Measuring by user necessary for Mini RX beacons and noisy cases Use manual input if table of distances didn t build It may happen if environment is very noisy or distances are very huge In that case cells color...

Page 128: ...e can cause a huge impact on your tracking 6 3 2 4 Repeat for all cells White means that everything is good you can freeze the map Green means frozen distance you can freeze the map but be careful with values Yellow means that something seems to be wrong check distances and sensors before freezing Red means some critical misses DO NOT freeze the map Manually measure and enter distances ...

Page 129: ...nage devices Use double click to put beacon into sleep mode Stationary beacon beacon Press right mouse button and additional menu will open There you can Remove beacon from current submap Remove beacon from the whole network Manually setup coordinates x y z Mobile beacon hedge Press right mouse button and additional menu will open There you can Remove beacon from the network Setup movement path Up...

Page 130: ...tions to control visualization process Clear map clear all movement path Dots timeout time of path s existence Video Help Dots timeout Dots size mode size of dots Save screenshot files save to Dashboard s folder screenshots Freeze screen The map freeze no updates of the path ...

Page 131: ...131 6 6 Map Settings Map Settings offer some helpful tools Save map saves map as ini file into Dashboard folder maps Load map loads map from ini format file Erase map erases map and clears it ...

Page 132: ...vice Sleep Send device asleep battery economy mode Wake up Wakes up device from sleeping mode Default Drops all device s settings to factory default Time sync Sends time from your PC to hedgehog for stream it out via UART Additional Ctrl feature To apply action to all beacons in the system use Ctrl left mouse click on button Applicable only for buttons that turn bold while Ctrl is pressed ...

Page 133: ...ay as a mirror reflection The CEILING button shows where the mobile beacon is located with respect to the stationary beacons When the arrow points up it means that the mobile beacon is below the stationary beacons When the arrow points down it means that the mobile beacon is above the stationary beacons ...

Page 134: ...iltering against location jumps Set of power saving features May not work in all settings or all SW releases Keep disabled if unsure Averaging between location update measurements More value less location jitter but higher latency Filter of distances as opposed to filter of locations More better filtering but may be too conservative and kill good measurements Keep Enabled normally Switch to cm for...

Page 135: ... 80 90dBm Higher value may overload Lower lost packets Chosen working band Exact working frequency Logical address of the device Keep 2 255 for beacons Address Pre selected channel one of the radio channels for communication between modem and beacons If enabled beacons will be seen as green dots on the map If disabled they won t be seen at all Enable or disable visibility of Service Areas Zones Ma...

Page 136: ...136 Advanced settings TBD Enabling will allow direction along with location TBD TBD TBD ...

Page 137: ...balanced and 500kbps the fastest but the lowest radio range and least immune to interference Logical address of the device Distinguish of beacon from another One of a predefined radio frequency channels Modulation a part of the radio profile Only for advanced users Only for advanced users Only for advanced users Only for advanced users Real carrier frequency ...

Page 138: ...ally Only for advanced users Radio profile settings No need to change manually Only for advanced users Radio profile settings No need to change manually Only for advanced users Radio profile settings No need to change manually Only for advanced users Radio profile settings No need to change manually Only for advanced users Radio profile settings No need to change manually Only for advanced users ...

Page 139: ... ID Enable for mobile beacon and disable for stationary beacon TBD TBD Measured voltage of internal battery NA Height must be set for stationary beacons Must also be set for mobile beacons in 1D or 2D modes Time from the latest reset ...

Page 140: ...e how the modem hears the beacon over radio Keep below 25dBm and above 80 90dBm to avoid losses of packets Lower end depends on radio profile and interference Select radio frequency band according to your HW 433MHz or 915MHz Real carrier frequency Selected device s address Selected radio channel TBD ...

Page 141: ...ed IMU X shift Calibration settings of embedded IMU Y shift Calibration settings of embedded IMU Z shift Calibration settings of embedded IMU X scale Calibration settings of embedded IMU Y scale Calibration settings of embedded IMU Z scale ...

Page 142: ...r each beacon different under one modem One of the pre selected frequency channels Radio profile settings No need to change manually Only for advanced users Radio profile settings No need to change manually Only for advanced users Radio profile settings No need to change manually Only for advanced users Radio profile settings No need to change manually Only for advanced users Real carrier frequenc...

Page 143: ...ally Only for advanced users Radio profile settings No need to change manually Only for advanced users Radio profile settings No need to change manually Only for advanced users Radio profile settings No need to change manually Only for advanced users Radio profile settings No need to change manually Only for advanced users Radio profile settings No need to change manually Only for advanced users ...

Page 144: ...nic pulses set according to your HW 50 default 1 99 lower strength of ultrasonic Keep default Number of ultrasonic pulses the TX beacon emits More stronger but longer echo For small distances 1 10 periods 20 30 for 10 20 meters For 20 m 50 periods Internal settings Automatic or manual gain control Manual can be useful in special conditions too high external audio noise for example ...

Page 145: ...s For advanced users only AGC settings For advanced users only Deep ultrasonic trigger settings For special cases only Deep ultrasonic trigger settings For special cases only Keep ADC Deep ultrasonic trigger settings For special cases only Deep ultrasonic trigger settings For special cases only ...

Page 146: ...special cases only Deep ultrasonic trigger settings For special cases only Deep ultrasonic trigger settings For special cases only Deep ultrasonic trigger settings For special cases only Deep ultrasonic trigger settings For special cases only ...

Page 147: ...only Deep AGC settings For special cases only Deep AGC settings For special cases only Deep AGC settings For special cases only TBD TBD TBD TBD TBD Enable disable sensor RX1 in map building mode Enable disable sensor RX2 in map building mode ...

Page 148: ...5 in map building mode Enable disable sensor RX1 in map frozen regular work mode Enable disable sensor RX2 in map frozen regular work mode Enable disable sensor RX3 in map frozen regular work mode Enable disable sensor RX4 in map frozen regular work mode Enable disable sensor RX5 in map frozen regular work mode TBD TBD TBD ...

Page 149: ...sonic sensor fusion data with IMU update rate 100Hz Enable or disable receiving raw IMU data with IMU update rate 100Hz TBD Type of protocol Speed of UART in hedgehog mode The same as with modem The same as with modem Timeout sleep settings Enable for Paired Beacons feature https youtu be aBWUALT3WTQ ...

Page 150: ...5 MHz allowable Radio bands 868 and 915 but when using antennas at 433 MHz it is possible to use both 315 and 433 MHz Mini RX beacons and Super Beacons are 868 915MHz only It is possible to change the frequency of radio but radio performance can be severely degraded It may be enough for smaller distances up to 10 20 meters but not more ...

Page 151: ...lor for your hedge but it still has some permanent colors which inform you about some tracking issues Blue normal mode and confident tracking Orange system provides the best location data possible but confidence is lower than blue lost radio packets weak ultrasonic coverage ...

Page 152: ...e of that they have different colors to make it easy to distinguish it Stationary beacons Green center Mobile beacons Dark blue center Examples Stationary beacons 19KHz beacon 25KHz beacon 31KHz beacon 37KHz beacon 45KHz beacon Mobile beacons 19KHz beacon 25KHz beacon 31KHz beacon 37KHz beacon 45KHz beacon ...

Page 153: ...d in general software package with all Marvelmind software in Super Modem folder This firmware can be updated via dashboard hex file or via DFU dfu file like other firmware in the package Please refer to Operating Manual for details of updating software via dashboard or dfu High level software is located on micro SD card inserted in the Raspberry Pi single board computer inside Super Modem To upda...

Page 154: ... Open Super Modem enclosure 7 1 2 2 Eject the micro SD card Super Modem should not be powered at this time 7 1 2 3 Insert micro SD card into any MS Windows computer via card reader 7 1 2 4 Download and unpack the archive with image of updated software 7 1 2 5 7 1 2 6 Install and run Win32 disk imager program supplied in the archive with image 7 1 2 7 Open the image file and write to the micro SD c...

Page 155: ...dified via configuration files on the micro SD card inserted in the Super Modem To modify these files you need to Open Super Modem enclosure Eject the micro SD card Super Modem should not be powered at this time Insert micro SD card into any computer with Linux Open and modify certain configuration files on the micro SD card see below Eject micro SD card from computer and insert back into Super Mo...

Page 156: ...ons wifi_network name SSID of WiFi network to connect wifi_password password PSK for this network In file stream_options udp_destination_ip IP address in local network where Super Modem will stream data udp_destination_port UDP port where Super Modem will stream data ...

Page 157: ...ures do not mix it Click Next Wait until beacon update finishes Note If it the first time you start the system press Default button for every beacon after SW update Repeat for all your beacons Be careful Default button will apply full default settings to this beacon except it s address If you had some custom Radio settings before it would be changed to 153kbps Radio profile 0 Radio channel SW upda...

Page 158: ...e This chapter describes DFU update for different types of devices Pros Ultimatum SW update erases all glitches settings and etc Makes it possible to revive beacon if everything goes bad Cons More complicated than a regular SW update clears all settings Save map file not to lose your map To make a DFU Programming you need to know where hardware reset button and DIP switches placed Reset button and...

Page 159: ...they have magnetic DFU switch and magnetic Reset button Industrial Super Beacon Plastic Industrial Super Beacon Metal 25kHz DIP switches Reset button on the other side Disassemble Carefully Magnetic DFU switch side Magnetic Reset side Magnetic DFU switch side Magnetic Reset side ...

Page 160: ...and Reset different types of Modems Modem HW v5 1 Modem HW v4 9 Super Modem Magnetic DFU switch side Magnetic Reset side Hardware Reset button on side DFU mode pins Hardware Reset button on side DFU mode pins Magnetic DFU switch side Magnetic Reset side ...

Page 161: ...press the Reset button device will go into DFU mode 2 Connect the device via USB to your PC Do not forget to power Industrial versions of beacon and Super Modem they do not have internal battery 3 Run DfuSe Choose whichever works the best for your Windows DfuSe v3 0 4 or DfuSe v 3 0 5 4 In the upper left corner of the DfuSe program you will see a device connected in the DFU mode If not reenter dev...

Page 162: ...for 1 second the second magnet to the Reset side of the device device will exit from DFU mode For Modem HW v5 1 and Modem HW v4 9 open DFU mode pins and press the Reset button device will go into DFU mode 9 Start the Dashboard left device connected to the PC via USB Do not forget to power Industrial versions of beacon and Super Modem they do not have internal battery device should appear in the Da...

Page 163: ...sic Dashboard version but you can easily purchase it if necessary You can see the list on Marvelmind com Products To order Go to Marvelmind com Products Choose features which you want to get e g MMSW0001 100Hz NMEA0183 Make an order Pay for the feature via PayPal or other methods Order the feature via the Dashboard by providing device s CPU ID or send us email with the device s CPU ID Open Dashboa...

Page 164: ...ey and send to you via email Place the license key into Dashboard Licenses folder Connect device to the Dashboard via USB Go to Licenses View activate licenses Choose Open license key Choose the license file be careful if you have licenses for multiple devices check CPU ID carefully The features become activated in the Dashboard ...

Page 165: ... any settings and corrupting the system That is something like safety button This is the first version of Dashboard Monitoring Mode New functionality and appearance may come with future SW updates How to enable Dashboard Monitoring Mode Click on the Stream capture button It will be renamed in future updates into Dashboard Monitoring Mode If you try to change settings while Dashboard Monitoring Mod...

Page 166: ... created to prevent people crossing dangerous zones Zones violations leads to alarm and will be written into CSV file How to create geofencing zone Unfreeze map submap may be frozen Choose submap Left mouse click on its icon and Right mouse button click on the map Zones setup ...

Page 167: ...reate a zone using Shift Left mouse click and clicking on map click on point removes it You can tune zone with entering distance and entering time If zone created press Save and close to save zone Freeze map ...

Page 168: ...168 Zone created and ready to work If mobile beacon crosses zone for tuned distance and tuned time that violation will be recorded to CSV file and hedgehog will be colored red in the Dashboard ...

Page 169: ...s to build complicated multi level maps Every submap correspond some height height corresponds to floors Show all layers floors Show no layers floors Show all objects even if they are out of floors coordinates List of layers floors Beacons counter in chosen floors all ...

Page 170: ...own adjustable height and its own floor plan Use right mouse button on the floor area to see an additional menu There you can change floor s height You can also insert your floorplan for that floor png jpeg bmp tiff Floor 4 and 5 are enabled ...

Page 171: ...171 Floor 5 is enabled Floor 4 is enabled ...

Page 172: ... Load floorplan Choose file png jpeg bmp tiff When the picture is loaded you can drag the beacons to the points where they are actually located After dragging two beacons the picture with beacons will be combined in scale Help video https www youtube com watch v NHUnCtJIYXc ...

Page 173: ... stable Z configuration Height of hedges for Vertical submap for stable Z Maximum measuring distance limitation mode Maximum measuring distance between stationary and mobile Service zone thickness value in meters Submap X shift value in meters Submap Y shift value in meters Submap Z shift value in meters Submap rotation value in degrees Plane rotation X value Vertical submaps for stable Z Plane ro...

Page 174: ...ew Axis extension allows user to rotate the map There are 90 gaps between views It helps in case of multifloor tracking when it is important to have a side view There are 3 directions of view To change view click on the icon Examples of view Y X X Y ...

Page 175: ...175 Z X ...

Page 176: ...ertical submaps feature FN0003 Vertical submap is a new feature for drone flights or some other specific cases It gives the user an opportunity to get solid Z data for vertical movement Example The drone flight ...

Page 177: ... beacons on the wall 7 9 1 5 Build the first submap horizontal consisting of all ground beacons 7 9 1 6 Change Limitation distance to manual and input the value in the submap s settings 7 9 1 7 Freeze and lock it 7 9 1 8 Build the second submap vertical horizontally consisting of two wall beacons and two ground beacons neighboring with wall beacons 7 9 1 9 Now freeze it 7 9 1 10 Press axis rotatio...

Page 178: ... the corner value 90 usually 7 9 1 13 Choose submap 2 and enable Only for Z coordinates mode 7 9 1 14 Change Limitation distance value 7 9 1 15 Change views and check the map 7 9 1 16 Wake up mobile beacon 7 9 1 17 Track ...

Page 179: ...or complex maps with multi floor and similar How to setup handover zones Choose any submap Use Alt Left mouse click on the other submap s service zone border neighboring Now neighboring service zones are colored with green dark green for chosen submap and light green for neighboring submaps Alt Left mouse click ...

Page 180: ...factory warehouse with total area of 10 000 300 000 or more based on smaller submaps 30 1000m2 A submap is a part of the map It includes a subset of used beacons covering part of the navigation area Current version of Marvelmind system can include up to 10 submaps Please also check our help video Nose shows direction of the tracking zone ...

Page 181: ...they appear in the first not frozen submap or in Submap0 if all beacons are frozen 7 11 1 2 Pressing the button will add a new empty submap to the system 7 11 1 3 Press the button with the submap number Submap0 Submap1 etc select the corresponding submap 7 11 1 4 In this state if the modem button is pushed the list of parameters on the right side represents some of the parameters of the selected s...

Page 182: ...e have the functions of adding and removing the beacons from the submap In the picture above we are removing beacon 3 from Submap0 Then we switch to Submap1 and add this beacon to the submap 7 11 1 8 When the submap is selected the beacons that do not belong to the submap are colored gray In the same way continue with removing beacon 10 from Submap0 and adding it to Submap1 7 11 1 9 Now there are ...

Page 183: ... hands But a more user friendly way is to drag and drop the selected submap using the mouse and holding down the CTRL button 7 11 1 12 Rotation of submap can be executed by using the mouse wheel The mirroring button can also be used it affects only submaps that are selected 7 11 1 13 After some movement rotation and mirroring of submaps we can locate the submaps close to their real relative locati...

Page 184: ...beacons This means that submaps cannot be aligned automatically To align submaps Build the system like in previous instruction Put M2 in mode on by clicking the icon Place the hedgehog near the boundary between two submaps You will see 2 orange hedgehogs blinking this is how the hedge is seen in two submaps To align submaps correctly CTRL scroll drag against each other until the orange mobile beac...

Page 185: ...17 The next step is to set Service zones which are zones where tracking is possible If a mobile beacon is out of a service zone it cannot be tracked If you built a complicated map you have to make service zones correctly Service zones must be crossing in order to provide correct and glide tracking ...

Page 186: ...FT Left mouse button on the map to create point 7 11 2 3 Use SHIFT Left mouse button on the point to delete it 7 11 2 4 Put points around submap move them to provide service area for current submap Service areas will cross each other If hedgehogs get lost between two submaps expand the service area ...

Page 187: ... an updated protocol with the changes Please also check our help video How to pair beacons Wake up stationary beacons and freeze the map Wake up two hedgehogs which were pre installed on robot copter drone Choose one beacon and go to Pairing mode parameter and activate Write the Address of paired beacon means number of the beacon current selected hedgehog is paired with Now choose location against...

Page 188: ...188 7 13 Map settings Map Settings offer some helpful tools Save map saves map as ini file into Dashboard folder maps Load map loads map from ini format file Erase map erases map and clears it ...

Page 189: ...ground color change This is a small feature that helps make tracking look better If you uploaded a floorplan and it is white you can tune Dashboard s background color to make it suit How to choose background color Load floorplan Right mouse button click on the background ...

Page 190: ...190 Choose color and press OK Color applied Now background matches floorplan ...

Page 191: ...hange FN0006 If you have multiple mobile beacons you can give each one its own color to make them recognizable on the map How to change hedgehog color Right mouse button click on the hedge in the list of devices Setup color ...

Page 192: ...192 Choose any color which suits you and press OK Now the hedgehog and its tracking path will be colored ...

Page 193: ...data size System configuration Radio profile kbps User payload data per cycle bytes Real update rate Hz User payload maximum data rate bytes per second 2 stationary beacons 3 meters maximum distance 500 FEC 0 16 0 32 16 512 153 FEC 0 16 0 32 16 512 38 4 FEC 0 9 0 32 8 256 38 4 no FEC 0 14 0 32 13 416 4 stationary beacons 11 meters distance 500 FEC 0 14 0 32 14 448 153 FEC 0 12 0 32 12 384 38 4 FEC...

Page 194: ...gehog with IMU SW and firmware version 5 85 or newer Ultrasound Update rate 4Hz or higher Before you start use the feature check whether accelerometer has been calibrated Check if hedge was not calibrated before Was damaged or fall down Put hedgehog on a flat surface antenna directs up and connect to your PC Run the Dashboard Go to view Accelerometer calibration in open window click autofill and c...

Page 195: ...ultrasound tracking has started select the hedgehog in the Dashboard go to menu Interfaces on the right and enable Processed IMU data After that it is recommended to bring the hedgehog to real estate and press the ZERO IMU button right bottom for additional sub calibration of the gyro After 5 seconds the hedgehog will begin streaming the processed IMU data Using Data in the Python Library Example ...

Page 196: ...196 7 18 IMU axis positioning Super Beacon IMU axis positions HW v4 9 IMU axis positions ...

Page 197: ...197 Mini TX IMU axis positions Mini RX beacon IMU axis positions ...

Page 198: ...d v6 240 log files writes in csv format How to use Player Go to File Player This is how the starting player menu looks like Select log opens save log file Play launch the playback Click Select log button and choose the file Now log is loaded Important for recording log file click Save map for saving all the beacons locations and attaching all the beacons to the log Log file also created while Free...

Page 199: ... slider You can move triangles and zoom place cursor on the slider mouse wheel Triangles limit the area in which player works and the statistics is calculated Start of Log time Currently playing time End of Log time Start of Playback End of Playback Play pause button Close player button Select log file ...

Page 200: ...in latency based on the selected parameters Real time player turned on by default You can turn it off if you need less delay You can tune it whether you need Backward amount of dots which player looks backward to provide smooth tracking Forward amount of dots which player looks forward to provide smooth tracking Tracking examples Real time player turned off ...

Page 201: ...201 Real time player turned on ...

Page 202: ...nds time since 1970 01 01 time from previous record in milliseconds time from running dashboard in milliseconds address of hedgehog X coordinate of hedgehog meters Y coordinate of hedgehog meters Z coordinate of hedgehog meters address of stationary beacon raw distance from hedgehog to stationary beacon meters The last pair beacon address distance is repeated n times equal stationary beacons quant...

Page 203: ...ystem From the mobile beacons Each mobile beacon knows its own position and does not know the positions of the other mobile beacons From modem router Knows position of every mobile beacon in the system Data from the mobile beacons and from the modem can be obtained at the same time if necessary A list of the supported interfaces is shown below More information on the interfaces can be found here h...

Page 204: ...204 8 1 Super beacon external interface pinout top view ...

Page 205: ...205 8 2 Beacon HW v4 9 external interface 4x4 pinout top view ...

Page 206: ...206 8 3 Modem HW v4 9 external interface pinout top view ...

Page 207: ... to turn off the beacon with DIP switches If you solder bad and kill the beacon Marvelmind team won t be responsible for it To get UART data streaming from beacon Mini RX you must solder to the pins on the board BAT you can disconnect internal battery and supply here an external power source of 3 5V 5 2V to the point with current up to 50mA ...

Page 208: ... using advanced settings only when you are confident with the system If you run into trouble connect the beacon or modem to the PC via USB and use the DEFAULT button It will upload factory settings to the board while keeping the device address untracked ...

Page 209: ...t that includes submaps stationary beacons and service zones within which positioning of mobile beacons is ensured by ultrasonic signals from the stationary beacons of this submap The main parameters of a submap are its size frequencies jitter codes and TDMA position of stationary beacons by which mobile beacons can not only be positioned but also determine in which submap the mobile beacon is loc...

Page 210: ... system Submap can contain from 1 to 4 beacons It can be 1D 2D and 3D Different types of submaps can be used together Mix 1D 2D 3D as you wish Map of the office floor for example may contain 1D submap for corridor 2D 3D submaps for office rooms All that submaps will form a big map with coverage you need Submaps can contain the same beacons It makes possible to use 3 beacons instead 4 It is very he...

Page 211: ... of responsibility of every submap How to create a service zone Choose submap click on the submap icon Use SHIFT Left mouse button on the map to create point Use SHIFT Left mouse button on the point to delete it Put points around submap move them to provide service area for current submap Service areas will cross each other If hedgehogs get lost between two submaps expand the service area ...

Page 212: ...fferent and depends on the mobile beacon s speed and system s update rate We recommend testing it with the speed of your mobile beacon mounted on a person robot copter General recommendation is to make handover smooth and correct make sure that your mobile beacon makes at least 4 refreshes in a handover zone Look at the following examples Example 1 Normal handover zone 14 10 11 12 Handover zone ma...

Page 213: ... 3 Very small handover zone Example 4 No handover zone 10 11 12 14 Hedge made 2 3 updates MAY BE NOT ENOUGH 10 11 12 14 Hedge made 1 2 updates NOT ENOUGH 10 11 12 14 Service zones not cross NO HANDOVER ZONE CREATED NO HANDOVER BETWEEN SUBMAPS ...

Page 214: ...st changed via settings in the Dashboard Different frequencies can be used In IA as a basic rule of Inverse Architecture s functionality In NIA Multi frequency NIA to increase update rate for multiple mobile beacons To make it easy to distinguish stationary beacons with different frequencies in the Dashboard colored in different colors 19KHz beacon 25KHz beacon 31KHz beacon 37KHz beacon 45KHz beac...

Page 215: ...ubmap This ensures the positioning of the beacon on the entire area of the map Jitter is a code corresponding to a stationary beacon depending on the code a stationary beacon introduces a delay before emission and accordingly the received signal will be delayed by this value the mobile beacon knows this delay by the emission cycle number and makes the appropriate distance adjustment Jitter codes s...

Page 216: ... this example sets of frequencies are 19 31kHz 31 45kHz and 45 19kHz while there are no repetitions in adjacent submaps while further construction of submaps using the same frequencies is allowed i e 19 31kHz 31 45kHz 45 19kHz 19 31kHz 31 45kHz 45 19kHz because in this case repetition does not occur It is CORRECT Jitter codes 19 j0 T1 kHz 25kHz j0 T1 31kHz j0 T1 45kHz j0 T1 19kHz j0 T1 25kHz j0 T1...

Page 217: ...1 45kHz j0 T1 45kHz j0 T1 19kHz j1 T1 while there are no repetitions within the entire map It is CORRECT map building The following particular qualities must apply to handovers within one submaps the handover zones of other submaps cannot overlap switching to a neighboring submap is possible only from a handover between these submaps 19kHz j0 T1 31kHz j0 T1 45kHz j0 T1 Submap0 Submap1 Submap2 31kH...

Page 218: ...ycle in which it should emit and the number of cycles of radiation after which these numbers are repeated is set We have 3 TDMA types Type 1 TDMA as NIA multiple beacons working algorithm Type 2 Full overlapping TDMA For better coverage in 2D See more on TDMA chapter Type 3 TDMA for huge IA maps building described below For building huge maps in IA we need TDMA Type 3 Example 1 19kHz j0 T1 31kHz j...

Page 219: ... SM0 SM3 SM4 TDMA 1 TDMA 2 TDMA 3 TDMA 1 TDMA 2 TDMA 3 TDMA 1 TDMA 2 TDMA 3 TDMA 1 TDMA 2 19kHz 19kHz 19kHz 19kHz 19kHz 19kHz 19kHz 19kHz 19kHz 19kHz 19kHz 31kHz 31kHz 31kHz 31kHz 31kHz 31kHz 31kHz 31kHz 31kHz 31kHz 31kHz 45kHz 45kHz 45kHz 45kHz 45kHz 45kHz 45kHz 45kHz 45kHz 45kHz 45kHz 19kHz 19kHz 19kHz 19kHz 19kHz 19kHz 19kHz 19kHz 19kHz 19kHz 19kHz 37kHz 37kHz 37kHz 37kHz 37kHz 37kHz 37kHz 37kH...

Page 220: ...uniqueness of neighboring sub maps use jitter For example when using Jitter Mode1 and only two codes 0 and 1 for each stationary beacon from 10 initial combinations you can get 40 submaps because each submap contains two beacons and accordingly 4 combinations however this number may turn out to be slightly less when one stationary beacon enters into more than one submap because the number of combi...

Page 221: ...ces chapter And set the required distance manually Then you need to move the submap to the desired coordinates using the settings of the submap click on the submap s tab icon and settings tab will appear in the right side of the Dashboard to specify its displacement and rotation After that you need to freeze the selected submap create the next one by pressing the button make it active and repeat t...

Page 222: ...of the received signal and trigger triggers It is necessary to verify that the main candidate corresponds to the actual distance and that there are no other candidates that could interfere with the correct measurement As a rule false candidates preceding the correct one is a consequence of the penetration of a different frequency you can check this by turning on the only selected transmitter optio...

Page 223: ...update rate reduces twice Mount stationary beacons in according to the TDMA chapters in Placement manual Wake up beacons included in Submap0 Enter the values in the table distance between beacons Freeze it If necessary set the shift rotation height etc Draw a service zone More info Submaps feature description Wake up beacons included in Submap1 If the submap uses beacons from other submaps you mus...

Page 224: ...tially first 19kHz 31kHz submap then 31kHz 45kHz submap You can also use absolutely the same set of frequencies in submaps Submap0 19kHz 31kHz Submap1 19KHz 31KHz Activate mobile beacons Freeze the entire map Now you can work with it If you have any jumps that can mean that you have wrong submaps positions Unfreeze all and try to move it until you get their correct positions TDMA modes System supp...

Page 225: ...225 How to change modes Choose hedge Go to Ultrasound TDMA mode Left mouse button click to change ...

Page 226: ...io profile parameter to 500kbps or any you need It is situated in the Dashboard on the right side of the Dashboard screen Tip Change the beacons profile before modem s in order not to lose your beacons It allows you to do it remotely 2 Room dimensions tracking areas Update rate is also having linear dependence with tracking distance distance between stationary and mobile beacon Longer distance low...

Page 227: ...same settings as in b but Real Time Player with settings 16 i e it takes into account up to 16 previous readings before giving out the new one What affects delay Real Time Player in the Dashboard For NIA Real Time Player in hedge For IA Window of averaging and Distance filter settings in modem For NIA Prefiltration coefficient and Ultrasonic filtering settings in hedge For IA How to decrease laten...

Page 228: ...nt and Ultrasonic filtering settings value to 0 For IA Choose your mobile beacon Go to Ultrasound Prefiltration coefficient Enter 0 value Choose your mobile beacon Go to Ultrasound Ultrasonic filtering Enter 0 value Complete Latency reduced ...

Page 229: ...ed of sound in air That happens because the speed of sound in metal is much higher than the speed of sound in the air The ultrasound signal may even look stronger than the real signal propagated through the air due to the lower amount of losses of ultrasonic in metal than in the air It is good practice to place beacons on something relatively soft or something that does not conduct sound Place bea...

Page 230: ...e it also gives information on the background noise level of the signal echo etc With this tool it is easy to set up the proper ultrasonic threshold on the Dashboard Echo External noises look similarly Thus choose the ultrasonic threshold below this value for example 500 to 2000 Type the reference beacon number and press Enter Choose the beacon to test Ultrasonic signal front Trigger red line Emit...

Page 231: ...ters The best things to do in this case Identify the beacons that are affected Usually they are those that are the closest to the source of noise Try to reposition them Manually reduce the gain of the affected stationary beacons so that the signal from the mobile beacon would have a 1000 1800 amplitude That would give the best signal to noise ratio Don t make the gain too high The noise will be am...

Page 232: ...ecords all measured positions in the hedgehog log file that is stored in the same folder as the Dashboard exe file The data is written in csv format each line describes the position of one of the hedgehogs at a certain moment The line format is described here ...

Page 233: ... beacons Basic trilateration formulas are given in this article https en wikipedia org wiki Trilateration As you see the position of mobile beacons X Y Z is calculated from positions of 3 stationary beacons which are set by values of d i j One of the beacons was shifted to 0 0 position to simplify formulas in the article In formulas for X Y we see d and j in denominators This means that with low v...

Page 234: ...ngular velocity and acceleration when moving the mobile beacon turn it in hands Close the window of the accelerometer and gyro data Open the calibration window View calibrate the accelerometer When calibrating it measures the data of the free fall gravity of the Earth corresponding to each of the three axes X Y Z The initial ones from these calculations remember the correction shifts indicated in ...

Page 235: ... Y The beacon rests on the end the RX3 sensor points toward the table calibration Y The beacon rests on the end the RX2 sensor is directed towards the table calibration X In order not to interfere with the USB connector the beacon can be placed on the edge of the table so that the cable hangs down The beacon rests on the end the RX5 sensor points toward the table calibration X In each measurement ...

Page 236: ... Rotate the Marvelmind map using the dashboard as shown on the attached screenshot You can also view the video https www youtube com watch v AsYXrtg7aVU feature youtu be How to Enter the angle correction the angle shown on screenshot on the Pixhawk side from the Mission Planner of APM Planner Refer to the parameter BCN_ORIENT_YAW http ardupilot org copter docs parameters html highlight bcn_orient_...

Page 237: ...rvelmind mobile beacon can be connected to Pixhawk and to any other hardware or software that inputs GPS according to the NMEA0183 protocol The mobile beacon can send GPS data via UART and USB virtual UART interfaces For further explanation please check out this document ...

Page 238: ...ds request to modem via USB Procedure of sending these requests in dashboard is shown on second screenshot This format of request is described in section 8 of modem protocol Modem transmits data to the hedgehog via radio using our proprietary protocol https marvelmind com pics modem_usb_protocol pdf ...

Page 239: ...ket shown in section 2 3 This communication on the robot side is implemented in the Arduino example on our site As you can see in the protocol robot should not request the waypoints the hedgehog will send the waypoints when they will be transmitted from dashboard But robot should confirm receiving each waypoint by this packet 0x03 0x47 0x01 0x02 0x00 2 bytes of checksum How to send a path Choose m...

Page 240: ...240 Right mouse button on it Set movement path Shift Left mouse click to add point ...

Page 241: ...241 Shift Left mouse click on point to remove that point Click on Upload path to send it to robot Path loaded ...

Page 242: ...oving It is also very important to provide proper ultrasonic coverage to the stationary beacons when the map is being formed Mobile beacon hedgehog or hedge is designed to be placed horizontally The mobile beacon has four horizontal and one vertical sensor each covering its own sector Together they cover 360 degrees horizontally and 180 degrees in the upper hemisphere The lower hemisphere is highl...

Page 243: ...he modem disconnect the antenna from the beacon Monitor the Received Signal Strength Indicator RSSI It must be in the range of 25 to 70dBm An RSSI of less than 70dBm will work too but packet losses may start occurring The quality of the radio connection very much depends on external interference as well because the used band is ISM either 915MHz or 433MHz and there are numerous co existing systems...

Page 244: ...king sensor The rest sensors are turned off Changing sensors settings could be found in the panel in the upper right corner of the Dashboard during your beacon is connected to the computer Beacon 3 RX3 and RX4 emit ultrasound in normal mode for better ultrasonic signal exchange with Beacon 2 In frozen mode RX2 added as working sensor The rest sensors are turned off Beacon Beacon 2D Hedgehog 7 ...

Page 245: ...of beacon may be internal battery or external USB power supply for more details check comparison table Battery lifetime totally depends on the mode of operation and can be varied between several days to several months or more for special applications ...

Page 246: ... in which case the tracking will not be interrupted 5 How the system works in very low and very high temperatures System is designed for normal office like conditions and temperatures 0 ºС 40 ºС You can see some other types of beacon outdoor explosion safe etc in the comparison table We also possible to produce some special versions which will suit your case Please write to info marvelmind com 6 A...

Page 247: ... The ISM band license free band for industrial science and medical applications in those countries is 915MHz In Europe it is 433MHz 11 Device do not connect via USB Use USB cable with long metal part If you have any problems with USB connection change the cable first One cable can work for one device and do not work for other 12 Does the orientation of the beacon matter Yes it is Place and orienta...

Page 248: ...pdate SW on modem and beacons Now connect all beacons and modem one by one and press Default button in the Dashboard When updating the SW please press Default button to make sure that beacons really have default settings Otherwise modem may be calling on a wrong channel or something Press Erase map ...

Page 249: ...antennas away from the motors and other noise sources as much as possible Use USB cable with long metal part If you have any problems with USB connection change the cable first One cable can work for one beacon and do not work for other Be sure that you use SW from the same pack When updating the SW please press Default button to make sure that beacons really have default settings Otherwise modem ...

Page 250: ...250 Contacts For additional support please send your questions to info marvelmind com ...

Page 251: ...Mouser Electronics Authorized Distributor Click to View Pricing Inventory Delivery Lifecycle Information Seeed Studio 102991312 ...

Reviews: