8
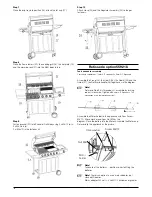
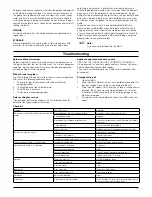
POL regulator
and hose
FIXING THE GAS REGULATOR TO THE CYLINDER
Confirm all barbecue control knobs are in the off position.
Hand-tighten the regulator supplied with this barbecue to the gas
cylinder by screwing in an anti-clockwise direction.
DO NOT OVERTIGHTEN!
As the regulator is fitted with a soft nose, it should only be tightened
a further 1/4 turn after resistance is first felt.
LEAK TESTING
Note!
Perform in a well-ventilated area
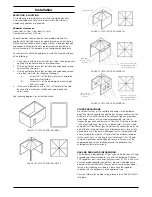
Confirm all control knobs are in the off position. Detach the control
panel located on the front of the barbecue body by pulling off the
knobs and removing all retaining screws. Open the gas control valve
on the cylinder. Check for leaks by brushing a solution of ½ water
and ½ soap over all gas system joints, including all valve, hose, and
regulator connections. NEVER USE AN OPEN FLAME to test for
leaks at anytime. If bubbles form over any of the joints, there is a
leak. Turn off the gas supply and retighten all joints. Repeat test. If
bubbles form again, do not use the barbecue.
Please contact your local dealer for assistance.
LEAK TEST ANNUALLY AND WHENEVER THE GAS BOTTLE IS
REMOVED, OR REPLACED.
Operation
Warning!
Before proceeding, be certain you understand the safety
information contained in this manual
This barbecue is not designed to be used with more than
66% of the cooking area as a solid plate. Full coverage of
plates will cause excessive build-up of heat and damage the
barbecue
Note!
Before using the barbecue for the first time, the
barbecue must be lit and burning for 30 minutes on the
“lo” position.
Important!
The regulator supplied with this BBQ may incorporate
an Excess Flow Control Safety Device. The Excess
Flow Control will activate to prevent gas flow should
a regulator malfunction occur. It is important that the
BBQ operator understands that all gas valves on the
BBQ are closed in the OFF position prior to opening
the gas cylinder valve. If the BBQ valves are open prior
to opening the cylinder valve, the Excess Flow Control
will be activated and prevent the BBQ from being lit.
To reset, close the BBQ valves and gas cylinder valve,
wait for 1 minute and use correct lighting procedure as
detailed below.
PREPARATION BEFORE COOKING
To prevent foods from sticking to the cookware, please use a long
handled brush to apply a light coat of cooking or vegetable oil
before each barbequing session.
USING THE ROTARY IGNITION
1. Read instructions before lighting.
2. Turn all knobs to “OFF” then open the LP tank valve. Always
keep your face and body as far from the grill as possible when
lighting.
3. Open hood during lighting.
4. Push in and turn any gas knob in an anti-clockwise direction
to the hi position. If the burner does not light immediately, turn
the gas control knob to the off position and wait one minute for
any accumulated gas to clear off the grill.
5. Once the burner is lit, release the knob to allow the knob to
rise.
6. The “lo” position is obtained by turning the knob fully anti-
clockwise.
7. Adjusting the control knob to your heat requirements can now
control the flame.
Important!
Keep a spray bottle of soapy water near the gas supply
valve and check the connections before each use.
Warning!
1. Do not light the grill if odour of gas is present, call
our service centre.
2. It is important to ensure that all control valves,
including the gas cylinder, are turned off after use.
For manual ignition
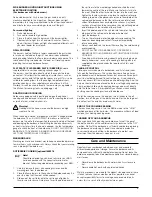
1. Light a 90mm barbecue match and hold adjacent to the lighter
hole at the right end of the barbecue. (Fig.1)
2. Turn the right hand gas control knob to the hi position. The
burner will light from the match.
3. Once the right burner is lit, the burner next to it can be turned on
and will light off the lit burner. Repeat till all burners are alight.
Each burner can be adjusted to provide a low setting by turning the
gas control to the “lo” position.


