background image

2. Cannot stop heating trouble shooting method


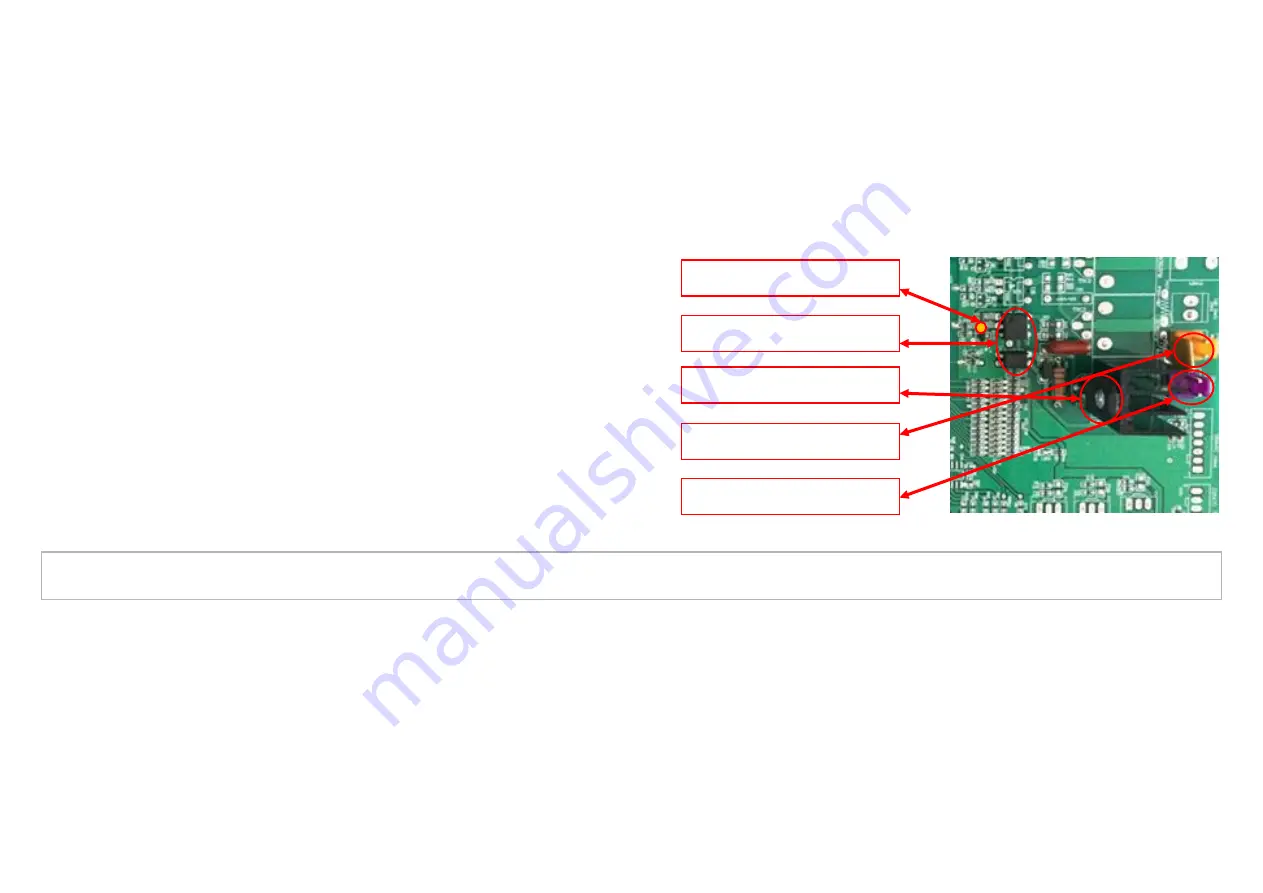
See  figure  29,  the  “BCR5PM”controlled  silicon  which  control  heater  fuse  on

-

off  breakdown,  or  the  front  “3150”optocoupler

“8650”patch triode which control signal are damaged. It will cause can’t stop power supply. Repair or replace mainboar

d. 


Figure 29 Circuit and picture of back heat function


SMD transistor 8050


Thermotherapy output CON05


AC24V output CON06


Silicon controlled BCR5PM


Optocoupler 3023


Summary of Contents for Ultimate Chiro

Page 1: ......

Page 2: ...al Structure II Main components Technical Specifications III Distribution and functions of the Power board Main board pluggable unit IV Troubleshoot of the chair V Disassemble diagram of parts of the...

Page 3: ...I Massage Chair Internal Structure Figure 1 Front of the chair 2D massage mechanism Actuator of calf rest Solenoid valve...

Page 4: ...Chair Internal Structure Figure 2 Back of the chair Travel switch Power switch Power filter 4A fuse Controller connection Air pump Power board Main PCB board Emergency switch Transformer Actuator of...

Page 5: ...ernal Structure Figure 3 2D massage mechanism motors detecting board Flapping motor Belt for flapping Width testing board Circle testing board Kneading motor Belt for kneading Traveling motor Travelin...

Page 6: ...me Specifications Rated voltage 3 10 Flapping Motor 54ZYT24 21G DC24V 3 10 Kneading motor 54ZYT24 24G DC24V 5 30 Traveling motor 62ZYT24 33W DC24V 3 8 4 0 Air pump YL250A AC24V II Main components Tech...

Page 7: ...24V 428 235 H DC24V Red black Output AC220V White black Output AC110V Black black Output AC12V Blue blue Output AC28V Transformer A38 220V 24V 10A 19V 4A AC110V AC220V 40 50 Solenoid Valve A382 Remark...

Page 8: ...V 5V power CON30 Transfer to main PCB board AC22V CON35 Transfer to main PCB board 24A 12V CON32 2 groups of AC22V input to transformer CON23 Input AC19V to transformer CON22 5VA and start signal swit...

Page 9: ...uator CON44 24VB 12V flat cable CON39 power supply of back rest actuator CON37 power supply of calf rest actuator CON31 green Foot rolling motor CON48 blue kneading motor CON25 red flapping motor CON1...

Page 10: ...flapper home Check and excluded 2 Filter is power switch itself good I did plug the power cord plugged in correctly Check and excluded II Second the fuse burned Troubleshooting 1 As shown in Figure 2...

Page 11: ...hen CON16 obtained at AC220V power toroidal transformer to obtain AC220V A38 220V 24V input power by the power board CON22 of JDQ 105LM control relay coil then it has AC22V AC19V and other output powe...

Page 12: ...rning phenomenon if the insurance burn plates usually due to excessive flow resulting in 4007 diode 4 7UP 400V capacitor 274 integration breakdown is bad replace the bad component or power supply boar...

Page 13: ...gure 2 Air plug is not inserted securely bad or the socket Signal line and needle seat sealing off you can exclude 2 As shown in Figure 9 hand control panel 11 0592M bad crystal will Lead to boot you...

Page 14: ...on Because of motor coil open circuit led to even the driver Board under a DC24V power supply the motor still not functioning Can use form 1 as reference measure the motor resistance if between 30 80...

Page 15: ...nector to Tapping motor then start Tapping function If kneading motor works means kneading motor is ok then the problem will be main board and the Wire harness If kneading motor not work means motor b...

Page 16: ...IRFS3607 Driver PMD2001D Quick resumption tube SF56 to see if broken obvious Find main board Driver output signal exist or not Exist signal means Driver and Back driver circuit fault if no signal mea...

Page 17: ...lt pls change the motor 2 Wire fault connected The wire plug bad connected will cause the motor can catch the DC24V voltage from the drive board Pic 15 16 find the CON19 plug in the drive board and th...

Page 18: ...ion such as the back massage hand go back and forth extend limited travel motor go up and down limited cylinder inside travel limited safety switch detection The inside construction and work principle...

Page 19: ...r fault with reclining and inclining The Failure analysis method 1 Reclining Angle memory function loss but the calf rest backrest cylinder normally working when in manual mode See picture 22 the dete...

Page 20: ...eclining and inclining Use the normal working cylinder to exchange the trouble one to make sure the fault from cylinder or drive board exchange the plug of both cylinder If it working after exchange t...

Page 21: ...ct it is coil open according to sheet 1 the normal resistance is 110 120 if not please change the air pump 2 There is no AC24V power for air pump as picture 22 it may defect of BCR5PM silicon controll...

Page 22: ...de SIN482 field effect tube resistance 74H595 patch integration has lose welding or badness Just change the badness components or mother can solve the problem silicon controlled BCR5PM Optocoupler 302...

Page 23: ...r get AC24V power from the mother board then the mother board controls each group of valves to turn on and cut off according to the program inflate or deflate to get massage effect So when find the ai...

Page 24: ...board got DC24V power when the motor itself coil open but motor can not work please consider form 1 measure the resistance if the resistance out of 30 80 then the motor should be changed Figure 26 Fo...

Page 25: ...Main PCB board defect Picture 26 or 27 test the paster field effect tube IRF3607 first then driver PMD2001D and fast recover SF56 to see if these components are defected Check if there is output from...

Page 26: ...tact See figure 28 power cord butt joint plug is bad contact will cause power can t be delivered to heating fuse Replace it 3 AC28V power failure If ring transformer does not have AC24V output or the...

Page 27: ...ff breakdown or the front 3150 optocoupler 8650 patch triode which control signal are damaged It will cause can t stop power supply Repair or replace mainboard Figure 29 Circuit and picture of back he...

Page 28: ...frame 1 Firstly rise the leg to the top or remove it then remove the front sealing plate Attention the chair need recline while remove the below row of screws 4 Fig 7 remove the 7 screws which in the...

Page 29: ...rmrest like orange arrows shown in the picture 5 Remove this screw which in the inner side of the back 7 Space capsule removal procedure remove the 8 screws on both sides of inner back shaking forward...

Page 30: ...hown red circle in picture put a piece of paper in the gap of shoulder decorative part Then use straight screwdriver inside and remover the shoulder decorative part from upper arm massager Remove the...

Page 31: ...er supply conversion and supply can lock the problem in the smallest range quickly 4 Know product all function unit drive control and check relation of all parts as all massage movements are controlle...

Reviews: