E-7
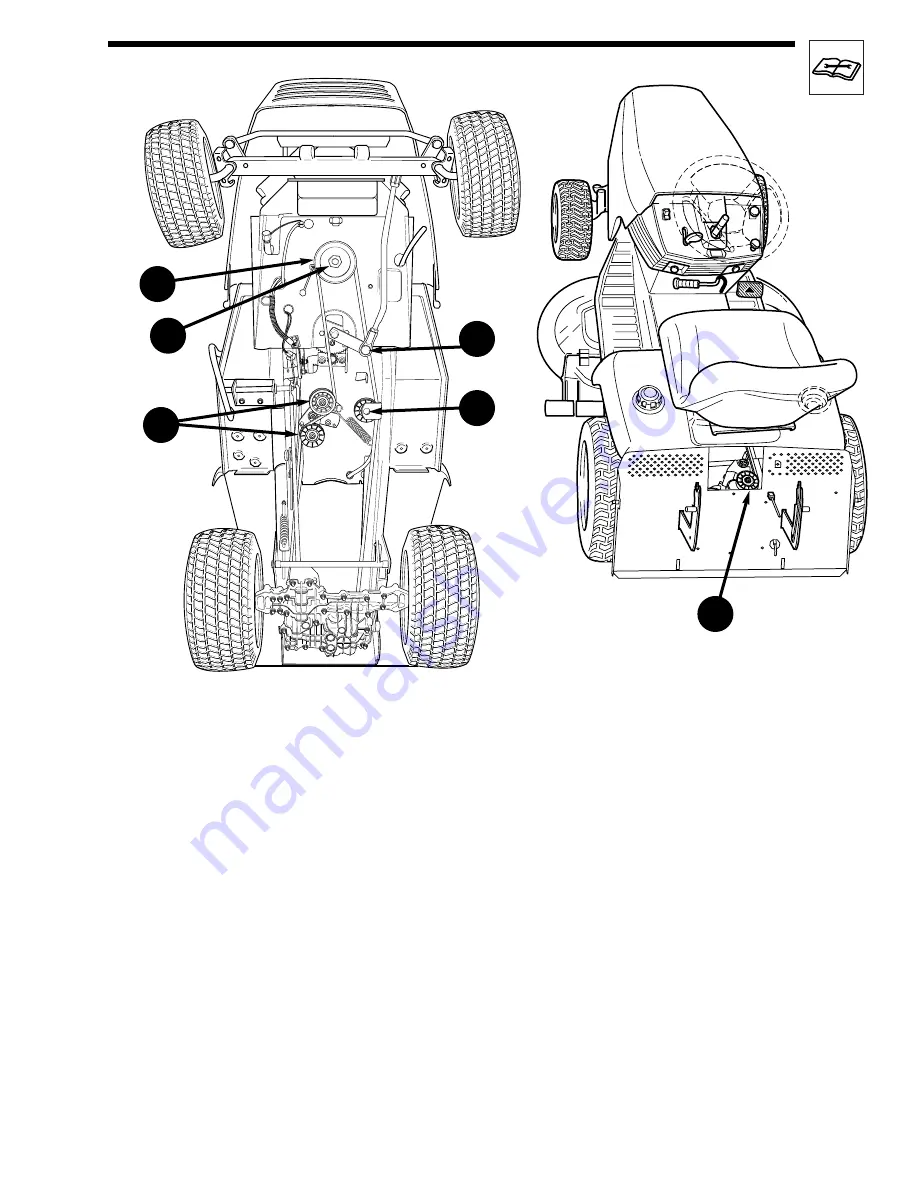
Tractor drive belt replacement
Remove old drive belt
1. Disengage the PTO, engage the parking brake, shut the
engine off, and remove the key. Remove the mower deck
and discharge tube.
2. Unplug the PTO clutch (A) electrical connector.
3. Remove the PTO clutch capscrew (B) and washers.
Remove the PTO clutch, drive pulley and key.
4. Remove the capscrew and locknut from the rear of
the drag link (D).
5. Loosen both idler assembly capscrews (C) and remove
the belt from the pulleys.
6. Loosen the front and rear frame idler pulleys (E and F) and
remove the belt from the pulleys.
7. Loosen the transmission belt guide and remove the belt
from the transmission pulley.
(procedure continues)
F
D
E
C
B
A
Install new drive belt
8. Install the new drive belt on the transmission input pulley,
and route the belt through all idler pulleys (C, E and F).
9. Install the engine drive pulley, key, washers and PTO
clutch (A). Install the belt on the drive pulley.
10. Secure the PTO clutch (A) using the original hardware.
Tighten the PTO clutch capscrew (B) to 61-75 N.m
(45-55 ft. lbs.). Be sure the frame clutch anchor engages
the PTO clutch.
11. Tighten all idler pulley capscrews (C, E and F).
12. Reconnect the drag link (D) to the steering arm. Coat the
drag link capscrew with thread-locking compound and
tighten to 23-31 N.m (17-23 ft. lbs.).
13. Release the parking brake.
14. Adjust the transmission input pulley belt guide to within
2-3 mm (1/8"-1/16") of the belt.
Summary of Contents for 1693685
Page 2: ...THIS PAGE INTENTIONALLY BLANK ...
Page 13: ...A 1 Safety rules and information ...
Page 19: ...B 1 Features and controls ...
Page 25: ...C 1 Operating the tractor ...
Page 36: ...C 12 ...
Page 37: ...D 1 Regular maintenance ...
Page 49: ...E 1 Adjustments and Service ...
Page 60: ...E 12 ...
Page 61: ...F 1 Troubleshooting ...
Page 66: ...F 6 ...


