background image

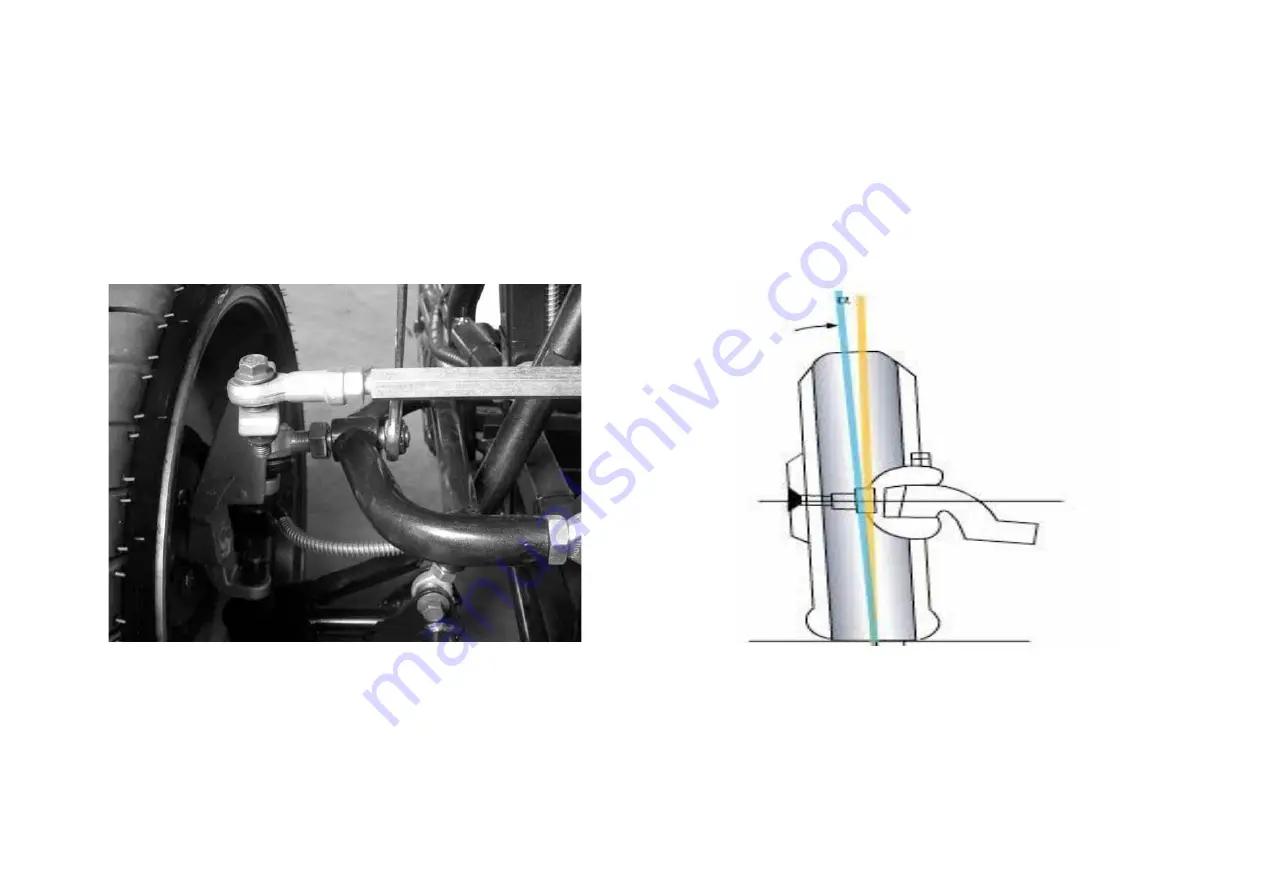
Camber adjustment method, Front wheel camber standards values is α


1° 

7

Summary of Contents for E-SPIDER

Page 1: ......

Page 2: ...and main procedures of operation adjustment maintenance and troubleshooting for your new E Spider It will help you familiarize yourself the vehicle for optimal operation minimized issues and a long se...

Page 3: ...CATION 3 4 PARTS VISUAL REFERENCE 5 6 SUSPENSION SETUP 7 10 MAIN AND CENTER DASH 11 12 VIN AND ENGINE NUMBER 13 BATTERY SAFETY 14 PRE RIDE BRAKE CHECK 15 TIRE INFORMATION 16 PRE RIDE INSPECTION 17 19...

Page 4: ...s vehicle is designed to be operated only on level on road surface free of obstacles Do not operate this vehicle while under the influence of alcohol or drags That can impair judgment and result Keep...

Page 5: ...specifically designed and tested on the atv Because our Company won t test accessories manufactured by other companies you are personally responsible for selection installation and use of them Always...

Page 6: ...pe 3 7V ternary lithium battery Height in 33 Charging Time 4 6Hr via 220V 8 12Hr via 110V Ground Clearance in 4 9 Range mi 90 Wheelbase in 67 5 Tire size front rear 185 30 14 270 30 14 Dry weight lb 6...

Page 7: ...e V 60 72 84 Idle current A 4 2 7 8 Motor Rotate speed RPM 3000 6000 Rated torque ft lb 7 3 Rated current A 50 42 36 Motor Efficiency 90 Primary Speed Ratio 2 1 Gear Speed Ratio 3 27 1 1 94 1 1 35 1 1...

Page 8: ...DESCRIPTION Headlight Rear View Mirror Windshield Shock absorber 5...

Page 9: ...DESCRIPTION Headlight t Rear Tire Front Tire Seat Slider adjustment Turn Signal 6...

Page 10: ...Camber adjustment method Front wheel camber standards values is 1 7...

Page 11: ...Front toe adjustment method Front wheel toe Standard value is 4MM A 4MM B 8...

Page 12: ...The height of chassis is adjustable Warning the screw of bearing joint must be tighten tighten the screws can t less than 15mm 9...

Page 13: ...Push the front frame to reach the lowest position adjust the limit screw beside right front shock absorber Make sure the minimum distance between the tie rod linkage and frame is 10mm or greater 10...

Page 14: ...5 Left and right turn signal Horn charging port Headlight switch Emergency Light Switch Speedometer Reverse Switch Main Switch Battery Level Indicato 11...

Page 15: ...IGNITION SWITCH The ignition switch is located at the right of the center dash 12...

Page 16: ...below These will assist with any future parts service or maintenance items needed and can also aid in recovery of a stolen vehicle 1 VIN 2 ENGINE CODE VIN Engine code NOTES 1 The VIN is stamped on th...

Page 17: ...ge is 3 7V 3 9V 4 2V lithium battery standard voltage system multiple string combinations corresponding multiples power between 30 and 70 To 3 Long term storage batteries more than 3 months must be pl...

Page 18: ...ning Before turning on the power switch please depress the brake pedal to ensure safe operation of the braking system braking state Do not drive until all instrument indicators are in normal condition...

Page 19: ...deformation See Yom dealer for change of damaged tires or punctured inner babes WARNING Do not attempt to patch a damaged tire or inner tire otherwise wheel balance and tire reliability may beimpaire...

Page 20: ...g run they can save time expense and you life 1 Whether the power is sufficient for battery life charge it in time as needed Front and rear brakes check operation and if necessary adjust free play 2 T...

Page 21: ...your vehicle s future reliability and performance by paying extra attention to how you ride during the first two week riding period During this period avoid full throttle riding and loading the engin...

Page 22: ...ctional before riding CAUTION 4 Drive with both hands on the wheel Riding with only one hand may cause loss of control 2 Open the throttle gradually so the vehicle moves forward 3 To slow down the veh...

Page 23: ...of the vehicle FRONT AND REAR HYDRAULIC DISC BRAKE The ATV is equipped with a set of 2 IN 1 single cylinder disc brake The front and rear hydraulic disc brake are controlled by a single brake switch s...

Page 24: ...ee play CAUTION The hydraulic disc brake is designed to operate under high pressure For the sake of safety and reliability the service life of brake hose master cylinder and brake fluid must not be be...

Page 25: ...ctor if your eyes were exposed Keep out of reach of children Replacement Brake fluid must be DOT3 or DOT4 standard Never mix with other types of fluid serious damage to brake system may occur CAUTION...

Page 26: ...and inspect for damage wear and oil or break fluid leakage CAUTION High pressure water or air can damage certain of the ATV Avoid spraying high pressure water at the following areas Wheel Hubs batter...

Page 27: ...long term storage so as to reduce negative influence on its performance Before storage perform regular maintenance to ensure the vehicle s performance after storage STORAGE 1 Clean and dry the vehicle...

Page 28: ...more often than specified in the schedule Maintenance work should be performed by a properly trained technician I INSPECTAND CLEAN ADJUST LUBRICATE OR REPLACE IF NECESSARY C CLEAN 1 LUBRICATE First w...

Page 29: ...he ambient temperature is higher than 65 C 6 Use only an approved charger Do not use a modified or damaged charger The use of high current or high voltage charging may cause problems in the charging a...

Page 30: ...or store batteries with other metal objects 6 Do not Pierce the battery shell with nails or other sharp objects and do not hammer or puncture the battery 7 Do not hit throw or cause mechanical shock t...

Reviews: