background image

ISTRUZIONI PER IL MONTAGGIO

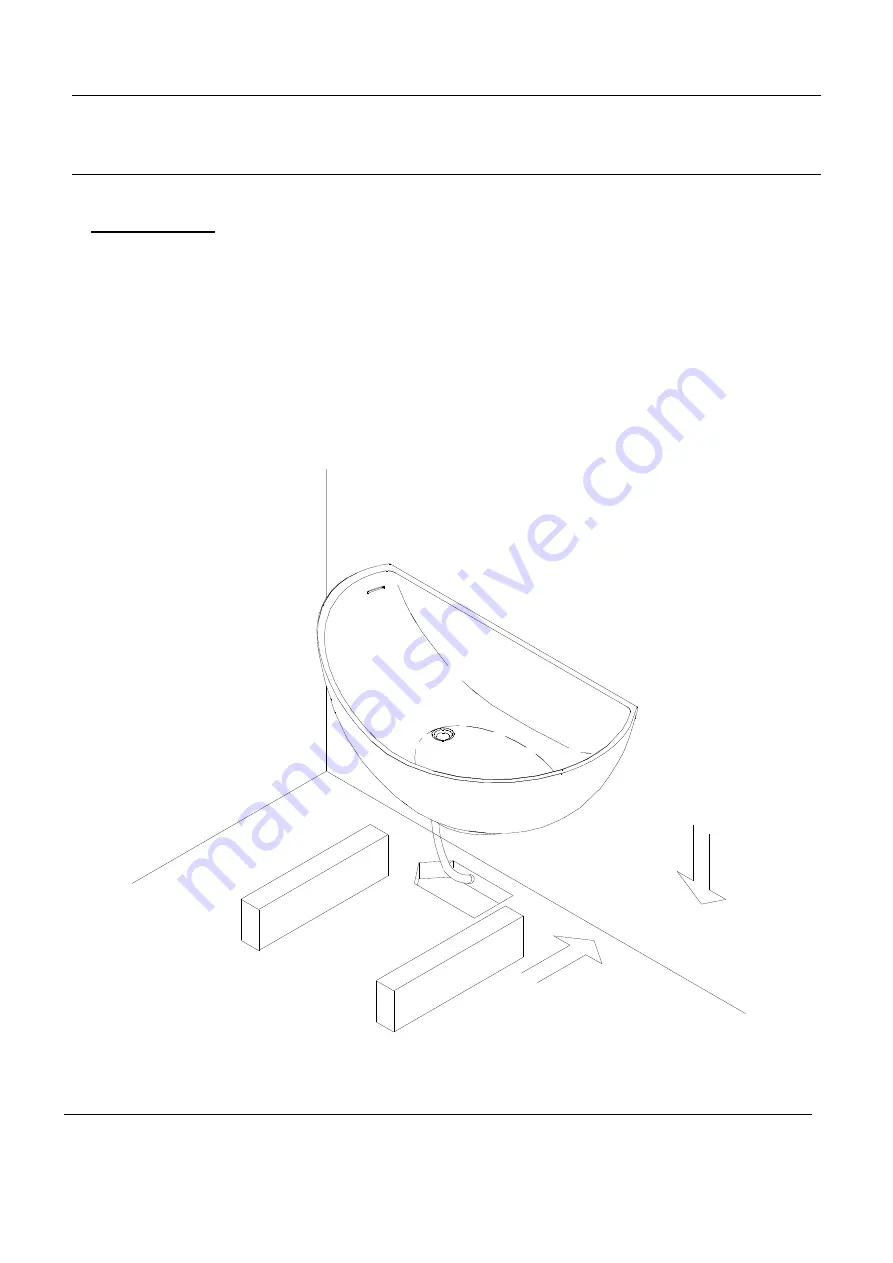
Operazione 2 :

Posizionare la vasca sui distanziali di polistirolo in dotazione (11x22 L.70 cm), in modo 
tale da facilitare i collegamenti scarico-sifone. Collegare il tubo flessibile con la 
tubazione di scarico a pavimento. Installare la piletta completa di sifone sulla vasca. 
Collegare il tubo estensibile al sifone . Mettere in posizione orizzontale la vasca sui 
distanziali di polistirolo (fig. 3).   

Fig.3

3

Summary of Contents for VANITY PARTY

Page 1: ...ISTRUZIONI PER IL MONTAGGIO INSTALLATION INSTRUCTIONS MONTAGEANLEITUNGEN INSTRUCTIONS POUR LE MONTAGE VASCA DA BAGNO BATHTUB BADEWANNE BAIGNOIRE VANITY PARTY...

Page 2: ......

Page 3: ...realizzare la sagoma in polistirolo serve per ricavare il pozzetto in fase di costruzione del fondo del massetto e della posa del pavimento E ASSOLUTAMENTE VIETATO movimentare la vasca PARTY afferrand...

Page 4: ...fare il fondo ed il massetto fig 2 Il pozzetto dovr essere ribassato rispetto al livello del pavimento di 13 cm Nel caso in cui la vasca vada collocata su un pavimento esistente la sagoma servir per...

Page 5: ...70 cm in modo tale da facilitare i collegamenti scarico sifone Collegare il tubo flessibile con la tubazione di scarico a pavimento Installare la piletta completa di sifone sulla vasca Collegare il t...

Page 6: ...re la tenuta dell impianto prima di togliere i distanziali di polistirolo posti sotto la vasca Se non ci sono perdite d acqua togliere i distanziali facendo attenzione che il tubo flessibile trovi all...

Page 7: ...l pavimento siliconare il perimetro della base d appoggio sufficiente un filo e ricollocarla a terra fig 6 facendo attenzione che il pozzetto non sia visibile Sigillare anche il perimetro esterno che...

Page 8: ...e utilizzare carta smerigliata prima bagnata poi asciutta In caso di AMMACCATURE E GRAFFI PROFONDI Alcuni danni gravi possono essere riparati completamente Contattare la ditta Mastella e spiegare il t...

Page 9: ...e polystyrene template serves for making the drain during construction of the floor rough the screed and laying of the floor Under no circumstances should the Party bathtub be moved or lifted without...

Page 10: ...H cm before making the floor rough and screed fig 2 The drain must be 13 cm lower than the floor level If the bathtub is being located on an existing floor the template will serve for cutting through...

Page 11: ...spacers provided 11x22 L 70 cm for an easier connection between drain and syphon Connect the hose to the floor drain pipe Install the waste complete with syphon on the bathtub Connect the hose to the...

Page 12: ...that the system is watertight before removing the polystyrene spacers positioned beneath the bathtub If there are no leaks remove the spacers taking care to ensure that the extensible pipe is housed i...

Page 13: ...4 Lift the end of the bathtub off the floor and apply silicone to the bathtub base support just a thread is sufficient then put the bathtub down again making sure that the drain is not visible Seal al...

Page 14: ...ible use emery paper first wet and then dry In the case of DENTS AND DEEP SCRATCHES Some severe damage can be fully repaired Contact Mastella and explain the type of problem that has arisen to assess...

Page 15: ...Styroporform zur Gewinnung des Ablaufschachts w hrend der Realisierung des Grunds des Estrichs und der Fu bodenverlegung Bitte unter keinen Umst nden die Wanne Party ohne die dazugeh rigen Gurte bewe...

Page 16: ...50x30x14 H cm positionieren Abb 2 Der Schacht muss im Vergleich zur Bodenebene um 13 cm abgesenkt sein Falls die Wanne auf einem bereits bestehenden Fu boden aufgestellt wird dient die Form zur Aussc...

Page 17: ...x70 cm so positionieren dass die Anschl sse Abfluss Siphon erleichtert werden Den Schlauch mit der Bodenabflussleitung verbinden Den Ablauf komplett mit Siphon auf der Wanne installieren Das ausziehba...

Page 18: ...n der Distanzst cke aus Stryopor unter der Badewanne die Dichtigkeit der Anlage Wenn keine Wasserleckagen vorliegen die Distanzst cke entfernen wobei darauf zu achten ist dass das ausziehbare Rohr inn...

Page 19: ...vom Boden anheben und den Umfang der Auflagefl che der Wanne silikonieren es reicht ein d nner Strich danach die Wanne wieder aufstellen und darauf achten dass der Schacht nicht sichtbar ist Auch den...

Page 20: ...Sie es mit Schmirgelpapier und zwar zuerst angefeuchtet und dann trocken Im Fall von DELLEN UND TIEFEN KRATZERN Einige schwere Sch den k nnen vollst ndig repariert werden Kontaktieren Sie die Firma M...

Page 21: ...gabarit en polystyr ne est utilis pour r aliser la bouche d vacuation au cours de la phase de construction de la couche de fond de la chape et de la pose du sol Il est absolument interdit de d placer...

Page 22: ...r la couche de fond et la chape Fig 2 La bouche d vacuation devra se trouver plus bas par rapport au niveau du sol de 13 cm Si la baignoire est install e sur un sol d j existant le gabarit servira cou...

Page 23: ...effet 11x22 L 70 cm de mani re faciliter les raccordements vidange siphon Raccorder le tuyau flexible avec le tuyau de vidange au sol Installer la bonde de vidage munie de siphon sur la baignoire Rac...

Page 24: ...stallation avant d enlever les l ments intercalaires en polystyr ne plac s sous la baignoire S il n y a pas de fuites d eau enlever les l ments intercalaires en v rifiant que le tuyau extensible soit...

Page 25: ...4 En soulevant la baignoire du sol siliconer le p rim tre de la base d appui de la baignoire il suffit d un fil et remettre en place la baignoire en veillant ce que la bouche d vacuation ne soit pas v...

Page 26: ...iser du papier d meri d abord mouill puis sec En cas de COUPS ET RAYURES PROFONDES Certains dommages graves peuvent tre compl tement r par s Contacter la soci t Mastella et expliquer le type de probl...

Page 27: ......

Page 28: ...l Via E Azzi 7 31038 Castagnole di Paese TV ITALIA Tel 0422 431732 Fax 0422 431760 www mastelladesign it mastella mastelladesign it Mastella S r l Via E Azzi 7 31038 Castagnole di Paese TV ITALIA 12...

Reviews: