background image

4

Lowes.com/masterforge

       SAFETY INFORMATION

15. The pressure regulator for LP-gas grill is set for 11-in. water column (WC). Natural gas

grill provides a hose assembly which includes a quick-disconnect device, but no pressure

regulator. The LP pressure regulator or the natural gas hose assembly must be used.

Replacement pressure regulators and hose assemblies must be those specified in the

parts list.

16. The cylinder used must include a collar to protect the cylinder valve.

17. Do not store a spare LP-gas cylinder under or near this appliance.

18. Never fill the cylinder beyond 80 percent full.

19. If the information in “17” and “18” is not followed exactly, a fire

causing death or serious injury may occur.

20. The natural gas grill and its individual shutoff valve must be disconnected from the gas

supply piping system during any pressure testing of that system at test pressures in

excess of 0.5 PSI (3.5 kPa).

21. The outdoor cooking gas appliance must be isolated from the gas supply piping system

by closing its individual manual shutoff valve during any pressure testing of the gas supply

system at test pressures equal to or less than 1/2 PSI (3.5 kPa).

22. 

CAlIFORNIA PROPOSITION 65 WARNINg: 

The burning of gas cooking fuel generates

some byproducts which are on the list of substances known by the state of California to

cause cancer, reproductive harm, or other birth defects. To reduce exposure to these

substances, always operate this unit according to the use and care manual, ensuring you

provide good ventilation when cooking with gas.

IMPORTANT:

 We urge you to read this manual carefully and follow the recommendations

enclosed. This will ensure you receive the most enjoyable and trouble-free operation of your

new gas grill. We also advise you retain this manual for future reference.

WARNINg: 

Your grill has been designed to operate using only the gas specified by the

manufacturer on the rating plate. Do not attempt to operate your grill with other gases. Failure

to follow this warning could lead to a fire hazard and bodily harm and will void your warranty.

WARNINg:

 Make certain your LP (propane) tank is filled by a reputable propane dealer. An

incorrectly filled or an overfilled LP tank can be dangerous. The overfilled condition combined

with the warming of the LP tank (a hot summer day, tank left in the sun, etc.) can cause LP

gas to be released by the pressure relief valve on the tank since the temperature increase

causes the propane to expand. LP gas released from the tank is flammable and can be

explosive. Refer to your Owner’s Manual for more information concerning filling your LP tank.

This unit contains one or more patents pending:

61/163,753

61/215,319

11/495,104

11/268,051

Summary of Contents for 0503231

Page 1: ...oper installation adjustment alteration service or maintenance can cause injury or property damage Read this instruction manual thoroughly before installing or servicing this equipment WARNING 1 Do no...

Page 2: ...3 Safety Tips 5 Package Contents 6 Hardware Contents 7 Preparation 8 Assembly Instructions 9 Natural Gas Conversion Instructions 17 Cooking with Gas 19 Operating Instructions 26 Care and Maintenance...

Page 3: ...electrical supply cords and the fuel supply hose away from heated surfaces 6 Inspect the hoses before each use for excessive abrasion or wear or cuts that may affect safe operation of the grill If the...

Page 4: ...s which are on the list of substances known by the state of California to cause cancer reproductive harm or other birth defects To reduce exposure to these substances always operate this unit accordin...

Page 5: ...Never store a propane tank whether full or empty inside your home or living area Before storing your tank make sure that it has been turned to the OFF position Should you store your grill indoors be...

Page 6: ...6 Lowes com masterforge Package Contents A H G I J K L M N O P Q R S T U B C D E F...

Page 7: ...Right Side Shelf Bracket 2 F Right Side Shelf 1 G Left Side Shelf 1 H Left Side Shelf Bracket 2 I Drip Tray Support 1 J Safety Tank Ring 1 K Tank Ring Bracket 1 PART DESCRIPTION QUANTITY L Rear Panel...

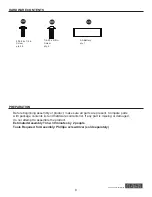
Page 8: ...ARATION Before beginning assembly of product make sure all parts are present Compare parts with package contents list and hardware contents list If any part is missing or damaged do not attempt to ass...

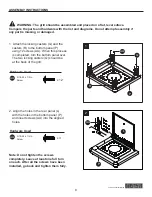
Page 9: ...12 screws AA When this process is completed turn the bottom panel over The two locking casters Q should be at the back of the grill 2 Align the holes in the rear panel L with the holes in the bottom p...

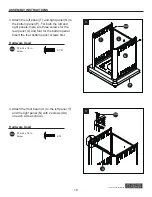
Page 10: ...panels there are three screws for the rear panel L and four for the bottom panel Insert the four bottom panel screws first Hardware Used AA 3 16 24 x 1 2 in Screw x 14 4 Attach the front beam U to th...

Page 11: ...ith 2 screws BB as shown 6 Attach the drip tray support I to the front beam U and rear panel L with 4 screws AA as shown 7 Remove the cap and the nut from the igniter M Secure the igniter to the right...

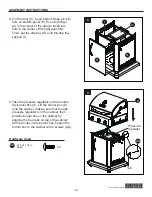
Page 12: ...the drip tray support I 9 Take the pressure regulator out from under the burner box A Lift the burner box A onto the cabinet making sure that the gas pressure regulator is in the cabinet then position...

Page 13: ...f the burner box with 2 screws AA on each bracket Hardware Used AA AA 3 16 24 x 1 2 in Screw x 8 Complete Steps 11 13 to complete assembly of the left side shelf G and right side shelf F 11 Move the s...

Page 14: ...g the side shelves on the brackets and slowly rotate the side shelves 13 Adjust the side shelves until they are aligned with the control box 14 Plug the main burner igniter wires into the sockets in t...

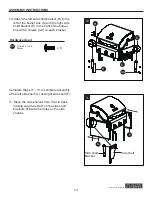
Page 15: ...TRUCTIONS 15 Place the heat tents B main grids C and warming rack D into the burner box A Remove the battery cap on the igniter M and insert a AA battery CC with the positive end facing outward Replac...

Page 16: ...NIDAD EN El INTERIOR RETIRE El TANQUE Y D JElO EN El EXTERIOR L G Sourcing Inc P O Box 1535 North Wilkesboro NC 28659 USA Modelo No RT2417S Tipo de gas propano Convertible a Gas Natural Entrada Quemad...

Page 17: ...ted and discard the rest Follow the conversion instruction provided with the kit Main Burner Conversion 16 Pull off the R pins and take the main burners out Adjust main burners air shutters by looseni...

Page 18: ...ginal positions Check the sparks before operating the grill Change to 10 ft NG hose 19 Take the regulator off from the manifold and replace it with 10 ft natural gas hose Please make sure the hose is...

Page 19: ...fety Requirements for Additional Information As shown in Fig 21b it is unsafe to operate the grill if the gas tank is not vertical LP Tank Fig 21a Fig 21b WARNING The Type I connective coupling see Fi...

Page 20: ...closed until the pressure is equalized This should occur within 5 seconds To ensure this does not cause difficulty in lighting the grill follow these instructions 1 Make sure all burner valves are OFF...

Reviews: