NOTICE:
The arbor bolt has left hand threads. Turn the
arbor bolt clockwise to loosen.
CAUTION:
Pay attention to the pieces removed,
noting their position and direction they face. Wipe the flanges
clean of any sawdust before installing a new saw blade.
•
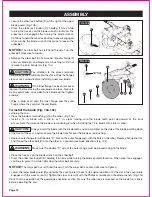
Remove the arbor bolt (C), flat washer (E) outer flange (F)
and saw blade (G) and blade screw bushing (J). Do not
remove the inner flange (H). (Fig. 10c)
FIG. 10b
FIG. 10c
ASSEMBLY
WARNING:
If the inner flange has been removed,
replace it before placing the saw blade on arbor. Failure to
do so could cause an accident since blade will not tighten
properly.
•
Wipe a drop of oil onto the inner flange and the outer
flange where they contact the saw blade.
CAUTION:
Always install the blade with the blade teeth and arrow printed on the side of the blade pointing down
at the front of the saw. And make sure the blade hole fits over the blade screw bushing.
To install the blade (Fig. 10a-10c)
•
Unplug the saw.
•
Place the blade screw bushing (J) on the arbor. (Fig. 10c)
•
Install a 12 in. blade with a 5/8 in. or 1 in. arbor making sure the blade teeth point downward at the front
of saw. Note that remove the blade screw bushing (J) when installing the 12 in. blade with a 5/8 in. arbor.
•
Replace outer flange (F) with double “D” flats on the outer flange align with the flats on the arbor. Replace flat washer (E),
and thread the arbor bolt (C) onto the arbor in a counter-clockwise direction. (Fig. 10c)
•
Place the hex key on the blade wrench on the arbor bolt.
•
Press the arbor lock button (D), holding it in firmly while turning the blade counterclockwise. When arbor lock engages,
continue to press it in while tightening the arbor bolt securely.
WARNING:
Make sure the double “D” side of the outer flange must be placed facing to the blade.
NOTICE:
The arbor bolt has left hand threads. Turn the arbor bolt counter-clockwise to tighten.
Page 19
•
Lower the lower blade guard (B) and rotate the cover plate (I) back to its original position until the slot in the cover plate
engages with the cross screw (A). Tighten the cross screw (A) with the Phillips screwdriver on the blade wrench. (Fig. 10a)
Verify that the operation of the guard does not bind or stick. Be sure the arbor lock is released so the blade turns freely
before operating the saw.
D
C
E
F
F
“D” flat
G
H
I
J
•
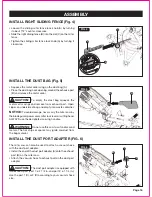
Locate the arbor lock button (D) on the right of the upper
blade guard. (Fig. 10b)
•
Press the arbor lock button (D), holding it firmly while
turning the hex key on the blade wrench clockwise. The
arbor lock will engage after turning the blade wrench.
Continue to hold the arbor lock button to keep it engaged,
while turning the blade wrench clockwise to loosen the
arbor bolt.
Summary of Contents for 240-0028
Page 44: ......


