Activation Code / Code d'activation /
Aktivierungscode / Activeringscode / Código
de Activación / Codice di attivazione / Código
de ativação /
Κωδικός ενεργοποίησης
/
Aktiveringskode / Aktiveringskode /
Aktiveringskod / Aktivointikoodi / Kod
aktywacyjny
/
Aktiváló kód
/
Codul de
activare / Aktiva
č
ní kód
/
Код
активации
/
Aktivasyon kodu
/
コードの使用
Primary Code / Code primaire / Primär-Code /
Primaire code / Código Principal / Codice
primario / Código primário /
Πρωτεύων
κωδικός
/ Primærkode / Primær kode /
Primär kod / Pääkoodi / Kod główny /
Els
ő
dleges kód / Codul principal / Primární
kód /
Первичный
код
/ Primer kod /
初期設定コード
5440EURD/5441EURD Instructions / Notice d'utilisation / Anleitungen / Instructies / Instrucciones / Istruzioni per l'uso / Instruções de utilização /
Οδηγίες
/
Instruksjoner / Brugsanvisning / Bruksanvisning / Käyttöohjeet / Instrukcja / Utasítások / Instruc
ț
iuni / Návod k použití /
Инструкции
/ Kullanım kılavuzu /
使い方
Key lock box Select Access SMART • Rangement sécurisé Select Access SMART • Key Lock Box Select Access SMART • De beveiligde opberging Select Access SMART • Caja de
seguridad Select Access SMART • Cassetta di sicurezza per chiavi Select Access SMART • Unidade de bloqueio segura Select Access SMART •
Το
σύστη
μ
α
ασφαλείας
Select Access
SMART • Den sikre nøkkelboksen Select Access SMART • Select Access SMART-nøgleboksen • Nyckelförvaringsboxen Select Access SMART • Lukittava Select Access SMART • Kasetka
na klucze Select Access SMART • Select Access SMART kulcstartó doboz • Sistemul de depozitare securizat Select Access SMART • Bezpe
č
nostní box na klí
č
e Select Access SMART •
Мини
-
сейфы
для
ключей
Select Access SMART • Select Access SMART güvenli muhafaza •
キーロックボックス、セレクトアクセス
A
7
For videos, instructions & FAQ’s, visit:
Pour des vidéos, modes d'emploi et FAQ, visitez :
Für Videos, Anleitungen & FAQ’s, besuchen Sie:
Kijk voor video's, instructies & FAQ's op:
Para videos, instrucciones y preguntas frecuentes, visite:
Per vedere i video, le modalità di utilizzo e le FAQ, visitare:
Para ver vídeos, modos de utilização e FAQ, vá a:
www.masterlock.com/masterlockvaultelocks/bluetooth-lockboxes
Για
βίντεο
,
οδηγίες
και
συχνές
ερωτήσεις
,
ε
π
ισκεφτείτε
τη
διεύθυνση
:
For videoer, instruksjoner og ofte stilte spørsmål, gå inn på:
For videoer, brugsanvisninger og FAQ'er, besøg:
För video, instruktioner och FAQ, besök:
Videot, käyttöohjeet ja UKK:t löydät osoitteesta:
Filmiki, instrukcje i FAQ (najcz
ęś
ciej zadawane pytania mo
ż
na znale
źć
na stronie:
Videókért, utasításokért és gyakran ismételt kérdésekért látogasson el a következ
ő
oldalra:
Pentru videoclipuri, instruc
ț
iuni
ș
i întreb
ă
ri frecvente, accesa
ț
i:
Návod k použití, videa a
č
asté dotazy najdete na:
Вы
сможете
посмотреть
видео
,
загрузить
подробную
инструкцию
и
найти
ответы
на
часто
задаваемые
вопросы
здесь
:
Videolar, kullanım açıklamaları ve Sık Sorulan Sorular için bu adresi ziyaret edin:
ビデオ、使い方、
よくある質問については下記をご参照下さい:
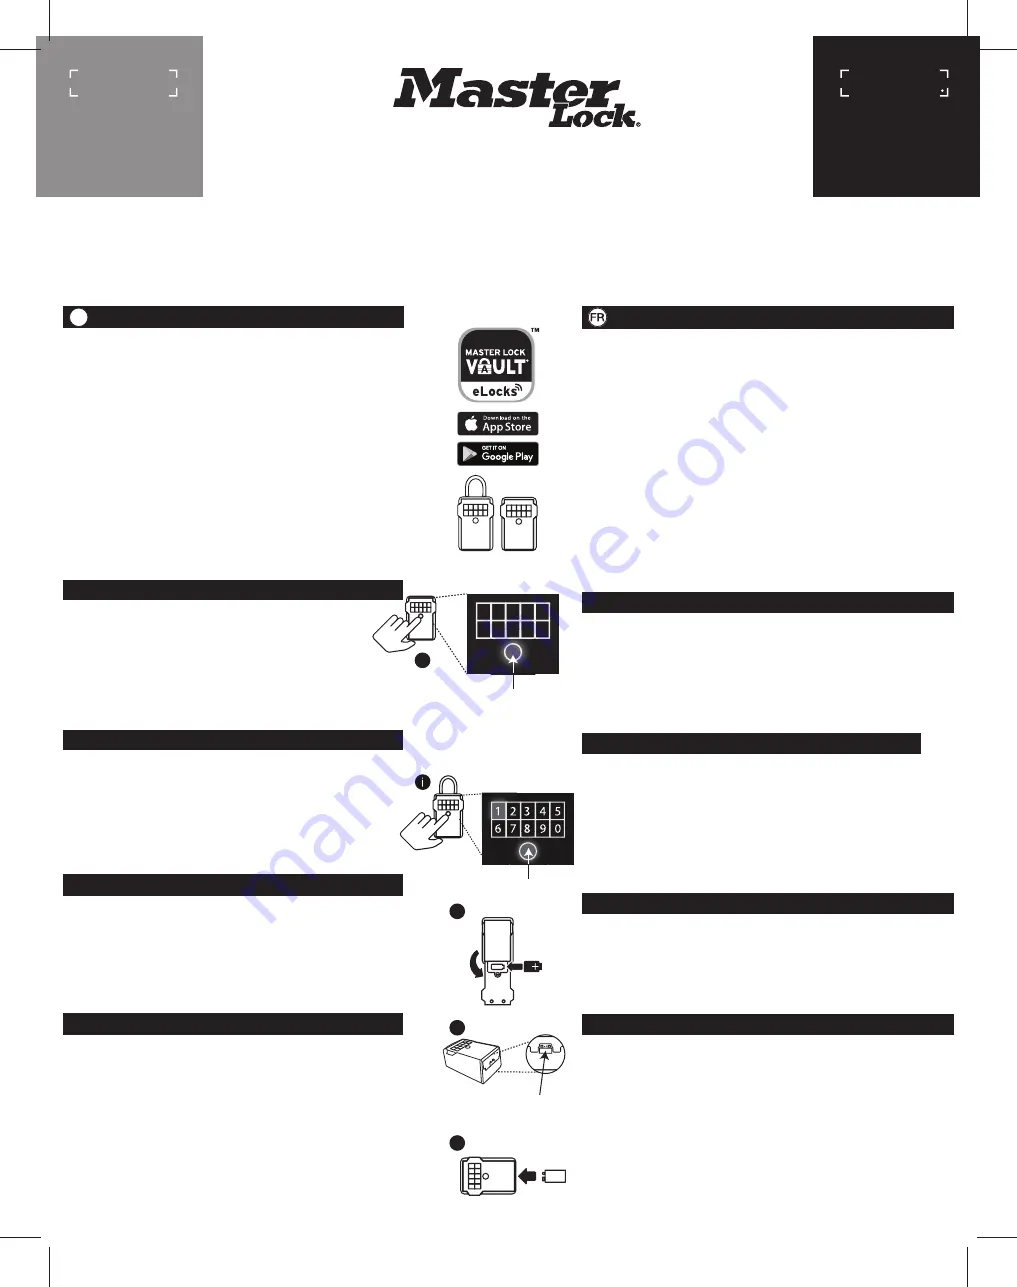
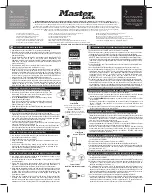
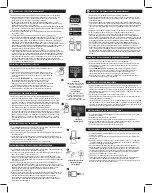
1. Low battery will be indicated through an email notification, the app, or by a
yellow light on the Select Access SMART.
2. Unlock & open the Select Access SMART.
3. Using a Flat Head screw driver, open the battery compartment door and
remove the battery.
4. Install a new CR123A battery, making sure to position the battery with
positive and negative sides facing the proper direction as indicated on the
door and battery compartment (See illustration 3).
5. Close the battery door and tighten the screw.
BATTERY INSTRUCTIONS – HOW TO REPLACE BATTERY
1. Un niveau de pile faible sera indiqué par email, par l’application ou par un voyant jaune
sur le Select Access SMART.
2. Déverrouillez et ouvrez la porte du Select Access SMART.
3. En utilisant un tournevis plat, ouvrez le compartiment de la pile et retirez la pile.
4. Installez une nouvelle pile CR123A en vous assurant que la position des pôles négatif et
positif soit dans la bonne direction, comme il est indiqué sur la porte du compartiment
de la pile (voir dessin n°3).
5. Fermez le couvercle de la pile et resserrez la vis.
NOTICE DE LA PILE – COMMENT REMPLACER LA PILE
1. Low battery will be indicated through an email notification, the app, or by a
yellow light on the Select Access SMART.
2. Locate the battery jump contacts on the bottom of the Select Access SMART
(see illustration 4).
3. Hold a new 9-volt battery underneath the product with the positive (+) and
negative (-) terminals pressed against the jump contacts (see illustration 5), in
the orientation indicated on the bottom of the lock box (see illustration 4).
4. While holding the battery in place, and with an authorized mobile device within
range of the lock box and in Touch Unlock mode, press any keypad button on the
lock box. If the lock box does not unlock, or an authorized mobile device is not
available, enter the Primary Code on the lock box keypad; while holding the
9-volt battery in place.
5. When lock box is opened, install a new CR123A battery. Please note that after
installing a new battery, the low battery icon will no longer display in the app
after the lock box and app communicate with each other. However, it will take
between 2 and 72 hours for the yellow LED to stop displaying on the lock itself.
BATTERY INSTRUCTIONS – HOW TO UNLOCK WITH EXTERNAL BATTERY
1. Un niveau de pile faible sera indiqué par email, par l’application ou par un voyant jaune
sur le Select Access SMART.
2. Localisez les contacts d’alimentation externe au bas du Select Access SMART (voir dessin n°4).
3. Maintenez une nouvelle pile 9 volts sous le produit en appuyant les bornes positive (+)
et négative (-) contre les contacts (voir dessin n°5), dans le sens indiqué au bas du
boîtier de verrouillage (voir dessin n°4).
4. En maintenant la pile en place, et avec un appareil mobile autorisé à portée du Select
Access SMART (se trouvant en mode déverrouillage par mode tactile), appuyez sur un
bouton du clavier du Select Access SMART. Si la porte ne se déverrouille pas, ou si un
appareil mobile autorisé n’est pas disponible, saisissez le code primaire sur le clavier du
Select Access SMART; tout en maintenant la pile 9 volts en place.
5. Une fois le boîtier de verrouillage ouvert, installez une nouvelle pile CR123A.
Veuillez noter qu’après l’installation d’une nouvelle pile, l’icône de pile faible ne sera plus
affichée dans l’application, une fois que l’application et le boîtier de verrouillage auront
communiqué entre eux. Cependant, il faudra compter entre 2 à 72 heures pour que le
voyant lumineux jaune cesse de s’afficher sur le Select Access SMART.
NOTICE DE LA PILE – COMMENT DÉVERROUILLER AVEC UNE PILE EXTERNE
QUICK START – UNLOCK WITH MOBILE DEVICE
1. Retirez le Select Access SMART et les instructions de l'emballage.
2. Suivez les instructions ci-dessous pour ouvrir la porte du Select Access. Puis dévissez
uniquement les 4 vis de l'intérieur du Select Access pour le retirer du packaging.
3. Sur l’appareil mobile Android ou iOS, visitez la boutique d’applications pour télécharger l’application
GRATUITE Master Lock Vault eLocks. Pour vérifier la compatibilité de votre appareil, visitez :
http://www.masterlock.com/masterlockvaultelocks/app-download-device-compatibility
(Remarque : Il existe deux applications Master Lock Vault. Téléchargez Master Lock Vault
version eLocks.)
4. Lancez l’application, puis créez un compte ou ouvrez une session à votre compte Master
Lock Vault existant.
5. Dans l'application Vault eLock de Master Lock, appuyez sur Ajouter un cadenas (+).
6. Sur votre appareil mobile, entrez le
CODE D'ACTIVATION
indiqué dans le carré gris pour
enregistrer le Select Access SMART. Une fois le boîtier de verrouillage enregistré, il sera
affiché dans la liste des “Cadenas”, dans l’application. Appuyez sur le nom du boîtier de
verrouillage afin d'accéder à ses détails et gérer les réglages additionnels, voir
l’historique d’accès, ou partager l’accès avec des invités. Une fois le CODE
D'ACTIVATION entré, le code d'essai "Try Me!" (0,0,0,0,0) ne fonctionnera plus.
7. Par défaut, votre Select Access SMART est en mode de déverrouillage par mode tactile.
Touchez n’importe quel bouton sur le clavier du boîtier de verrouillage pour l’éveiller et le
déverrouiller. Lorsque le voyant s’allume en vert, ouvrez-le dans les 5 secondes, sinon il
se reverrouillera. Le voyant vert signifie que la porte peut maintenant être ouverte en la
tirant. (Remarque : Vous pouvez modifier la portée de communication entre le téléphone
et le boîtier de verrouillage à partir de la caractéristique de calibrage de l’application.)
DÉMARRAGE RAPIDE – DÉVERROUILLAGE PAR APPAREIL MOBILE
1. Retirez le Select Access SMART et les instructions de l'emballage.
2. Suivez les instructions ci-dessous pour ouvrir la porte du Select Access. Puis dévissez
uniquement les 4 vis de l'intérieur du Select Access pour le retirer du packaging.
3. Entrez le
CODE PRIMAIRE
, indiqué dans la case noire au dessus, sur le clavier du Select
Access SMART.
(Remarque : Ne tirez pas sur la porte lors de la saisie du code et n’appuyez pas sur le
bouton « EFFACER » (voir dessin n° 2). La saisie du code primaire effacera le code
d'essai « Try Me ».
4. Lorsque le voyant s’allume en vert, ouvrez la porte du Select Access SMART dans les 5
secondes suivantes sinon elle se reverrouillera.
DÉMARRAGE RAPIDE – DÉVERROUILLAGE PAR CLAVIER NUMÉRIQUE
NOTICE DE LA PILE - COMMENT REMPLACER LA PILE
1. Remove the Select Access SMART & instructions from package.
2. Follow the instructions below to open the Select Access door. Then
remove only the 4 screws in the corners from the inside of the back
of the lock box, to remove from the packaging.
3. Enter the
PRIMARY CODE
, located in the black box above, into the
Select Access SMART keypad.
(Note : Do not pull on the door when entering the code and do not
press the clear button. (see illustration 2). Entering the Primary
Code will erase the Try Me code.)
4. When light of the Select Access SMART turns green, open within 5
seconds or it will relock.
QUICK START– UNLOCK WITH THE NUMERIC KEYPAD
Jump contacts
Contacts d’alimentation externe
1 2
4 5
6
3
8
7
9 0
Clear Button
Note : Pressing the clear button erases
all input and restarts the process.
Bouton "EFFACER"
Remarque : Appuyer sur le bouton
« EFFACER » efface toutes les entrées
et réinitialise les données.
4
3
2
5
1. Remove the Select Access SMART & instructions from package.
2. Follow the instructions below to open the Select Access door. Then remove only
the 4 screws in the corners from the inside of the back of the lock box, to remove
from the packaging.
3. On your Android or iOS mobile device, visit the app store to download the FREE
Master Lock Vault eLocks app. To check your device compatibility, visit:
http://www.masterlock.com/masterlockvaultelocks/app-download-device-compa
tibiliy. (Note: There are two Master Lock Vault apps. Download the Master Lock
Vault eLocksversion.)
4. Follow prompts to log into, or create, a Master Lock Vault account.
5. In Master Lock Vault elocks app, touch Add a Lock (+).
6. Enter
ACTIVATION CODE
shown above to register the Select Access SMART &
follow instructions to connect mobile device to lock. Once your key lock box is
registered, it will display in the Lock List inside the app. Touch the name of the key
lock box to access the lock details and manage additional settings, view the
access history, or share access with guests. Once the ACTIVATION CODE has
been entered, the “Try Me! Mode (0,0,0,0,0) will no longer work.
7. By default, your Select Access SMART is in Touch Unlock mode. Touch any button
on the lock box keypad to wake and unlock it. When the light turns green, open
within 5 seconds or it will relock. The green light means the door can now be
opened by pulling on it. (Note: You can change the phone-to-lock box
communication range in the app settings, by using the Device Calibration feature.)
GB
5440EURD
5441EURD
1. Once you have downloaded the Master Lock Vault eLocks app and
registered your Iock box, press any button on the Iock box key pad to wake your
Iock box. in the app, touch the "Remove Shackle" button on the Lock Details
page, which is found under "Manage Lock". Your Iock box will again light green,
and you can then remove the shackle within 5 seconds.
2. To remove the shackle using the Iock box keypad:
Press the clear button and first digit of your primary code, from the black box
above, simultaneously (See illustration i).
Release the clear button and first digit, then enter the rest of the primary code.
When the light turns green, remove the shackle within 5 seconds or it will relock.
(Note: Pressing the clear button erases all input and restarts the process.)
QUICK START - REMOVE THE SHACKLE
1.Après avoir téléchargé l’application Master Lock Vault eLocks et enregistré votre
rangement sécurisé, appuyez sur une touche du clavier du rangement sécurisé pour l’activer.
Dans l'application, appuyez sur « Retirer anse » sur la page des détails du Select Access,
accessible via « Gérer le cadenas ». Lorsque la lumière de votre rangement sécurisé devient
verte, vous avez 5 secondes pour retirer la anse.
2.Pour retirer la anse en utilisant le clavier du rangement sécurisé :
appuyez simultanément sur le bouton « EFFACER » et sur le premier chiffre de votre code
primaire sur la partie supérieure de la boite noire (voir illustration i).
Relâchez les touches puis entrez la suite de votre code primaire. Dès que la lumière
devient verte, vous avez 5 secondes pour retirer la anse. Une fois ce temps dépassé, elle
se bloquera de nouveau. (Remarque : appuyer sur le bouton « EFFACER » efface toutes
les entrées et réinitialise le processus.)
DÉMARRAGE RAPIDE - RETIRER LA ANSE
Clear Button
Bouton "EFFACER"


