background image

320.340.6464

10

•  Personal Protective Equipment: 

Wear personal protective equipment as 

directed on the chemical label while servicing sprayer. 

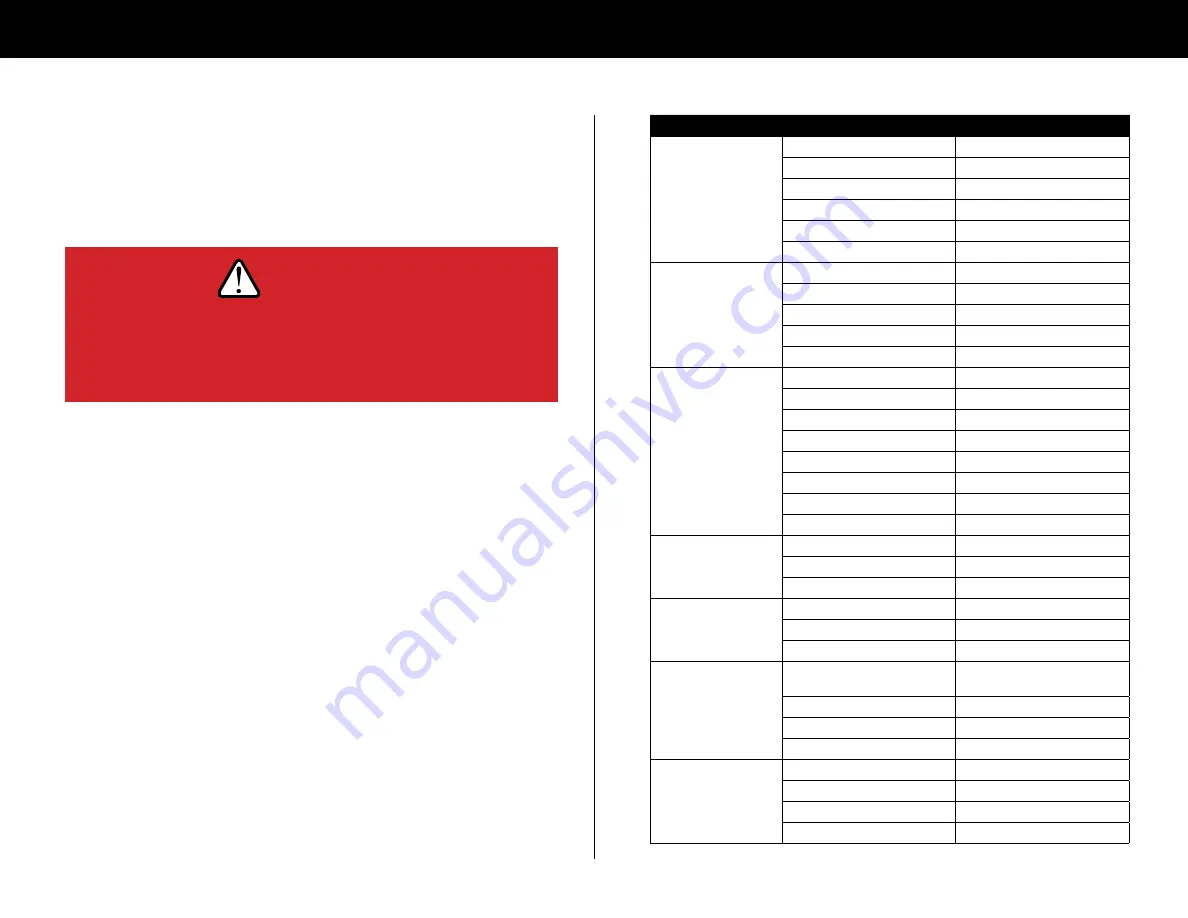
•  Review Troubleshooting Table: 

Review the troubleshooting table to the right 

for the type of problem you are experiencing.  DO NOT attempt to repair until 
reading remaining steps listed below are followed.

•  Empty & Flush Tank: 

Empty the tank and flush the sprayer with water as 

directed in the section Cleaning, Decontaminating & Storage.

•  Disconnect Power/Relieve Pressure:

 Disconnect power to the sprayer and 

be sure all system pressure is relieved by squeezing the gun trigger.

•  Perform Repairs: 

Follow the directions provided in the troubleshooting table 

to repair the sprayer.


Note: 

Never try to unclog the sprayer nozzle by blowing through it.

•  Test after Repairs: 

After repairs, ALWAYS test the sprayer for leaks with 

fresh water before using. 

BEFORE ATTEMPTING TO SERVICE SPRAYER

WARNING

Before troubleshooting or attempting to service your pump or sprayer, read 

the following safety rules to avoid accidental exposure to chemicals and the 

possibility of electric shock.

TROUBLESHOOTING

Here you will find troubleshooting steps for some of the most common issues 
users have with sprayers.

PROBLEM

CAUSE

SOLUTION

Pump Will Not Turn On

Bad Electrical Connection

Check Battery Connections

Fuse Blown

Replace Fuse

Short In Wire

Check Condition of Wires

Low Voltage

Check Voltage

Locked Drive

Replace Diaphragm Assembly

Faulty Pressure Switch

Replace Pressure Switch

Pump Will Not Prime

Out of Product

Refill Supply Container

Inlet Air Leak

Tighten Fittings or Replace Cracked Fittings

Inlet/Outlet Tube Obstruction

Remove Obstruction

Clogged Intake Valve

Remove Obstruction

Low Voltage

Check Voltage

Low Pressure or Flow

Worn Spray Gun Nozzle

Replace Spray Gun 

Worn Boom Nozzle

Replace Boom Nozzle

Worn Wobble Plate or Diaphragm

Replace Diaphragm Assembly

Worn Pressure Switch

Replace Pressure Switch

Inlet Air Leak

Tighten Fittings or Replace Cracked Fittings

Inlet/Outlet Tube Obstruction

Remove Obstruction

Clogged Intake Valve

Remove Obstruction

Low Voltage

Check Voltage

Pump Leaks

Loose Fasteners

Tighten Fasteners

Pump Seals Degraded

Replace Pump Head Assembly

Leak In Diaphragm

Replace Diaphragm Assembly

Poor Spray Distribution

Clogged Intake Tube

Remove Obstruction

Clogged Suction Strainer

Clean Suction Strainer

Worn Spray Gun Nozzle

Replace Spray Gun

Pump Cycles While Not Spraying Leak In the System

Tighten Leaking Hose Clamps, Fittings or 
Replace Spray Gun

Faulty Pressure Switch

Replace Pressure Switch

Low Voltage

Check Voltage

Air Trapped In System

Purge Air From System

Rough Operation

Flexible Mounting Surface

Mount Pump On Rigid Surface

Loose Pump Head

Tighten Fasteners

Compressed Base Feet

Decompress Base Feet

Rigid Plumbing

Plumb Pump with Flexible Pluming

ANY QUESTIONS, COMMENTS, PROBLEMS OR PARTS ORDERS

CALL OUR SPRAYING DIVISION 

Summary of Contents for 12 VOLT SPOT SPRAYER

Page 1: ...320 340 6464 INSTRUCTIONS FOR ASSEMBLY OPERATION SERVICING STORAGE 12 VOLT SPOT SPRAYERS 12VSPT M ...

Page 2: ...EFORE SPRAYING 6 DURING SPRAYING 7 AFTER SPRAYING 7 OPERATION PREPARING USING SPRAYER 7 PREPARING SPRAYER 8 USING SPRAYER 8 SPOT SPRAYING 8 BROADCAST SPRAYING 8 OPERATION CLEANING DECONTAMINATING STORAGE 9 TROUBLESHOOTING 10 TROUBLESHOOTING TABLE 10 SPRAYER BREAKDOWNS 11 TRADITIONAL SPRAYER 11 DELUXE SPRAYER 11 Sprayers sold shall be warranted from defects in workmanship and material when used wit...

Page 3: ...MPONENTS Tank Lid 1 33 103221 Spray Gun Assembly 1 SG 4507F or SG 2218 18 Wire Harness 1 33 103233 TOOLS REQUIRED INCLUDED HARDWARE SPOT SPRAYER COMPONENTS Drain Cap Gasket 1 33 103220 Tank Lid Tether 1 33 103222 Gun Clip Kit 1 GC 100 KIT 3 8 Snapper Hose Clamp 1 SHC F Drain Cap Tether 1 33 103219 T EFLON TAP E TEFLON TAPE 12V PUMP ASSEMBLY COMPONENTS Pressure Gauge 1 1124DAB100 Pressure Regulator...

Page 4: ...TS None 2 Applies Drain Cap to Drain Port TOOLS PARTS None Un thread Tank Lid from Sprayer Tank Fold the thin side of the T end of the Tank Lid Tether onto the tether itself and insert from bottom of Tank Lid Pull Tank Lid Tether through top of Tank Lid so the ball end remains inside the Tank Lid Creates Tank Lid Assembly 3 Thread Tank Lid Assembly back onto the Sprayer Tank Thread the T end of Te...

Page 5: ...cast sprayer skip this step and move on to step 7 9 TOOLS PARTS Slip the 3 8 Hose Clamp over the end of the Spray Gun Hose Push Spray Gun Assembly Hose onto the bottom hose barb of the Pressure Regulator Assembly and tighten the 3 8 Hose Clamp with Pliers Connects Spray Gun to Regulator 8 Slide locking clip on 12v Diaphragm Pump to open the port Insert the quick attach side of Pressure Regulator A...

Page 6: ... or the general environment NOTE THE USE OF CORROSIVE OR FLAMMABLE CHEMICALS IN THIS SPRAYER IS HAZARDOUS AND WILL ALSO VOID YOUR WARRANTY TOOLS PARTS Connect Wire Harness to 12v Diaphragm Pump by pushing the two pin terminal connectors together Connect the red clamp to your battery s positive post and the black clamp to the negative post Connects Sprayer to Battery 10 None NOTE Connecting wire ha...

Page 7: ...near areas accessible to children and pets Eating Smoking DO NOT eat drink smoke rub your eyes or touch any part of your bare skin while handling chemicals and spraying Heat Flames DO NOT spray near open flames or sources of heat Spills ALWAYS clean up spills immediately per instructions on the chemical label Unattended ALWAYS turn off vehicle and set brake or block wheels turn off power to spraye...

Page 8: ...r dilatation ratios that are called out by chemical label Ensure chemical is thoroughly mixed with a stirring device and then securely thread tank lid back on sprayer tank USING SPRAYER SPOT SPRAYING Spot Spraying To spot spray pull the gun trigger Make sure nozzle of gun is pointed towards vegetation in need of spraying Adjustable Nozzle Twist the spray nozzle to adjust from a straight stream to ...

Page 9: ...ous chemical exposure to humans and the environment as well as equipment damage Personal decontamination is required after spraying to minimize unsafe exposure to chemicals and potential illness SPRAYER STORAGE Prepare the sprayer for end of season storage by running RV anti freeze through the system This will keep internal parts lubricated protect against corrosion and keep the unit from freezing...

Page 10: ...e Fuse Short In Wire Check Condition of Wires Low Voltage Check Voltage Locked Drive Replace Diaphragm Assembly Faulty Pressure Switch Replace Pressure Switch Pump Will Not Prime Out of Product Refill Supply Container Inlet Air Leak Tighten Fittings or Replace Cracked Fittings Inlet Outlet Tube Obstruction Remove Obstruction Clogged Intake Valve Remove Obstruction Low Voltage Check Voltage Low Pre...

Page 11: ...p Kit 2 15 SHC F Snapper Hose Clamp 3 8 2 ID Part Number Description Qty 1 15 25 40 60 Gallon Tank 1 2 EF2200 QA or EF3000 QA 2 2 GPM or 3 0 GPM Everflo Pumps 1 3 34 140164 Inline Strainer 1 4 33 103622 23 Rubber Hose 1 5 33 103221 Tank Lid 1 6 33 103222 Tank Lid Tether 1 7 EF QC A38 QA x 3 8 HB Fitting 1 8 SHC F Snapper Hose Clamp 2 9 RTS2 0 14 125 Hose Strap 1 10 33 103127 10 24x1 Screw 4 11 33 ...

Page 12: ...320 340 6464 PLEASE FOLLOW ALL WARNINGS IN THIS MANUAL FAILURE TO DO SO COULD RESULT IN PROPERTY DAMAGE INJURY 12VSPT M ...

Reviews: