background image

49

DO NOT DIVE.

Spa Controls

TIME-OF-DAY

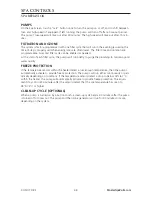
BE SURE TO SET THE TIME-OF-DAY

Setting the time-of-day is important for determining filtration times and other background fea-
tures. 
“Set Time” will appear on the display if no time-of-day is set in the memory.
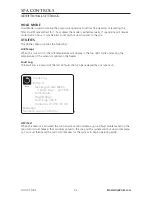
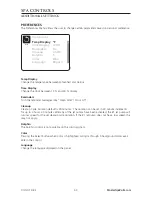
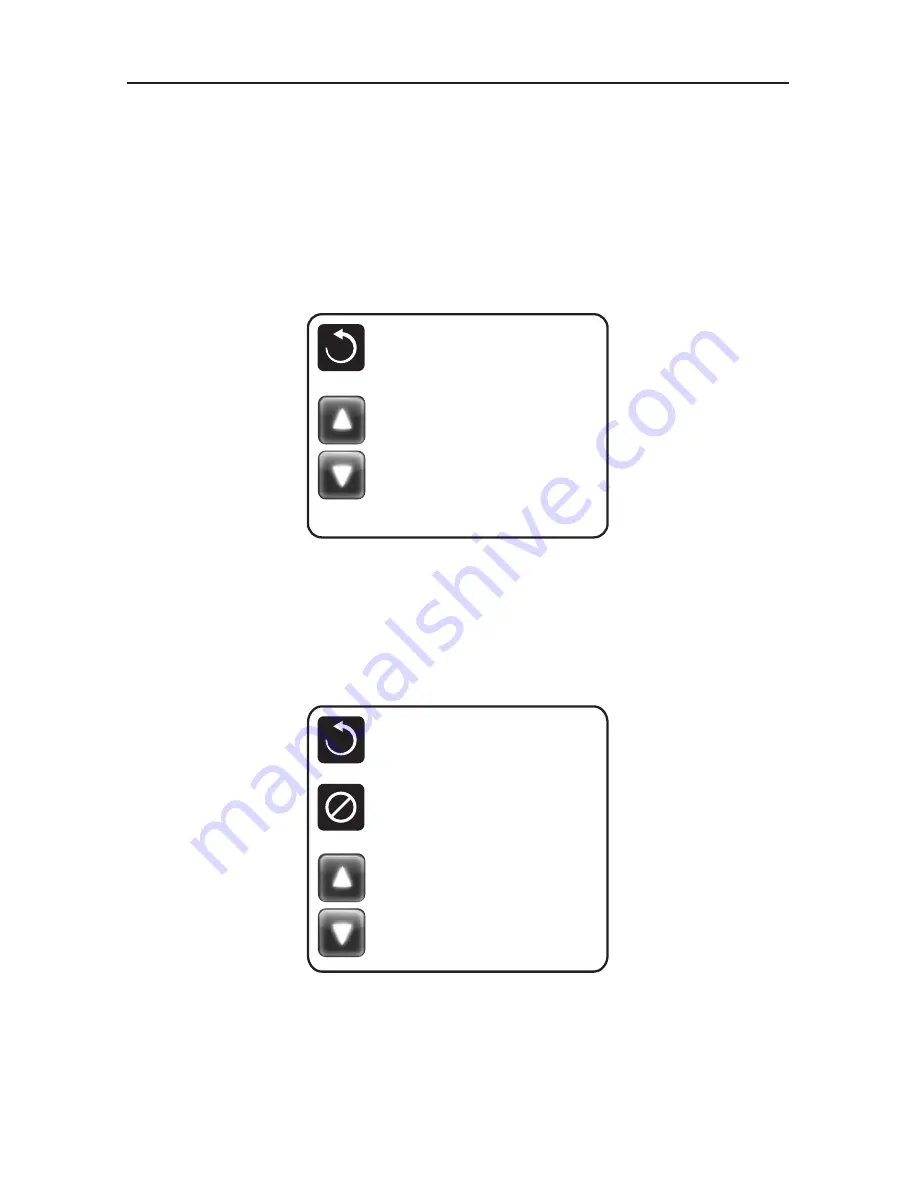
On the Settings Screen, select the Time-of-Day line. On the Time-of-Day screen, simply touch 
the time to select the Hour, Minutes, AM/PM and 12/24 Hour segments. Use the Up and Down 
Buttons to make changes.

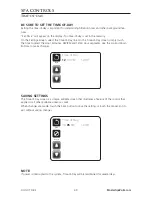
SAVING SETTINGS

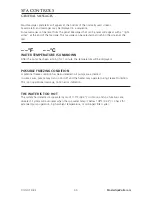
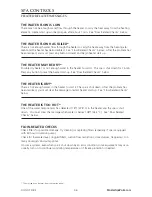
The Time-of-Day screen is a simple, editable screen that illustrates a feature of the control that 
applies to all other editable screens as well. 
When changes are made, touch the back button to save the setting or touch the cancel icon to 
exit without saving changes. 

NOTE:

If power is interrupted to the system, Time-of-Day will be maintained for several days.

Time of Day

Back

12

:00 PM

12 HR

Time of Day

Back

12

:00 PM

12 HR

Cancel

Save

10:

05

 PM

12 HR

MasterSpaParts.com

Summary of Contents for 1250A-Spa

Page 1: ...presents OWNER S MANUAL MasterSpaParts com...

Page 2: ...MasterSpaParts com...

Page 3: ...the links to the customer support section Record Of Ownership Name Address City State Zip Phone Date Purchased Model Serial Dealer Name Service Tech Rep Serial Number Location The serial number for y...

Page 4: ...Start Up 21 Schedule 22 23 Troubleshooting Guide 24 Regular Maintenance Procedures 25 29 Swim Spa Troubleshooting Guide 30 31 Winterizing Storing Your Swim Spa 32 Swim Spa Care Maintenance Record 33...

Page 5: ...sign should be mounted with screws or another type of permanent fastener Additional or replacement signs can be obtained from your dealer or direct from the factory INTRODUCTION It s time to relax Yo...

Page 6: ...connect a minimum 6 AWG 13 302mm2 solid copper conductor between this unit and any metal equipment metal enclosures of electrical equipment metal water pipe or conduit within 5 feet 1 5m of the unit...

Page 7: ...e that children can not use this spa unless they are supervised at all times DANGER Risk of Injury The suction fittings in this spa are sized to match the spe cific water flow created by the pump Shou...

Page 8: ...pa f Persons using medication should consult a physician before using a spa since some medication may induce drowsiness while other medication may affect heart rate blood pressure and circulation For...

Page 9: ...and injuries WARNING People with infections sores or the like should not use the spa Warm and hot water temperatures may allow the growth of infectious bacteria if not properly disinfected CAUTION Saf...

Page 10: ...ovided in the electric supply service panel with a continuous copper wire equivalent in size to the circuit conductors supplying this equipment At least two lugs marked Bonding Lugs are provided on th...

Page 11: ...ILISER UNE CUVE DE RELAXATION WARNING TO AVOID INJURY EXERCISE CARE WHEN ENTERING OR EXITING THE SPA OR HOT TUB AVERTISSEMENT POUR VITER DES BLESSURES USER DE PRUDENCE EN ENTRANT DANS UNE CUVE DE RELA...

Page 12: ...RDANCE WITH MANUFACTURER S INSTRUCTION ATTENTION LA TENEUR DE L EAU EN MATI RES DISSOUTES DOIT TRE CONFORME AUX DIRECTIVES DU FABRICANT Hyperthermia occurs when the internal temperature of the body re...

Page 13: ...t to turn the diverter valve only when the pump is turned off 6 WATER FEATURE VALVE if equipped Located on the top flange of the swim spa this smaller valve adjusts water flow to the water falls and o...

Page 14: ...ate to cover the filters Remove filter lid to access filters for maintenance 13 WEIR GATE The weir gate is the horizontal door located in front of the filters that helps keep debris trapped in the fil...

Page 15: ...large jets are grouped at the end of your swim spa to offer water flow for exercising against A jet diverter valve may control the flow for these jets 25 SWIM SPA JUNCTION BOX MP Swim Spa Only The in...

Page 16: ...our local building department to confirm that your surface is adequate for supporting a swim spa All sides of the swim spa must be accessible for regular maintenance or in the event that service is ne...

Page 17: ...the swim spa see Surface Pad Requirements Do not backfill with sand gravel or earth Doing so will void the warranty Plan for complete drainage so standing water never reaches the electrical equipment...

Page 18: ...ode This lasts approximately 5 minutes The pur pose of the priming mode is to help insure that the jet pumps have been primed with water and are ready to operate It may be necessary in some instances...

Page 19: ...er cleaner every 30 days and rinse the Eco Pur cartridge with a hose to remove any buildup of containments Do not soak the Eco Pur cartridge in filter cleaner If water appears to be visually cloudy du...

Page 20: ...r chlorine or bro mine efficiency 5 Shocking This is when you add either extra chlorine superchlorinate by raising the chlorine level above 8 ppm or add a non chlorine oxidizer potassium monoperoxysul...

Page 21: ...e Like what happens when you put sugar in coffee or tea 10 Useful life of water in days Water should be drained at least once every 180 days Useful life may vary by usage and bather load 11 Defoamer F...

Page 22: ...aporation and also will cause minerals and metals to precipitate out of solution 3 Air Dust and other airborne contaminants are introduced into the swim spa 4 Environment The environment surrounding t...

Page 23: ...ne level of 5 to 8 ppm on initial start up to begin sanitizing the swim spa water Bathers should not enter the swim spa until the chlorine levels drop below 5 0 ppm Always refer to the chemical manufa...

Page 24: ...he pumps causing unwarranted damage See the clean your filter elements in the maintenance section of this manual for more information EVERY 180 DAYS Drain and refill your swim spa with fresh water ins...

Page 25: ...hat whatever is put into it have a pH as close to neutral as possible That is why only chemicals made for spas should be used Always refer to the chemical manufactures dosage recommendations listed on...

Page 26: ...materials Add spa clarifier see dealer Old water Change swim spa water Scum Ring Around Spa Build up of oils dirt and organic elements Wipe off with a clean towel add an enzyme product Eye Skin Irrit...

Page 27: ...of diverter valve by gently prying up on both sides of the handle assembly at the same time Turn the cap piece counter clockwise It may be necessary to put a clean towel over the cap and turn it with...

Page 28: ...formation Your dealer can help provide you with these details NOTE Always turn water feature valve down so that the water features do not hit the cover when the cover is closed CARE OF YOUR SWIM SPA C...

Page 29: ...rt and outer ring NOTE To prevent premature failure of your spa cover always turn Laminar Flow Jets down so that they do not hit the cover when the cover is closed You do not want to completely turn j...

Page 30: ...oating exposing the metal to corrosion The best defense to combat corrosion on stainless steel components in your swim spa is make sure that it is kept clean and free of any chemical build up Always C...

Page 31: ...indow glass cleaning compounds are not recommended Cleaning products that con tain any type of abrasive material should not be used REFILL YOUR SWIM SPA When filling the Momentum swim spa always fill...

Page 32: ...eft hand corner behind the double plastic doors The swim spa GFCI breaker or disconnect should be located in a weath er proof box close to the spa but no closer then 5 feet If the swim spa does not re...

Page 33: ...mode depending on the model 5 Check the control panel for light indicator Wait a reasonable amount of time approximately 1 hour to see if the water temperature is rising 6 Check to make sure that the...

Page 34: ...access panels 10 Cover swim spa to prevent water from entering the swim spa If you decide to winterize your swim spa we recommend that you periodically check the swim spa throughout the winter to assu...

Page 35: ...RE AND MAINTENANCE RECORD DATE Drain Clean Spa Clean Filter Cartridge Test GFCI Soak Filter Cartridge in Solution Clean and Condition Spa Cover Miscellaneous Service Miscellaneous Service DATE DATE DA...

Page 36: ...RE AND MAINTENANCE RECORD DATE Drain Clean Spa Clean Filter Cartridge Test GFCI Soak Filter Cartridge in Solution Clean and Condition Spa Cover Miscellaneous Service Miscellaneous Service DATE DATE DA...

Page 37: ...s to comply with section 422 20 of the National Electrical Code A dis connect must be installed and be readily accessible to the swim spa occupants but installed at least five feet from the swim spa A...

Page 38: ...KER DISCONNECT BLK BLK WHT WHT Refer to wiring diagram inside swim spa junction box for proper power connection to terminals The swim spa junction box is located inside swim spa behind the factory ins...

Page 39: ...be readily accessible to the swim spa occupants but installed at least five feet from the swim spa A Ground Fault circuit interrupter GFCI must be used to comply with section 680 42 of the National El...

Page 40: ...T RED SWIM SPA JUNCTION BOX Refer to wiring diagram inside swim spa junction box for proper power connection to terminals The swim spa junction box is located inside swim spa behind the factory instal...

Page 41: ...e swim spa occupants but installed at least five feet from the swim spa A Ground Fault circuit interrupter GFCI must be used to comply with section 680 42 of the National Electric Code A ground fault...

Page 42: ...D SWIM SPA JUNCTION BOX Refer to wiring diagram inside swim spa junction box for proper power connection to terminals The swim spa junction box is located inside swim spa behind the factory installed...

Page 43: ...50A GFCI 240V 50A SVC 4 2 275 3 240 22 955 2 MP Signature S 9300 215 x 94 x 60 Configuration 3 240V 50A SVC 4 2 270 3 290 22 965 2 MP Signature S With Wave XP Pro 9300 215 x 94 x 60 Configuration 7 24...

Page 44: ...lerts High Temperature Range vs Low Temperature Range is indicated in the upper right corner The Jets Icon in the center will indicate when a pump is running and also the heater function A Lock icon i...

Page 45: ...u exit the screen On the right side of the screen the menu selections can be selected by touching the screen in any area of white text Selecting one of these items will change to a different screen wi...

Page 46: ...Circ Pump Icon will appear to indicate its activity but out side of Priming Mode the 24 hour Circ Pump cannot be controlled directly NOTE The icon for the 24 hour pump if so equipped that is associat...

Page 47: ...The up and down buttons on the left side of the screen allow you to scroll through the different setting options DUAL TEMPERATURE RANGES HIGH VS LOW This system incorporates two temperature range sett...

Page 48: ...rops below the set temperature READY IN REST MODE READY REST appears in the display if the spa is in Rest Mode and the Jets 1 Button is touched It is assumed that the spa is being used and will heat t...

Page 49: ...n off the pumps and repeat the process Note Turning the power off and back on again will initiate a new pump priming session Sometimes momentarily turning the pump off and on will help it to prime Do...

Page 50: ...e pumps will run briefly to purge the plumbing to maintain good water quality FREEZE PROTECTION If the temperature sensors within the heater detect a low enough temperature then the pumps automaticall...

Page 51: ...Minutes AM PM and 12 24 Hour segments Use the Up and Down Buttons to make changes SAVING SETTINGS The Time of Day screen is a simple editable screen that illustrates a feature of the control that app...

Page 52: ...t is possible to overlap Filter Cycle 1 and Filter Cycle 2 which will shorten overall filtration by the overlap amount PURGE CYCLES In order to maintain sanitary conditions as well as protect against...

Page 53: ...ed settings cannot be adjusted Settings Lock allows access to a reduced selection of menu items These include Set Temperature Invert Lock Utilities Information and Fault Log They can be seen but not c...

Page 54: ...y shut down power to the spa UTILITIES The Utilities Menu contains the following A B Temps When this is set to On the A B temperature will display in the top right corner indicating the temperature of...

Page 55: ...e reminder messages like Clean Filter On or Off Cleanup Cleanup Cycle Duration default is 30 minutes The duration can be set in 30 minute increments for up to 4 hours 30 minutes after any of the jet p...

Page 56: ...the System System Model Displays the Model Number of the System Current Setup Displays the currently selected Configuration Setup Number Configuration Signature Displays the checksum for the system c...

Page 57: ...e pump has been running for 1 minute the temperature will be displayed POSSIBLE FREEZING CONDITION A potential freeze condition has been detected All pumps are activated In some cases pumps may turn o...

Page 58: ...HE HEATER IS DRY There is not enough water in the heater to start it The spa is shut down After the problem has been resolved you must clear the message to restart heater start up See Flow Related Che...

Page 59: ...1 hour Call for Service SENSOR A FAULT SENOR B FAULT A temperature sensor or sensor circuit has failed Call for Service COMMUNICATIONS ERROR The control panel is not receiving communication from the S...

Page 60: ...ars on more than one power up THE CLOCK HAS FAILED Contact your dealer or service organization CONFIGURATION ERROR SPA WILL NOT START UP Contact your dealer or service organization A PUMP MAY BE STUCK...

Page 61: ...o select programmed Smart Workouts See Swim Number App SNAPP Instruction Manual for further information OPTIONAL EXERCISE EQUIPMENT ALL The optional exercise equipment package makes it easy to exercis...

Page 62: ...Workouts can be selected from here by touching the highlighted area Please refer to the Smart Workout Reference guide included with the spa information materials From there you can select Smart Worko...

Page 63: ...Jog 15 1 1 1 Switch Legs 8 Jog 30 1 1 1 Trailing Forward Back Both Flow Directions 9 Jog 45 1 1 1 Flies 10 Jog 45 1 1 1 Push Pulls 11 Jog 45 1 1 1 Push Downs 12 Jog 45 1 1 1 Hip Flexion Extension 13 J...

Page 64: ...Straight leg rise out 9 Jog 25 1 1 1 Switch legs 10 Jog 45 1 1 1 Flies forward 11 Jog 45 1 1 1 Switch legs 12 Jog 45 1 1 1 Flies side 13 Jog 45 1 1 1 Switch legs 14 Jog 45 1 1 1 Push Pulls 15 Jog 45 1...

Page 65: ...eg rise in 11 Jog 45 1 1 1 Switch legs 12 Jog 75 1 1 1 Flies forward 13 Jog 75 1 1 1 Switch legs 14 Jog 75 1 1 1 Flies side 15 Jog 75 1 1 1 Switch legs 16 Jog 75 1 1 1 Alternating push pulls 17 Jog 75...

Page 66: ...Arm circles backward 8 Jog 60 65 45 39 High knees 9 Jog 60 1 1 1 Row bars 10 Jog 60 65 45 39 Running in place 11 Jog 30 1 1 1 Band bicep curl right arm 12 Jog 30 1 1 1 Band bicep curl left arm 13 Jog...

Page 67: ...12 Swim 60 65 45 39 Breast stroke 13 Jog 60 1 1 1 Band chest press 14 Swim 60 54 34 30 Free style swim 15 Jog 60 1 1 1 Band bicep curl right arm 16 Jog 60 1 1 1 Band bicep curl left arm 17 Swim 60 54...

Page 68: ...60 1 1 1 Band bicep curl right arm Step Mode Seconds W ave Swim Number W ave XP Swim Number W ave XP Pro Swim Number R ecommended Exercise 19 Jog 60 1 1 1 Band bicep curl left arm 20 Swim 120 76 56 4...

Page 69: ...1 1 Jog in Place 11 Swim 60 67 47 40 Free Style Swim 12 Swim 60 61 41 35 Kick Chore 13 Swim 60 54 34 30 Catch Up Drill 14 Swim 60 67 47 40 Backstroke 15 Jog 60 1 1 1 Jog in Place 16 Swim 60 67 47 40 F...

Page 70: ...Z 9 Swim 120 1 1 1 Free Style Moderate Effort 10 Swim 60 65 45 39 Free Style Hard Effort 11 Jog 30 1 1 1 Jog in Place 12 Swim 60 65 45 39 Fly Drill 2 2 2 13 Swim 60 1 1 1 W Fly 5 Strokes Fast 10 55 FR...

Page 71: ...47 40 Moderate Kick 19 Swim 60 74 54 46 Hard Kick Step Mode Seconds W ave Swim Number W ave XP Swim Number W ave XP Pro Swim Number R ecommended Exercise 20 Swim 60 67 47 40 Catchup with Steady Kick 2...

Page 72: ...ulsion suction grate assembly X804490 Propulsion grate fasteners 4 per grate X717900 Propeller Wave X400125 Wave XP X400820 Wave XP PRO X400820 Max Frequency Wave 66Hz Wave XP 60Hz Wave XP PRO 68Hz Th...

Page 73: ...e Down Press once Volume down Press and hold Fast volume down Press once Volume down Press and hold Fast volume down Play Pause Press once Play Pause Press and hold No function Press once Toggle mute...

Page 74: ...ing process is not effective check the battery voltage of the remote If above 3V DC refer to section 1 5 above top make sure the battery is installed correctly If battery voltage is below 3V DC replac...

Page 75: ...button once to listen to the station stored in that button 3 5 SWITCH BETWEEN US AND EUROPEAN FM MODES 1 Make sure dock and remote are turned on and in RADIO mode 2 Press the AUDIO button 6 time in a...

Page 76: ...ith wet hands CAUTION Risk of Electric Shock Do not leave compartment door open CAUTION Risk of Electric Shock Replace components only with identical components WARNING Prevent Electrocution Do not co...

Page 77: ...Close Latch Protective Door 2 Power ON OFF Button 3 Water Dust Protection Inner Gasket 4 3 5mm Aux Input for MP3 Devices 5 Power ON OFF LED 6 Security Strap for digital media devices 7 USB Connector 8...

Page 78: ...Press and hold Toggle to manual seeking 12V Trigger Random Press once Random playback Press and hold Toggle 12V on off Press once No function Press and hold Toggle external 12V power on off Play paus...

Page 79: ...t Forward Press once Next track Press and hold Fast forward Press once Scan up Press and hold Toggle manual seeking 1 DIR Press once Back to previous folder Press and hold No function Press once Liste...

Page 80: ...the door The LED should not be illuminated 2 Press the red POWER button on the remote 3 Press and hold the MODE button until the LCD reads PAIR 4 Continue to press and hold the MODE button during ste...

Page 81: ...press the PLAY PAUSE button 3 Use and Volume UP DOWN to scroll through the songs in the folder and press PLAY PAUSE to play the desired song 3 1 1 2 IPHONE IPOD SEARCH 1 When using an iPhone or iPod...

Page 82: ...uetooth device is linked 2 Play the song from device and the sound will play through the Digital Media Locker 3 Press PLAY PAUSE to play pause the song 4 Press FAST REWIND FORWARD buttons to play prev...

Page 83: ...he or preset button once to listen to the station stored in that button 4 5 SWITCH BETWEEN US AND EUROPEAN FM MODES 1 Make sure dock and remote are turned on and in RADIO mode 2 Press the AUDIO button...

Page 84: ...DO NOT DIVE 108 DO NOT DIVE Deluxe Fusion BT Stereo Option Additional Features 5 1 INTERNAL DOCK LIGHT Use the trigger on the remote to toggle the internal illumination light ON OFF MasterSpaParts co...

Page 85: ...it from the Assembly Pin iii Unplug the Lamp Connector Plug attached to the end of the UV Lamp and place the Upper Enclosure Assembly in a safe place iv Slowly pull the UV Lamp out of the Quartz Tube...

Page 86: ...he water removed from the spa and that the UV Lamp and Quartz Tube have cooled before performing maintenance on the Quartz Tube ii Remove the Upper Enclosure Assembly and UV Lamp as described in Secti...

Page 87: ...ound the Quartz Tube for leaks v Correct any leak found by carefully tightening the Compression Nut no more than one turn vi SHUT DOWN the spa once you have confirmed that there are no leaks vii Insta...

Page 88: ...those representations which are stated in our written limited warranty Your dealer is an independent business person or company and not an employee or agent of the manufacturer We cannot and do not ac...

Reviews: