background image

ELECTRICAL INSTALLATION REQUIREMENTS

16

DO NOT DIVE.

E

EL

LE

EC

CT

TR

RIIC

CA

AL

L  IIN

NSST

TA

AL

LL

LA

AT

TIIO

ON

N  R

RE

EQ

QU

UIIR

RE

EM

ME

EN

NT

TSS

H

HA

AV

VE

E  Y

YO

OU

UR

R  E

EL

LE

EC

CT

TR

RIIC

CIIA

AN

N  R

RE

EA

AD

D  T

TH

HE

E  F

FO

OL

LL

LO

OW

WIIN

NG

G  IIN

NF

FO

OR

RM

MA

AT

TIIO

ON

N

B

BE

EF

FO

OR

RE

E  IIN

NSST

TA

AL

LL

LA

AT

TIIO

ON

N  B

BE

EG

GIIN

NSS  

E

Elleeccttrriiccaall  ccoon

nn

neeccttiioon

nss  m

maad

dee  iim

mp

prroop

peerrllyy,,  oorr  tth

hee  u

ussee  ooff  w

wiirree  ggaau

uggee  ssiizzeess  ffoorr  iin

nccu

urrrriin

ngg

p

poow

weerr  w

wh

hiicch

h  aarree  ttoooo  ssm

maallll,,  m

maayy  ccoon

nttiin

nu

uaallllyy  b

blloow

w  ffu

usseess  iin

n  tth

hee  eelleeccttrriiccaall  eeq

qu

uiip

pm

meen

ntt

b

booxx,,  m

maayy  d

daam

maaggee  tth

hee  iin

ntteerrn

naall  eelleeccttrriiccaall  ccoon

nttrroollss  aan

nd

d  ccoom

mp

poon

neen

nttss,,  m

maayy  b

bee  u

un

nssaaffee  aan

nd

d

iin

n  aan

nyy  ccaassee  w

wiillll  vvooiid

d  yyoou

urr  w

waarrrraan

nttyy..  

IItt  iiss  tth

hee  rreessp

poon

nssiib

biilliittyy  ooff  tth

hee  ssp

paa  oow

wn

neerr  ttoo  een

nssu

urree  tth

haatt  eelleeccttrriiccaall  ccoon

nn

neeccttiioon

nss  aarree  m

maad

dee

b

byy  aa  q

qu

uaalliiffiieed

d  eelleeccttrriicciiaan

n  iin

n  aaccccoorrd

daan

nccee  w

wiitth

h  tth

hee  N

Naattiioon

naall  E

Elleeccttrriiccaall  C

Cood

dee  aan

nd

d  aan

nyy

llooccaall  aan

nd

d  ssttaattee  eelleeccttrriiccaall  ccood

deess  iin

n  ffoorrccee  aatt  tth

hee  ttiim

mee  ooff  iin

nssttaallllaattiioon

n..  

T

Th

heessee  ccoon

nn

neeccttiioon

nss  m

mu

usstt  b

bee  m

maad

dee  iin

n  aaccccoorrd

daan

nccee  w

wiitth

h  tth

hee  w

wiirriin

ngg  d

diiaaggrraam

mss  ffoou

un

nd

d

iin

nssiid

dee  tth

hee  ccoon

nttrrooll  b

booxx..  T

Th

hiiss  eeq

qu

uiip

pm

meen

ntt  h

haass  b

beeeen

n  d

deessiiggn

need

d  ttoo  oop

peerraattee  oon

n  6

60

0H

Hzz..  

aalltteerrn

naattiin

ngg  ccu

urrrreen

ntt  oon

nllyy,,  2

24

40

0  vvoollttss  aarree  rreeq

qu

uiirreed

d..  M

Maakkee  ssu

urree  tth

haatt  p

poow

weerr  iiss  n

noott  aap

pp

plliieed

d

w

wh

hiillee  p

peerrffoorrm

miin

ngg  aan

nyy  eelleeccttrriiccaall  iin

nssttaallllaattiioon

n..  A

A  ccoop

pp

peerr  b

boon

nd

diin

ngg  llu

ugg  h

haass  b

beeeen

n  p

prroovviid

deed

d

oon

n  tth

hee  eelleeccttrriiccaall  eeq

qu

uiip

pm

meen

ntt  p

paacckk  ttoo  aalllloow

w  ccoon

nn

neeccttiioon

n  ttoo  llooccaall  ggrroou

un

nd

d  p

pooiin

nttss..  T

Th

hee

ggrroou

un

nd

d  w

wiirree  m

mu

usstt  b

bee  aatt  lleeaasstt  6

6  A

AW

WG

G  ccoop

pp

peerr  w

wiirree  aan

nd

d  m

mu

usstt  b

bee  ccoon

nn

neecctteed

d  sseeccu

urreellyy  ttoo  aa

ggrroou

un

nd

deed

d  m

meettaall  ssttrru

uccttu

urree  ssu

ucch

h  aass  aa  ccoolld

d  w

waatteerr  p

piip

pee..  A

Allll  M

Maasstteerr  SSp

paass  eeq

qu

uiip

pm

meen

ntt  p

paacckkss

aarree  w

wiirreed

d  ffoorr  2

24

40

0  V

VA

AC

C  oon

nllyy..  T

Th

hee  oon

nllyy  eelleeccttrriiccaall  ssu

up

pp

pllyy  ffoorr  yyoou

urr  ssp

paa  m

mu

usstt  iin

nccllu

ud

dee  aa

5

50

0  A

AM

MP

P  ssw

wiittcch

h  oorr  cciirrccu

uiitt  b

brreeaakkeerr  ttoo  oop

peen

n  aallll  n

noon

n--ggrroou

un

nd

deed

d  ssu

up

pp

pllyy  ccoon

nd

du

uccttoorrss  ttoo

ccoom

mp

pllyy  w

wiitth

h  sseeccttiioon

n  4

42

22

2--2

20

0  ooff  tth

hee  N

Naattiioon

naall  E

Elleeccttrriiccaall  C

Cood

dee..  T

Th

hee  d

diissccoon

nn

neecctt  m

mu

usstt  

b

bee  rreeaad

diillyy  aacccceessssiib

bllee  ttoo  tth

hee  ssp

paa  ooccccu

up

paan

nttss,,  b

bu

utt  iin

nssttaalllleed

d  aatt  lleeaasstt  ffiivvee  ffeeeett  ffrroom

m  tth

hee  ssp

paa..

A

A  G

Grroou

un

nd

d--F

Faau

ulltt  C

Ciirrccu

uiitt  IIn

ntteerrrru

up

ptteerr  ((G

GF

FC

CII))  m

mu

usstt  b

bee  u

usseed

d  ttoo  ccoom

mp

pllyy  w

wiitth

h  sseeccttiioon

n

6

68

80

0--4

42

2  ooff  tth

hee  N

Naattiioon

naall  E

Elleeccttrriiccaall  C

Cood

dee..  A

A  ggrroou

un

nd

d  ffaau

ulltt  iiss  aa  ccu

urrrreen

ntt  lleeaakk  ffrroom

m  aan

nyy  

oon

nee  ooff  tth

hee  ssu

up

pp

pllyy  ccoon

nd

du

uccttoorrss  ttoo  ggrroou

un

nd

d..  A

A  G

GF

FC

CII  iiss  d

deessiiggn

need

d  ttoo  aau

uttoom

maattiiccaallllyy  ssh

hu

utt

ooffff  p

poow

weerr  ttoo  aa  p

piieeccee  ooff  eeq

qu

uiip

pm

meen

ntt  w

wh

heen

n  aa  ccu

urrrreen

ntt  ffaau

ulltt  iiss  d

deetteecctteed

d..  

P

Poow

weerr  h

hooookk--u

up

p  ttoo  tth

hee  ssp

paa  m

mu

usstt  b

bee  2

24

40

0  vvoolltt  3

3  w

wiirree  p

pllu

uss  ggrroou

un

nd

d  ((6

6  A

AW

WG

G  ccoop

pp

peerr))..  

R

Roou

uttee  tth

hee  ccaab

bllee  iin

nttoo  tth

hee  eeq

qu

uiip

pm

meen

ntt  aarreeaa  ffoorr  ffiin

naall  h

hooookk--u

up

p  ttoo  tteerrm

miin

naallss  iin

nssiid

dee  tth

hee

ccoon

nttrrooll  p

paan

neell..  T

Th

hee  ssp

paa  m

mu

usstt  b

bee  h

hooookkeed

d  u

up

p  ttoo  aa  ““d

deed

diiccaatteed

d””  2

24

40

0  vvoolltt,,  5

50

0  aam

mp

p  b

brreeaakkeerr

aan

nd

d  G

GF

FC

CII..  T

Th

hee  tteerrm

m  ““d

deed

diiccaatteed

d””  m

meeaan

nss  tth

hee  eelleeccttrriiccaall  cciirrccu

uiitt  ffoorr  tth

hee  ssp

paa  iiss  n

noott  b

beeiin

ngg

u

usseed

d  ffoorr  aan

nyy  ootth

heerr  eelleeccttrriiccaall  iitteem

mss  ((p

paattiioo  lliiggh

httss,,  aap

pp

plliiaan

ncceess,,  ggaarraaggee  cciirrccu

uiittss,,  eettcc..))..  IIff

tth

hee  ssp

paa  iiss  ccoon

nn

neecctteed

d  ttoo  aa  n

noon

n--d

deed

diiccaatteed

d  cciirrccu

uiitt,,  oovveerrllooaad

diin

ngg  w

wiillll  rreessu

ulltt  iin

n  ““n

nu

uiissaan

nccee

ttrriip

pp

piin

ngg””  w

wh

hiicch

h  rreeq

qu

uiirreess  rreesseettttiin

ngg  ooff  tth

hee  b

brreeaakkeerr  ssw

wiittcch

h  aatt  tth

hee  h

hoou

ussee  eelleeccttrriiccaall  p

paan

neell..

R

Reevv..  0

05

5//0

01

1//0

06

6  

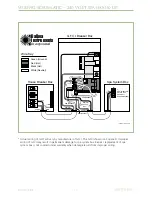
Permanently Connected Equipment Assembly with Pump(s), Heaters, Luminaine, Ozone, Spa Side
Control(s), Pump shut off device, and Audio/Video Components.

Note: Some of the above components may be optional or not available with every spa model.

Summary of Contents for 5643lbsLSX1050

Page 1: ...MASTER SPAS OWNER S MANUAL...

Page 2: ...______________________________________________ Address __________________________________________________________________________________ City _________________________________________________________...

Page 3: ...r Maintenance Start Up 27 Spa Water Maintenance Schedule 28 29 Water Maintenance Trouble Shooting Guide 30 Why Chemicals are Important in a Spa 31 Maintenance Recommendations 32 33 Winterizing Your Sp...

Page 4: ...be mounted with screws or another type of permanent fastener Additional or replacement signs can be obtained from your dealer or direct from the factory INTRODUCTION It s time to relax You now have y...

Page 5: ...ithin five 5 feet 1 5M of metal surfaces if in accordance with the National Electrical Code each metal surface is permanently connected by a minimum No 6 AWG 8 4mm solid copper conductor attached to t...

Page 6: ...iabetes high or low blood pressure or circulatory system problems should consult a physician before using the spa F Since excessive water temperatures have a high potential for causing fetal damage du...

Page 7: ...than adults in the same water with elevated temperatures above 99 F Children should spend less time in water above body temperature than adults 8 WARNING The use of alcohol drugs or medication can gr...

Page 8: ...speakers headphones additional audio video components etc to the system These units are not provided with an outdoor antennae Do not service this product yourself as opening or removing covers may ex...

Page 9: ...he circuit conductors supplying this equipment 16 At least two lugs marked Bonding Lugs are provided on the external surface or on the inside of the supply terminal box or compartment To reduce the ri...

Page 10: ...VE DE RELAXATION WARNING TO AVOID INJURY EXERCISE CARE WHEN ENTERING OR EXITING THE SPA OR HOT TUB AVERTISSEMENT POUR VITER DES BLESSURES USER DE PRUDENCE EN ENTRANT DANS UNE CUVE DE RELAXATION ET EN...

Page 11: ...ANUFACTURER S INSTRUCTION ATTENTION LA TENEUR DE L EAU EN MATI RES DISSOUTES DOIT TRE CONFORME AUX DIRECTIVES DU FABRICANT Hyperthermia occurs when the internal temperature of the body reaches a level...

Page 12: ...he diverter valve only when the pump is turned off Your new Master Spa features a variety of jet styles All jets regardless of style return the water to the spa Air is mixed with the water by using th...

Page 13: ...our jets by opening or closing the air control valves Typically one dial controls the air to water ratio and mix to one group of jets When not in use the air controls should be kept in the closed posi...

Page 14: ...should service be required 12 DRAINING YOUR SPA The drain is located behind the front panel on the far right side You can access the drain by unscrewing the corner screws and removing the corner panel...

Page 15: ...e high limit switch trip repeatedly contact your dealer or qualified service representative to diagnose the problem 18 SLICE VALVES These valves are used by service personnel to shut off water to the...

Page 16: ...ervice the pumps 23 HEATER UNION These are used by service personnel to easily service the heater 24 OZONATOR Your ozonator will operate in conjunction with your filtration system and circulation pump...

Page 17: ...n nt t p pa ac ck ks s a ar re e w wi ir re ed d f fo or r 2 24 40 0 V VA AC C o on nl ly y T Th he e o on nl ly y e el le ec ct tr ri ic ca al l s su up pp pl ly y f fo or r y yo ou ur r s sp pa a m...

Page 18: ...NOTE For a 240 V dedicated hook up the white neutral wire is not required between the G F C I and the system box GRN GRN GROUND RED HOT BLK HOT BLK HOT RED HOT RED HOT WHT NEUTRAL WHT WHT BLK HOT GRN...

Page 19: ...m that your surface is adequate for supporting a spa Be sure to locate your spa so that equipment remains above grade and is not subject to flooding The equipment side s of the spa must be accessible...

Page 20: ...OT DIVE 3 Be sure all pump and heater unions are secure Each pump has 2 unions and the heater has 2 unions A newly delivered spa may have loose unions caused in transporting the spa Check that all sli...

Page 21: ...covered under warranty To relieve an airlock situation loosen the union see picture on the discharge of the pump the end of the pump that water is being pushed through Water should leak out Tighten t...

Page 22: ...ye skin irritation rapid chlorine or bromine loss and total alkalinity destruction With high pH the results can be cloudy water eye skin irritation scale formation and poor chlorine or bromine efficie...

Page 23: ...e water i e Like what happens when you put sugar in coffee or tea 10 Useful life of water in days Water should be drained at least once every 180 days Useful life may vary by usage and bather load 11...

Page 24: ...xidize organic compounds in the water The ECO PUR filter system will not eliminate the need to maintain proper water chemistry but can make the maintenance a more natural experience Note Eco Pur filte...

Page 25: ...ould be maintained between 150 and 250 PPM part per million Step 4 Adjust pH total Alkalinity TA and Calcium hardness utilizing the directions on the chemical bottles provided by your dealers start up...

Page 26: ...e ECO PUR filter system will actually aid in stabilizing the ph ECO PUR does not alter the TDS total dissolved solids The use of sequestrants and stain scale inhibitors is not required for regular mai...

Page 27: ...ablespoon of non chlorine shock or 1 3 teaspoon of Dichlor to spa per 250 gallons AS NEEDED If water looks hazy shock treat with 1 teaspoon of Dichlor per 500 gallons These are general recommendations...

Page 28: ...controls open 7 Using test strips or a test kit test for pH and adjust if necessary to within the 7 2 and 7 8 range using the pH alkalinity increaser or decreaser 1 2oz at a time Wait 15 minutes rete...

Page 29: ...ng an enzyme product in place of the clarifier following the label directions 5 Use a small amount of defoamer only if necessary Day Two Skip Day Three 1 Test and adjust total alkalinity if necessary...

Page 30: ...abel directions 4 Shock with 2oz of non chlorine shock or superchlorinate following label directions A spa should be shocked at least once a week even if it is not used If using chlorine as the saniti...

Page 31: ...tion inadequate filtration Water chemistry Adjust chemistry levels not balanced Suspended particles or Add spa clarifier see dealer organic materials Old water Change spa water Scum Ring Around Spa Bu...

Page 32: ...oduced into the spa 4 Environment The environment surrounding the spa is also a consideration Watch for pollen grass sand dirt lawn fertilizer dust storms insects dogs cats etc 5 Consider the human ne...

Page 33: ...the spa equipment Your filter elements must be cleaned regularly once a month on average with normal spa use With heavy use they will need to be cleaned more often Turn spa off Never have the spa runn...

Page 34: ...t insert with a pair of needle nose pliers Clean plastic filter at the back of the Jet insert so all holes are free of debris Reinstall Jet insert and outer ring 33 DO NOT DIVE NOTE To prevent prematu...

Page 35: ...out of your unit 3 Remove access panels from equipment area 4 Loosen all pump unions 5 Remove winterizing plug from the face of the pump s 6 Using your shop vac in a blowing mode insert the hose into...

Page 36: ...70lbs 4 pump 49 4910lbs LSX850 94 x 94 x 36 240V 50A 510 gallons 870lbs 4 pump 57 5118lbs LSX 94 x 94 x 36 240V 50A 450 gallons 895lbs 4 pump 60 4644lbs LSX557 66 x 84 x 32 240V 50A 210 gallons 565lbs...

Page 37: ...pa is first actuated it will go into Priming mode after displaying some configuration information The Priming mode will last for up to 4 minutes and then the spa will begin to heat and maintain the wa...

Page 38: ...ress Warm or Cool to choose the filter start time hour Enter the hour by pressing Program Mode Press Warm or Cool to choose the filter start time minutes Each press changes the start time by 5 minutes...

Page 39: ...t only when the pump has been running for at least 2 minutes The STANDARD icon will display until the mode is changed Economy mode heats the spa to the set temperature only during filter cycles The EC...

Page 40: ...owing Filter Cycle 1 Filter Cycle 2 Panel Lock Temperature Lock L E D Light Press the Light button to turn the light on and off If you wish to change the function of the lights turn the lights off the...

Page 41: ...irc system and during clean up cycles On some systems the ozone generator operates whenever the pump runs If your system is configured with the optional ozone suppress feature the ozone generator will...

Page 42: ...tings are preserved on all systems DO NOT ENTER THE WATER Remove the spa cover and allow water to cool Once the heater has cooled reset by pushing any button If spa does not reset shut off the power t...

Page 43: ...east two minutes Press any button to leave Standby mode and return to normal operation Message Meaning Every 7 days Every 7 days Every 30 days Every 30 days Every 90 days Every 180 days Every 180 days...

Page 44: ...hat the last measured spa temperature displayed is current only when the pump has been running for at least 2 minutes To display the set temperature press the Warm or Cool pad once To change the set t...

Page 45: ...id when the temperature is not current and will alternate with the temperature when the temperature is current Sleep mode heats the spa to within 20 F 10 C of the set temperature only during filter cy...

Page 46: ...ved on all systems After the pump has been running for 2 minutes the temperature will be displayed DO NOT ENTER THE WATER Remove the spa cover and allow water to cool Once the heater has cooled reset...

Page 47: ...umps have been primed Press any button to reset or this message will automatically reset within 15 minutes If problem persists contact your dealer or service provider Follow action required for dr mes...

Page 48: ...ump 73 4145lbs Exeter 3 84 x 84 x 36 240V 50A 410 gallons 705lbs 3 pump 57 3985lbs Exeter SE 84 x 84 x 36 240V 50A 410 gallons 735lbs 4 pump 72 4015lbs Windsor 3 94 x 94 x 36 240V 50A 510 gallons 760l...

Page 49: ...SE Portsmouth SE Windsor SE Windsor STS Exeter SE Cape Cod SE 4 Pump System Note Refer to pg 52 for Somerset operation Your system has a 24 hour circ pump The circ pump and the ozone generator run co...

Page 50: ...desired temperature Note that the last measured spa temperature displayed is current only when the pump has been running for at least 2 minutes Std will be displayed momentarily when you switch into S...

Page 51: ...fter the pump has been running for 2 minutes the temperature will be displayed DO NOT ENTER THE WATER Remove the spa cover and allow water to cool Once the heater has cooled reset by pushing any butto...

Page 52: ...s have been primed Press any button to reset or this message will automatically reset within 15 minutes If problem persists contact your dealer or service provider Follow action required for dr messag...

Page 53: ...the Temp pad will continue to either raise or lower the set temperature If the opposite direction is desired release the pad and let the display revert to the current water temperature Press the pad...

Page 54: ...0 F 10 C of the set temperature only during filter cycles SL will display solid when the temperature is not current and will alternate with temperature when temperature is current Freeze Protection If...

Page 55: ...reserved on all systems After the pump has been running for 2 minutes the temperature will be displayed DO NOT ENTER THE WATER Remove the spa cover and allow water to cool Once the heater has cooled r...

Page 56: ...ve been primed Press any button to reset or this message will automatically reset within 15 minutes If problem persists contact your dealer or service provider Follow action required for dr message Sp...

Page 57: ...speakers 4 on the LSX 800 1000 1050 models and two exterior speakers STEP 1 To use the pop up speaker system press down on the button located in the corner This will automatically raise the speaker f...

Page 58: ...y components for example cable additional speakers headphones additional Audio Video components etc to the system NOTE These units are not provided with an outdoor antennae when provided it should be...

Page 59: ...els two exterior speakers water resistant Dolphin remote I Pod docking station and a one touch TV and speaker housing 58 DO NOT DIVE The TV and pop up speakers can be raised and lowered by pressing th...

Page 60: ...le cable additional speakers headphones additional Audio Video components etc to the system NOTE These units are not provided with an outdoor antennae when provided it should be installed in accordanc...

Page 61: ...ge is not covered under warranty if the cover is installed while the TV and speakers are still in the upright position To lift and lower your Windsor TV follow these simple instructions To lift press...

Page 62: ...ection or satellite connection to your STS Note Due to the brightness of daytime light it may be difficult to view the TV during daytime hours Please consider this when placing your spa outdoors It al...

Page 63: ...2 AA replaceable batteries These may be replaced by removing the 5 screws on the back of the Dolphin Care should be taken when replacing the cover so that the water seal is not damaged Note Any time t...

Page 64: ...t may be difficult to view the TV during daytime hours Please consider this when placing your spa outdoors It also may be difficult to operate the dolphin remote due to UV rays Note Due to software va...

Page 65: ...tch the video input to watch DVDs and to the tuner for viewing broadcast TV Setup Button J Use this button to program device codes see page 65 Your Dolphin Remote has been preprogrammed at the factory...

Page 66: ...eed to be reprogrammed 1 Select Device I The LED will blink once to confirm 2 Press and Hold the Setup button J The LED will blink once and then twice to continue 3 Enter the four digit code on the Nu...

Page 67: ...programming of TV channels If using either a satellite receiver or cable box make sure unit is on before starting this procedure 1 Select TV device I 2 Press the Arrow up button B to bring up the TV...

Page 68: ...3 Press Mode to select Video Input F Turn on the one piece DVD CD Stereo Receiver 1 Select Device I 2 Press Power A 3 Select the DVD mode by pressing the mode button F 4 There must be a DVD loaded fo...

Page 69: ...igit 5 5 6 Digit 6 6 7 Digit 7 7 8 Digit 8 8 9 Digit 9 9 0 Digit 0 0 CH Channel Up CH Channel Down VOL Volume Up Volume Up VOL Volume Down Volume Dn Mute Mute Mute Format Play Play Pause TV Stop Stop...

Page 70: ...the spa does not respond contact your local service company PUMP S DO NOT OPERATE 1 Press the Jets button on your control panel If you hear the pumps trying to operate A Check that all the slice valve...

Page 71: ...er icon If the light is on or the indicator icon is moving the spa should be heating Wait a reasonable amount of time approximately 1 hour to see if the water temperature is changing 6 Check to make s...

Page 72: ...osits and grit sand that may get into the internal parts of the diverter valve it may become hard to turn or freeze up completely In this case it is necessary to remove the handle and cap of the diver...

Page 73: ...ht bulb goes out it is very easy to replace Use a 12 volt 6 watt bulb that should be available through your dealer First make sure the power to the spa is off You can access the spa light fitting by r...

Page 74: ...TILATION OF COVER AND SPA NOTE The cover warranty is provided through the cover manufacturer and not through Master Spas You will need to mail the cover warranty back to the cover manufacturer CARE OF...

Page 75: ...74 DO NOT DIVE DATE Drain Clean Spa Clean Filter Cartridges Soak Filter Cartridges in Solution Change ECO PUR Element Every 180 Days Test GFCI Clean and Condition Spa Cover Miscellaneous Service DATE...

Page 76: ...SPA CARE AND MAINTENANCE RECORD 75 DO NOT DIVE DATE DATE DATE DATE DATE DATE DATE DATE DATE DATE DATE DATE DATE...

Page 77: ...___________________________________________________________ Address ________________________________________________________________ City________________________________________ State_______ Zip _____...

Page 78: ...6927 Lincoln Parkway Fort Wayne IN 46804 800 860 7727 www masterspas com POP09OWNMAN Rev 11 08...

Reviews: