background image

11

ASSEMBL

Y

STEP 9

Insert temperature gauge (18) into lid (1). 

Secure in place with temperature guage 

support (

included with temperature guage 

kit

) and wing nut (N).

STEP 10

Insert ignition wire into ignitor (17) as 

shown.

Using screw (D) attach ignitor (17) to base 

pan (2).

17

D

2

18

N

1

IGNITION WIRE

8

ASSEMBL

Y

STEP 3

Place heat insulation washers (O) on base 

pan handle (16). Insert base pan handle 

(16) into base pan (2). 

Attach heat plate 

suppport (10) as shown. Secure using 

washers (H) lock washers (G) and wing 

nuts (K).

Repeat step on opposite side for 

remaining base pan handle.

STEP 4

Some parts not shown for clarity

.

Place wind guard (13) on burner (7) as 

shown. Insert regulator/valve (15) onto 

end of burner and twist to secure. 

2

O

H

G

K

16

10

7

15

13

Summary of Contents for 20030111

Page 1: ...tdoors where it is well ventilated This manual contains important information necessary for the proper assembly and safe use of the appliance Read and follow all warnings and instructions before assem...

Page 2: ...re for 90 days from the date of original retail purchase Masterbuilt warranty does not cover paint fi nish as it may burn off during normal use Masterbuilt warranty does not cover rust of the unit Mas...

Page 3: ...ce of local codes with National Fuel Gas Code ANSIZ223 1 NFPA 54 Storage and Handling of Liquefi ed Petroleum Gasses ANSI NFPA 58 or CSA B149 1 Natural Gas Installation Code Propane Storage and Handli...

Page 4: ...16 When outside temperature is cooler than 65 F and or altitude is above 3 500 feet additional cooking time may be required To insure that meat is completely cooked use a meat thermometer to test inte...

Page 5: ...alve to OFF position and wait fi ve minutes and repeat lighting procedures If ignition still does not occur see match light directions below 4 Place a long lit match or candle lighter through lighting...

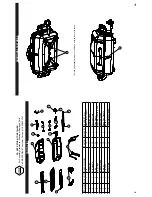
Page 6: ...ntrol Knob 6 2 Bottom Hinge 15 1 Regulator Valve 7 1 Burner 16 2 Base Pan Handle 8 1 Lid Lock 17 1 Ignitor 9 1 Heat Plate 18 1 Temperature Gauge STOP DO NOT RETURN TO RETAILER For Assembly Assistance...

Page 7: ...ty 2 O Heat Insulation Washer Qty 6 B M5x10 Phillips Screw Qty 14 D M6x10 Phillips Screw Qty 1 Item No Part No Description Item No Part No Description 1 9903100010 Lid Kit 11 9003100029 Warming Rack 2...

Page 8: ...g nuts J as shown Repeat step for remaining legs STEP 2 Insert burner 7 with ignition wire at an angle into side hole in base pan 2 Secure using washer H lock washer G and screw C J F H 2 2 4 B H G 7...

Page 9: ...2 18 N 1 IGNITION WIRE 8 ASSEMBLY STEP 3 Place heat insulation washers O on base pan handle 16 Insert base pan handle 16 into base pan 2 Attach heat plate suppport 10 as shown Secure using washers H...

Page 10: ...B through top hinge as shown Secure using washer H lock washer F and wing nut J Repeat step for remaining top hinge 10 ASSEMBLY STEP 7 Place lid 1 onto base pan 2 as shown Make sure top hinge 5 is in...

Reviews: