background image

headline bars

continuation tabs

notes

warnings

headline bars

continuation tabs

notes

warnings

headline bars

continuation tabs

notes

warnings

17

headline bars

continuation tabs

notes

warnings

headline bars

continuation tabs

notes

warnings

headline bars

continuation tabs

notes

warnings

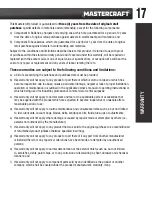
This Mastercraft product is guaranteed for 

three (3) years from the date of original retail 

purchase

 against defects in materials and workmanship, except for the following components:

a)  Component A: Batteries, chargers and carrying case, which are guaranteed for a period of 2 years 

from the date of original retail purchase against defects in workmanship and materials; and

b)  Component B: Accessories, which are guaranteed for a period of 1-year from the date of original 

retail purchase against defects in workmanship and materials.

Subject to the conditions and limitations described below, this product, if returned to us with proof 
of purchase within the stated warranty period and if covered under this warranty, will be repaired or 
replaced (with the same model, or one of equal value or specification), at our option. We will bear the 
cost of any repair or replacement and any costs of labour relating there to.

These warranties are subject to the following conditions and limitations:

a)  a bill of sale verifying the purchase and purchase date must be provided;
b)  this warranty will not apply to any product or part thereof which is worn or broken or which has 

become inoperative due to abuse, misuse, accidental damage, neglect or lack of proper installation, 
operation or maintenance (as outlined in the applicable owner’s manual or operating instructions) or 
which is being used for industrial, professional, commercial or rental purposes; 

c)  this warranty will not apply to normal wear and tear or to expendable parts or accessories that 

may be supplied with the product which are expected to become inoperative or unusable after a 
reasonable period of use; 

d)  this warranty will not apply to routine maintenance and consumable items such as, but not limited 

to, fuel, lubricants, vacuum bags, blades, belts, sandpaper, bits, fluids, tune-ups or adjustments; 

e)  this warranty will not apply where damage is caused by repairs made or attempted by others (i.e., 

persons not authorized by the manufacturer);

f)  this warranty will not apply to any product that was sold to the original purchaser as a reconditioned 

or refurbished product (unless otherwise specified in writing); 

g)  this warranty will not apply to any product or part thereof if any part from another manufacturer 

is installed therein or any repairs or alterations have been made or attempted by unauthorized 
persons;

h)  this warranty will not apply to normal deterioration of the exterior finish, such as, but not limited 

to, scratches, dents, paint chips, or to any corrosion or discolouring by heat, abrasive and chemical 
cleaners; and

i)  this warranty will not apply to component parts sold by and identified as the product of another 

company, which shall be covered under the product manufacturer’s warranty, if any.

W

ARRANTY 

Summary of Contents for 054-2437-2

Page 1: ...054 2437 2 BELT SANDER IMPORTANT Read and understand this instruction manual thoroughly before using the product INSTRUCTION MANUAL ...

Page 2: ...headline bars continuation tabs notes warnings headline bars continuation tabs notes warnings headline bars continuation tabs notes warnings ...

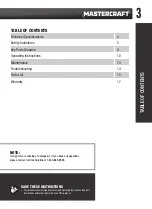
Page 3: ...bleshooting 14 Parts List 15 Warranty 17 NOTE If any parts are missing or damaged or if you have any questions please call our toll free helpline at 1 800 689 9928 SAVE THESE INSTRUCTIONS This manual contains important safety and operating instructions Read all instructions and follow them with use of this product TABLE OF CONTENTS ...

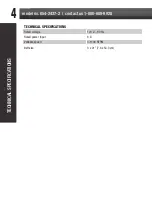
Page 4: ...on tabs notes warnings headline bars continuation tabs notes warnings model no 054 2437 2 contact us 1 800 689 9928 4 TECHNICAL SPECIFICATIONS TECHNICAL SPECIFICATIONS Rated voltage 120 V 60 Hz Rated power input 6 A Variable speed 0 1100 SFPM Belt size 3 x 21 7 6 x 53 3 cm ...

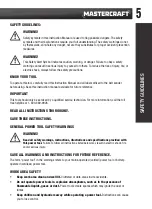
Page 5: ...iced by a qualified service technician For more information call the toll free helpline at 1 800 689 9928 READ ALL INSTRUCTIONS THOROUGHLY SAVE THESE INSTRUCTIONS GENERAL POWER TOOL SAFETY WARNINGS WARNING Read all safety warnings instructions illustrations and specifications provided with this power tool Failure to follow all instructions listed below may result in electric shock fire and or seri...

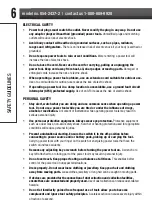
Page 6: ...ol Do not use a power tool while you are tired or under the influence of drugs alcohol or medication A moment of inattention while operating power tools may result in serious personal injury Use personal protective equipment Always wear eye protection Protective equipment such as a dust mask non skid safety shoes hard hat or hearing protection used for appropriate conditions will reduce personal i...

Page 7: ... accidents are caused by poorly maintained power tools Keep cutting tools sharp and clean Properly maintained cutting tools with sharp cutting edges are less likely to bind and are easier to control Use the power tool accessories tool bits etc in accordance with these instructions taking into account the working conditions and the work to be performed Use of the power tool for operations different...

Page 8: ...the risk of injury always wear ear protection A suitable breathing respirator must be worn while sanding lead paint some woods and metal to avoid breathing the harmful toxic dust or air Always wear safety goggles and a dust mask when sanding especially when sanding overhead The machine is not suitable for wet sanding Do not use sanding paper that is larger than needed Extra paper extending beyond ...

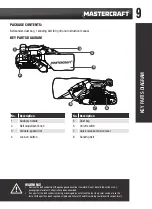
Page 9: ...lease tension lever 4 Lock on button 8 Sanding belt KEY PARTS DIAGRAM WARNING Remove the belt sander from the package and examine it carefully Do not discard the carton or any packaging material until all parts have been examined If any part of the belt sander is missing or damaged do not attach the tool to a power source or use the tool until the part has been repaired or replaced Failure to heed...

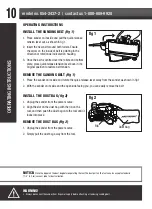
Page 10: ...on lever back in its original position to restore belt tension REMOVE THE SANDING BELT fig 1 1 Place the sander on its side and rotate the quick release lever away from the sander as shown in fig 1 2 With the sander on its side and the open side facing you you can easily remove the belt INSTALL THE DUST BAG fig 2 1 Unplug the sander from the power source 2 Align the slot on the dust bag with the r...

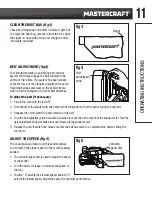
Page 11: ...er so that the belt is facing the operator 3 Squeeze the on off switch to begin rotation of the belt 4 Turn the belt adjustment knob counter clockwise to move the belt away from the sander motor Turn the belt adjustment knob clockwise to move it towards the sander motor 5 Release the on off switch and make sure that the belt has come to a complete stop before setting the tool down ADJUST THE SPEED...

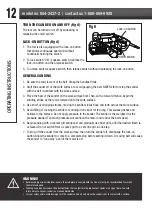
Page 12: ... lowered onto the work surface 4 Use short overlapping strokes moving the sander slowly back and forth across the work surface 5 Avoid tilting or rocking the sander or sanding in one spot for too long This causes gashes and hollows in the surface Do not apply pressure to the sander The sander is the weighted for the pressure needed Too much pressure will overload the motor and reduce the belt spee...

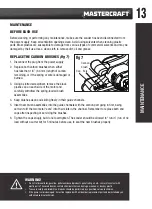
Page 13: ...ep brushes clean and sliding freely in their guide channels 5 Insert new brush assemblies into the guide channels with the carbon part going in first being certain to fit the two metal ears into their slots in the channel Remember to replace both end caps after inspecting or servicing the brushes 6 Tighten the caps snugly but do not overtighten The sander should be allowed to run in run at no load...

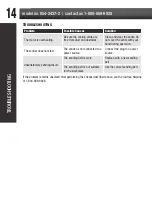
Page 14: ...t and obstacles Clean and clear the vents Do not cover the vents with your hand during operation The sander does not start The sander is not connected to a power source Connect the plug to a power source Unsatisfactory sanding result The sanding belt is worn Replace with a new sanding belt The sanding belt is not suitable for the workpiece Use the correct sanding belt If the problem remains unsolv...

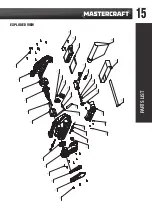
Page 15: ...15 EXPLODED VIEW PARTS LIST ...

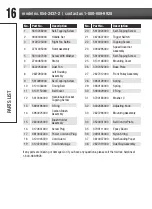
Page 16: ... 3131148000 Mounting Cover 7 3422254000 Dust Fan 26 3707452000 Base Plate 8 2827293000 Left Housing Assembly 27 2827312000 Front Pulley Assembly 9 5610290000 Self Tapping Screw 28 3660129000 Spring 10 3121034000 Timing Belt 29 3660130000 Spring 11 3131150000 Belt Cover 30 5660029000 E Ring 12 5610394000 Hexalobular Socket Tapping Screw 31 3700183000 Washer C 13 5690196000 O Ring 32 3402685000 Adju...

Page 17: ...ce as outlined in the applicable owner s manual or operating instructions or which is being used for industrial professional commercial or rental purposes c this warranty will not apply to normal wear and tear or to expendable parts or accessories that may be supplied with the product which are expected to become inoperative or unusable after a reasonable period of use d this warranty will not app...

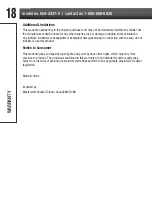
Page 18: ...or damage including without limitation any indirect incidental consequential or exemplary damages arising in connection with the sale use or inability to use this product Notice to Consumer This warranty gives you specific legal rights and you may have other rights which may vary from province to province The provisions contained in this warranty are not intended to limit modify take away from dis...

Page 19: ......

Page 20: ......

Reviews: