headline bars
continuation tabs
notes
warnings
12
model no. 060-1350-6 | contact us 1-800-689-9928
ASSEMBLE THE UPPER HANDLE BAR
(fig 2)
1. Align the holes on the upper handle bar with the
holes on the lower handle bar.
2. Insert the locking levers with washers into the
holes and nuts and then turn the locking levers
clockwise to lock the upper handle bar onto the
lower handle bar.
CABLE CLAMP
(fig 3)
This mower is equipped with two cable clamps.
Simply press the cable clamps onto the bar, and then
the cable can be fixed onto the upper handle bar.
ATTACH/REMOVE THE MULCHING INSERT
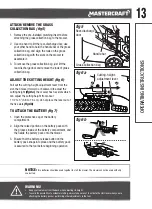
(fig 4)
1. Lift the rear-discharge door and insert the mulching
insert into the grass outlet of the mower. And then
release the rear-discharge door.
2. To remove it, lift the rear-discharge door and just
pull the mulching insert out directly. Then release
the rear-discharge door.
OPERA
TING INSTRUCTIONS
NOTICE:
• The mulching insert must be removed in order to install and use the grass collection bag.
• When using the function of the mulching insert, you can get more fine grass clippings on your lawn.
• Empty the grass collection bag frequently during use. Do not wait until it is completely full. We recommend emptying it when
it is half full.
fig 4
Rear-discharge
door
Mulching
insert
fig 3
Cable
clamps
fig 2
Upper handle bar
Nut
Washer
Locking
lever
Lower handle bar


