background image


20 


NICKEL-CADMIUM BATTERY 
MAINTENANCE 

 
Nickel-cadmium batteries are powerful, 
rugged and provide hundreds of 
charge/discharge cycles if properly 
maintained and periodically ‘exercised’.   
Exercising is required to recover most of 
the capacity lost during usage. This 
process reduces the size of the active 
cadmium hydroxide crystals on the anode, 
to expose the entire surface area and 
restore capacity. 
 

How to care for your Nickel-cadmium 
battery 

1.  Never allow a battery to freeze. 


2.  Never charge a battery that has been 

stored at temperatures above 45° C 
(113° F).  Allow it to sit at room 
temperature for at least 30 minutes 
before charging.  
 

3.  Do not charge a battery if it feels 

warm to the touch. 
 

4.  Never charge a battery after a short 

use. Let it sit until it is needed again. 
 

5.  Never charge the battery until the tool 

in which it is being used cannot 
produce useful work. 
 

HOW TO EXERCISE A NICKEL-
CADMIUM BATTERY


NOTE:

 Ni-Cd and Ni-Mh batteries have a 

self discharge rate of approximately 1% 
per day. The self discharge rate depends 
upon the temperature.


1.  Every two months or after 30 

charge/discharge cycles, whichever 
comes first, fully discharge your 
battery. To fully discharge the battery, 
place it in the tool that it came with 
and work with the tool until it nearly 
stops and no longer produces useful 
action.   
 

2.  If the tool came in a kit with a 

worklight, insert the battery into the 
light. Turn the switch ON and leave it 
ON until the filament is cherry red. 
 

3.  Let the battery rest for 30 minutes at 

room temperature 21°


C (70° F) 

before charging. 


4.  Charge the fully discharged battery 

for approximately 1 hour at 21° C 
(70° F).


LITHIUM-ION BATTERY MAINTENANCE 

 
Lithium-ion batteries share many 
characteristics with Nickel-Cadmium 
batteries.  
 
The major characteristic that is NOT 
shared with Nickel-Cadmium batteries is 
that Lithium-ion batteries do not have a 
“memory” and do not require to be 
completely discharged periodically. It is 
recommended that you charge your 
Lithium-ion batteries after each use so 
they will be fully charged when needed. 
 

NOTE:

 A fully charged battery will loose 

about 2% of its charge per month during 
storage.


MAINTENANCE 

Summary of Contents for 54-2733-6

Page 1: ...ur diagnostic Class 2 Charger input 120 V AC 60 Hz Charger output 14 4 to 18 V DC 2 2 A maximum Replacement charger 54 3103 0 LED 54 3101 4 LCD Replacement battery 54 3102 2 Ni Cd Replacement battery...

Page 2: ...ls 6 Service 6 Specific safety rules 7 Battery charger safety 8 9 Symbols 10 Know your impact wrench 11 Available accessories 11 Contents 12 Assembly and operating 13 19 Charging the battery pack 13 1...

Page 3: ...e permanent eye damage Prescription eyeglasses ARE NOT a replacement for proper eye protection WARNING Non compliant eyewear can cause serious injury if broken during the operation of a power tool SAV...

Page 4: ...level of risk from exposure to these chemicals varies according to how often this type of work is performed In order to reduce exposure to these chemicals work in a well ventilated area and use approv...

Page 5: ...contact between the operator s body and grounded surfaces such as pipes radiators ranges and refrigerators There is an increased risk of electric shock if the operator s body is grounded Do not expose...

Page 6: ...using the switch is dangerous and must be repaired Disconnect the plug from the outlet before making any adjustments changing accessories or storing the tool Such preventive safety measures reduce th...

Page 7: ...njury Before each use check the impact sockets and accessories for excessive wear or cracks Worn or damaged sockets or accessories may shatter and possibly cause serious injury Worn accessories may al...

Page 8: ...r skin follow these steps 1 Wash immediately with soap and water 2 Neutralize with a mild acid such as lemon juice or vinegar 3 If liquid gets into your eyes flush immediately with clean water for a m...

Page 9: ...teries in your normal household garbage or in landfill sites as they will add to the pollution of the environment Please return all defective rechargeable battery packs to your local Canadian Tire sto...

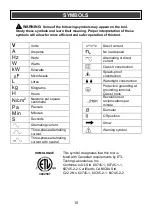
Page 10: ...Protective grounding at grounding terminal Class I tools Revolutions or reciprocations per minute Diameter Off position Arrow Warning symbol SYMBOLS WARNING Some of the following symbols may appear o...

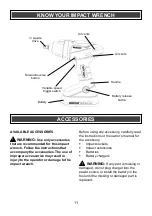
Page 11: ...y accessory carefully read the instructions or the owner s manual for the accessory Impact sockets Impact extensions Batteries Battery chargers WARNING If any part is missing or damaged do not plug ch...

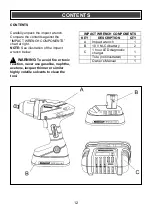
Page 12: ...of the impact wrench below WARNING To avoid fire or toxic reaction never use gasoline naphtha acetone lacquer thinner or similar highly volatile solvents to clean the tool CONTENTS IMPACT WRENCH COMP...

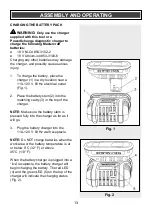
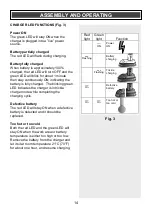
Page 13: ...g 1 2 Place the battery stem 2 into the matching cavity 3 in the top of the charger NOTE Make sure the battery stem is pressed fully into the charger as far as it will go 3 Plug the battery charger in...

Page 14: ...cates the charger is in trickle charge mode while completing the charging cycle Defective battery The red LED will stay ON when a defective battery is detected and it should be replaced Too hot or too...

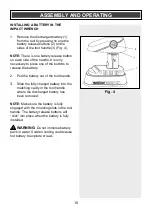
Page 15: ...ns to release the battery 2 Pull the battery out of the tool handle 3 Slide the fully charged battery into the matching cavity in the tool handle where the discharged battery has been removed NOTE Mak...

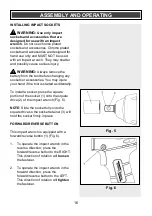
Page 16: ...d accidentally To install a socket press the square portion of the socket 1 onto the square drive 2 of the impact wrench Fig 5 NOTE Slide the socket fully onto the square drive so the socket retainer...

Page 17: ...gger switch 2 Fig 7 NOTE The impact wrench will turn at its slowest speed when the trigger switch is depressed slightly The impact wrench will turn at its fastest speed when the trigger switch is full...

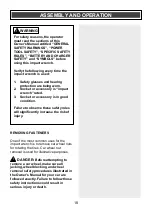
Page 18: ...ty instructions could result in serious injury or death ASSEMBLY AND OPERATION For safety reasons the operator must read the sections of this Owner s Manual entitled GENERAL SAFETY WARNINGS POWER TOOL...

Page 19: ...e tool level with the ground and with a firm grasp squeeze the trigger switch 4 When removing fasteners do not allow the impact wrench to operate more than 15 seconds unless the fastener begins to tur...

Page 20: ...f approximately 1 per day The self discharge rate depends upon the temperature 1 Every two months or after 30 charge discharge cycles whichever comes first fully discharge your battery To fully discha...

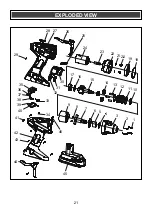
Page 21: ...21 EXPLODED VIEW 1 2 3 5 4 6 7 8 9 10 11 12 13 14 15 16 17 18 19 20 21 22 23 24 26 28 29 25 30 27 34 31 33 32 35 36 37 38 39 40 41 42 43 44 46 45...

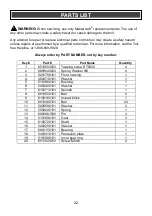
Page 22: ...y PART NUMBER not by key number Key Part Part Name Quantity 1 6515503023 Tapping screw ST5X30 4 2 6609040003 Spring Washer 5 4 3 5201780101 Front housing 1 4 4600740101 Washer 1 5 5101880101 Bushing 1...

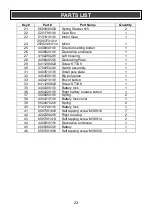
Page 23: ...mbly 1 31 4404510101 Small pole plate 1 32 4404500101 Big pole plate 1 33 4404210101 Box of button 1 34 6411290823 Screw ST3X8 1 35 4404300101 Battery lock 1 36 4404220101 Right battery release button...

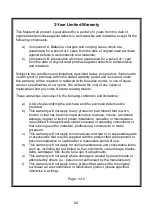
Page 24: ...limitations a A bill of sale verifying the purchase and the purchase date must be provided b This warranty will not apply to any product or part thereof that is worn broken or that has become inopera...

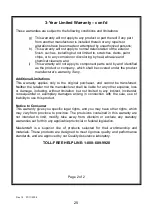
Page 25: ...warranty applies only to the original purchaser and cannot be transferred Neither the retailer not the manufacturer shall be liable for any other expense loss or damage including without limitation b...

Reviews: