background image


9


LASER LINE 

Gently depress the laser switch to activate the laser line.


LASER APERTURE 

When the laser line is switched on, an intense narrow beam of pure red light is emitted from 
the laser aperture. The line shines along the workpiece in order to guide you as you cut. The 
line is clearly visible, and will not be obscured by sawdust. 


WARNING: 

Always verify that the saw is switched off and unplugged form the power 

supply before making any adjustments. 

 
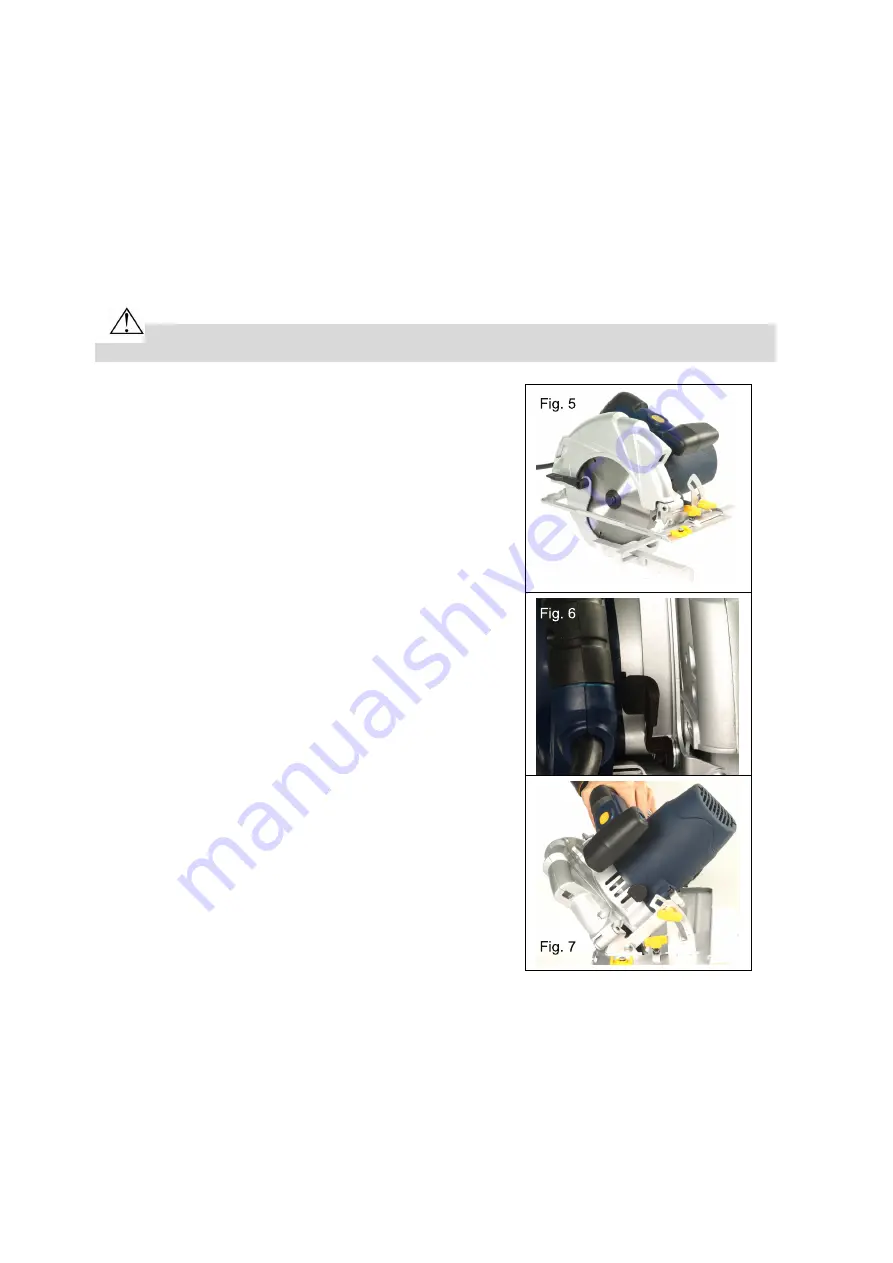
PARALLEL CUTS 

The parallel fence guide allows you to make parallel 
cuts in a sheet of wood, all at the same width. 
 
1.  Unscrew the setting screw, and slide the fence 

guide into the slot in the base plate, as shown in 
Fig.5. 

2.  Adjust the guide to the required width, according to 

the scale. Do not forget the width of the blade. 

3.  Tighten the setting screw. 
 

ADJUSTING THE CUTTING DEPTH 

1.  Loosen the depth locking lever, as shown in Fig.6. 
2.  Hold the base plate flat against the edge of the 

workpiece, and lift the body of the saw until the 
blade is at the right depth. The saw teeth must 
project 2 mm out of the wood. 

3.  Tighten the depth locking lever. 


ADJUSTING THE CUTTING ANGLE 

1.  Loosen the angle locking knob, which is located at 

the front of the base plate. 

2.  Tilt the body of the saw until the required angle is 

reached, using the 0

45

°

 bevel gauge as a guide. 

3.  Tighten the locking knob in order to secure the 

base plate. 


MAINTENANCE 

Before each use, inspect the circular saw, on/off switch, and cord for damage. Check for 

Fig. 7


Summary of Contents for Hawkeye Laser 54-8347-0

Page 1: ...all Safety Instructions Warnings and Caution sections Use your tool properly and only for its intended purpose Safety symbols in this manual are used to indicate possible dangers The safety symbols and their explanations require your full understanding The safety warnings do not eliminate any danger by themselves and they are not substitutes for proper accident prevention measures This Safety Aler...

Page 2: ...e switch is dangerous and must be repaired Disconnect the plug from the power source before making any adjustments changing accessories or storing the tool Such preventive safety measures reduce the risk of starting the tool accidentally When not in use store tools out of the reach of children and other untrained persons Tools are dangerous in the hands of untrained users Maintain tools with care ...

Page 3: ...cified for the tool can result in serious injury to the user and damage to the tool WARNING The operation of any tool can result in foreign objects being propelled into your eyes which could result in severe eye damage When operating power tool always wear safety goggles or safety glasses with side shields or a full face shield if necessary WARNING Remove adjusting keys or switches before turning ...

Page 4: ... and wavelengths of 400 nm 700 nm Under normal circumstances these lasers do not present an optical hazard but staring at the beam may cause flash blindness WARNING Do not stare directly at the laser beam A hazard may exist if you deliberately stare into the beam Please observe all of the following safety rules The laser must be used and maintained in accordance with the manufacturer s instruction...

Page 5: ...d must be released The lower guard should operate automatically for all other sawing operations Always verify that the lower guard is covering the blade before placing the saw down on a bench or the floor An unprotected coasting blade will cause the saw to walk backward cutting whatever is in its path Be aware of the time it takes for the blade to stop after the trigger is released NEVER hold the ...

Page 6: ...nto existing walls or other blind areas The protruding blade may cut objects that can cause KICKBACK Do not use blades made of high alloy high speed steel HSS Do not use the circular saw near fumes or combustible liquids Secure small pieces of wood firmly before working Never hold them in your hand Never slow the blade down with your hands or by applying pressure to the side of the blade Never app...

Page 7: ...e guard lever 7 Depth locking lever 8 Angle locking knob 9 0 45 bevel gauge 10 Hexagon bolt 11 Base plate 12 Flange 13 Parallel fence guide 14 Parallel fence locking knob 15 Dust extraction port 16 Wrench 17 Cord guard 18 Laser aperture 19 Laser switch 20 Switch lock button 13 8 5 19 6 4 3 15 9 10 11 12 14 8 9 18 2 16 17 7 2 1 20 ...

Page 8: ...crew the hexagon screw using the spanner that is provided 3 Remove the outer blade flange and the hexagon screw 4 Remove the saw blade from the inner flange and pull it out 5 Clean the flange thoroughly before mounting the new saw blade 6 Mount the new saw blade and tighten the hexagon screw Check for concentricity and ensure that it runs freely by turning the blade by hand Note The direction in w...

Page 9: ...t in the base plate as shown in Fig 5 2 Adjust the guide to the required width according to the scale Do not forget the width of the blade 3 Tighten the setting screw ADJUSTING THE CUTTING DEPTH 1 Loosen the depth locking lever as shown in Fig 6 2 Hold the base plate flat against the edge of the workpiece and lift the body of the saw until the blade is at the right depth The saw teeth must project...

Page 10: ... tool may become hazardous when used on another tool WARNING Maintain tools with care Keep cutting tools sharp and clean Properly maintained tools with sharp cutting edges are less likely to bind and are easier to control WARNING Check the power cord before each use If it is damaged replace it immediately Never use a tool with a damaged cord WARNING To ensure safety and reliability all repairs sho...

Reviews: